Where Is the Starter Located on a Ford F-150?
Contents
- 1 Key Takeaways
- 2 📑 Table of Contents
- 3 Why Knowing Your Starter’s Location Matters
- 4 Starter Placement Across F-150 Generations and Engines
- 5 Step-by-Step: How to Locate and Access the Starter
- 6 Essential Tools and Safety Measures
- 7 Diagnosing Starter Problems Before Replacement
- 8 Final Thoughts: To DIY or Not to DIY
- 9 Frequently Asked Questions
Locating the starter on your Ford F-150 is essential for diagnosing no-start problems. Its position varies by engine—typically on the driver’s side bellhousing—but can be accessed from the engine bay or underneath the truck. Always disconnect the battery first and consult your owner’s manual for model-specific details before beginning any work.
Key Takeaways
- Location Varies by Engine: The starter’s position changes significantly between the 4.6L V8, 5.4L V8, and 3.5L/2.7L EcoBoost V6 engines.
- Common Placement: On most F-150s, it’s mounted on the driver’s side of the engine, bolted to the transmission bellhousing.
- Two Main Access Points: You can often reach it from the top (engine bay) or the bottom (under the vehicle), depending on the model year and engine.
- Component Removal May Be Needed: Some models require removing the air filter box, inner fender well, or even the exhaust manifold for clear access.
- Safety is Non-Negotiable: Always disconnect the negative battery terminal before touching any electrical components or bolts.
- Consult Your Manual: The factory service manual for your specific year and engine is the ultimate authority on location, torque specs, and procedure.
- Professional Help is Okay: If you’re uncomfortable working under the truck or with heavy components, seeking a mechanic is a smart choice.
📑 Table of Contents
Why Knowing Your Starter’s Location Matters
Let’s face it: few things are more frustrating than turning the key in your Ford F-150 and hearing nothing but a silent dash or a dreaded single click. The starter motor is the hero responsible for spinning your engine to life. When it fails, your truck is dead in the water. Knowing exactly where this critical component lives on your specific F-150 isn’t just trivia—it’s the first, most crucial step in diagnosing the problem, getting an accurate repair quote, or even tackling the replacement yourself to save money. The F-150’s design has evolved over decades, and the starter’s home has shifted with different engines and generations. This guide will walk you through every variation, so you can point to it with confidence, whether you’re under the hood with a flashlight or crawling under the chassis with a creeper.
Think of it like a treasure map. You wouldn’t start digging for treasure without knowing the “X” marks the spot, right? Similarly, you don’t want to start removing random parts under the hood hoping to find the starter. That leads to frustration, wasted time, and potentially creating new problems. We’ll break it down by engine family, generation, and access method. By the end, you’ll have a crystal-clear mental picture of your starter’s location, the obstacles in your way, and the best path to reach it. We’ll also cover the essential safety steps and tools you’ll need, because a successful repair is a safe repair.
Starter Placement Across F-150 Generations and Engines
The Ford F-150 has been in production since 1948, but we’ll focus on the modern, commonly driven models from the 1990s onward. The starter’s location is primarily dictated by two things: the engine type and the transmission it’s paired with. Since the starter must physically engage the engine’s flywheel or flexplate (which is attached to the transmission), its position is determined by the engine/transmission assembly’s placement in the truck’s frame. Here’s a detailed breakdown.
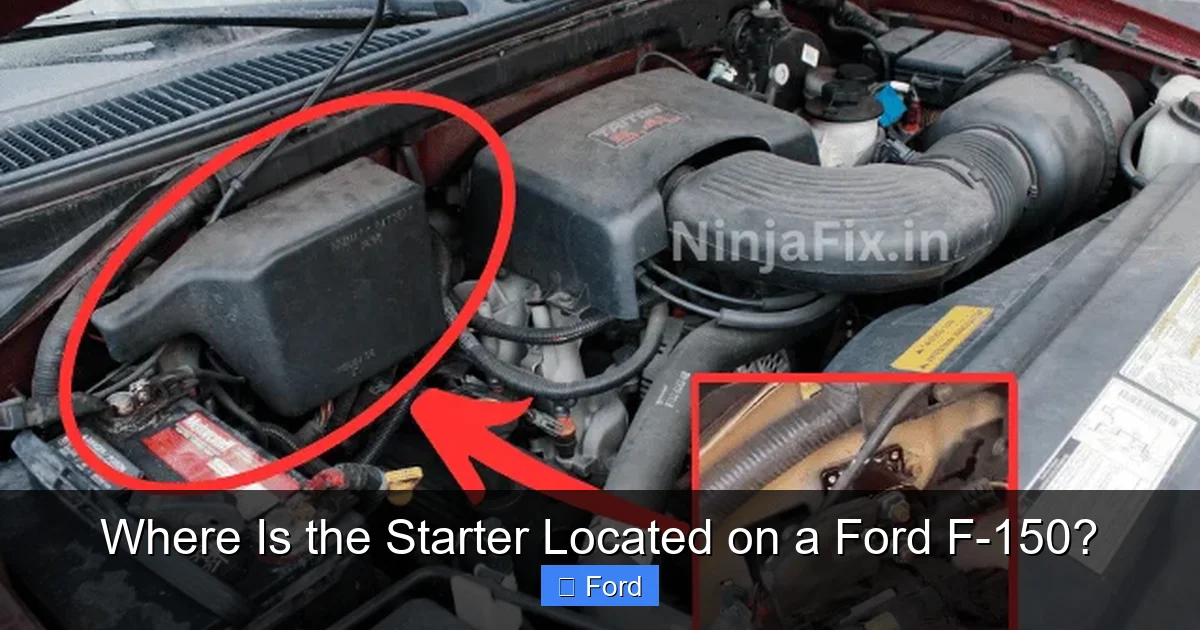
Visual guide about Where Is the Starter Located on a Ford F-150?
Image source: ninjafix.in
The Classic V8 Era: 4.6L and 5.4L Modular Engines (1997-2014)
For nearly two decades, the workhorses of the F-150 were the 4.6L and 5.4L V8 engines, part of Ford’s Modular family. On these trucks, the starter is almost universally located on the driver’s side (left side) of the engine, mounted directly to the rear of the engine block where it meets the transmission bellhousing. It’s tucked up against the engine, making it somewhat accessible from the top of the engine bay but often easier to reach from underneath.
- 4.6L V8 (1997-2010, 2011-2014 in some models): You’ll find it on the driver’s side, behind the lower intake manifold and near the firewall. Access from the top is cramped due to the intake plumbing. The best approach is usually from the bottom, after removing the front driver’s side tire and possibly part of the inner fender well for clearance.
- 5.4L V8 (1999-2010, 2011-2014 in some models): The location is nearly identical to the 4.6L. However, on 2004-2010 models with the 5.4L 3-valve engine (often called the “Triton”), the starter is positioned slightly lower and can be even more challenging to access from above. For these, going underneath is almost always the preferred method. You’ll see it bolted to the bellhousing, with the solenoid and electrical connections facing outward.
Practical Tip: On these older V8s, a common trick is to locate the large, two-bolt mounting pattern on the driver’s side bellhousing. Follow the thick positive battery cable from the battery; it will lead you directly to the starter solenoid. That’s your visual confirmation.
The EcoBoost Revolution: 3.5L and 2.7L V6 Engines (2011-Present)
With the introduction of turbocharged EcoBoost V6 engines, packaging became tighter. The transversely mounted turbochargers and associated plumbing changed the under-hood landscape significantly.
- 3.5L EcoBoost (2011-Present): The starter is still on the driver’s side, but it’s now positioned lower and further back, almost tucked under the engine. On many models (especially 2015-2020), the best access is from underneath the truck. You will likely need to remove the front driver’s side tire and the plastic inner fender liner. In some cases, the exhaust manifold or downpipe may partially obstruct the starter, requiring careful maneuvering or partial removal.
- 2.7L EcoBoost (2015-Present): Similar to the 3.5L, the starter is on the driver’s side bellhousing. However, due to the engine’s different packaging, it may be slightly more accessible from the top on certain years compared to the 3.5L, but under-truck access is still the standard recommendation for ease and safety.
Real-World Example: On a 2021 F-150 with the 3.5L EcoBoost, a DIYer would typically raise the driver’s side front of the truck with a jack and secure it on jack stands. After removing the wheel and the plastic splash shield (inner fender liner), the starter is visible, mounted with two bolts. The main challenge is the tight workspace around the turbocharger and intercooler pipe nearby.
The Latest Generation: 3.3L V6 and 5.0L V8 (2021-Present)
The current fourteenth-generation F-150 (2021+) continues the trends of the previous generation but with some refinements.
- 5.0L V8 (Coyote): The starter remains on the driver’s side of the bellhousing. Access is very similar to the older 5.4L, but the engine bay is more crowded with emissions and sensor wiring. Under-truck access after wheel and liner removal is the clear path.
- 3.3L V6 (2021-Present): This non-turbo V6 has a simpler induction system. The starter location is consistent with other modern F-150s—driver’s side, bellhousing-mounted. It may be one of the easier ones to access from underneath due to fewer surrounding components.
A quick note on the Raptor and other high-performance models: While the engine type (usually a high-output 3.5L EcoBoost or 5.2L V8 in older Raptors) dictates location, always check for any model-specific skid plates or underbody shielding that must be removed first. For instance, the Dodge Ram 1500’s catalytic converter location is also under the truck, and accessing any undercar component on a full-size truck often involves dealing with similar splash shields and plates.
Step-by-Step: How to Locate and Access the Starter
Now that you know the general zip code, let’s talk about the exact address and the best route to get there. We’ll break this into two primary access strategies: from the top (engine bay) and from the bottom (under the vehicle). For most modern F-150s (2011+), the bottom approach is superior.
Visual guide about Where Is the Starter Located on a Ford F-150?
Image source: ninjafix.in
Method 1: Access from Underneath the Truck (Recommended for 2011+)
This is the safest and most efficient method for most modern F-150s. It provides the most direct line of sight and room to use tools.
- Safety First: Park on a solid, level surface. Engage the parking brake. Chock the rear tires securely. Raise the front driver’s side of the truck using a floor jack at the designated factory lift point (usually on the frame rail behind the front wheel). Place jack stands under solid frame rails. Lower the truck onto the stands. Never rely on the jack alone.
- Remove the Wheel and Liner: Remove the driver’s side front wheel. Next, locate and remove all plastic fasteners (usually push-pins or plastic nuts) holding the inner fender liner (splash shield) in place. Gently pull it back and out of the way. You may need to detach it from the lower rocker panel as well.
- Locate the Starter: Crawl under the truck and look up at the driver’s side of the engine/transmission interface. You’ll see a cylindrical or solenoid-topped component bolted to the bellhousing. It will have a thick, red positive cable (from the battery) and a smaller wire bundle connected to the solenoid. This is your starter.
- Identify the Mounting Bolts: There are typically two bolts securing the starter. One is often easy to see and access. The second may be more obscured, behind or below the starter body. Use a light and mirror if needed.
Pro Tip: Before you even touch a bolt, take a clear photo of the wiring connections and the overall setup with your phone. This will be your reference guide for reassembly, especially for the sometimes finicky connector on the solenoid.
Method 2: Access from the Engine Bay (Sometimes Possible)
This method is more common on older trucks (pre-2011) with larger engine bays or on some specific 2011-2014 models with certain engines. It avoids crawling under the truck but is often more contorted.
- Open the Hood: Secure the hood open.
- Locate the General Area: On the driver’s side of the engine, look low down, near where the engine block meets the transmission. You are looking for the same component: a cylindrical part with a solenoid on top and two large bolts.
- Clear the Path: On many models, the air filter box and intake tubing will be directly in your way. You will likely need to remove the entire air filter assembly. This involves loosening clamps and disconnecting the mass airflow sensor (MAF) electrical connector. Label any connectors you disconnect. On some EcoBoost models, the intercooler pipe or charge air tubing may also need to be moved.
- Reaching the Bolts: Even with the air box out, the starter bolts can be difficult to reach. You will need various extensions, wobble joints, and swivels on your socket set. Patience and the right tool angles are key.
Example: On a 2008 F-150 with a 5.4L V8, you might access the starter from the top after removing the air filter box. The upper bolt is reachable with a long extension. The lower bolt often requires a universal joint and a lot of feel. For a 2015 F-150 with a 3.5L EcoBoost, top access is nearly impossible without removing significant turbo-related components, making the bottom method the only practical choice.
When Component Removal is Absolutely Necessary
On certain model-year and engine combinations, the starter is so tightly packaged that simply removing the wheel and liner isn’t enough. You may encounter:
- Exhaust Manifold/Downpipe Obstruction: On some 3.5L EcoBoost trucks, the starter is positioned behind the driver’s side exhaust manifold. To get the starter out, you may need to unbolt the exhaust manifold from the cylinder head and carefully work it out of the way. This is a more advanced job, as exhaust manifold bolts can be seized and require careful heat management.
- Frame Crossmember or Skid Plate: Some trucks have a structural crossmember or a heavy-duty skid plate (especially FX4 or Raptor models) that sits directly between the starter and the ground. You will have to unbolt and lower this crossmember or remove the skid plate section to create enough vertical clearance to drop the starter out.
- Transfer Case (4×4 Models): On 4×4 models, the transfer case sits very close to the starter. While you usually don’t need to remove the transfer case, you must be acutely aware of its proximity. Dropping the starter requires angling it carefully to avoid banging into the transfer case housing.
In these complex scenarios, consulting a factory service manual or a proven online tutorial for your exact year, make, and engine is highly advisable. The process can escalate from a simple 30-minute job to a multi-hour undertaking.
Essential Tools and Safety Measures
Before you slide under that truck, having the right gear and following strict safety protocols is what separates a successful repair from a trip to the emergency room.
Visual guide about Where Is the Starter Located on a Ford F-150?
Image source: ninjafix.in
The Must-Have Toolkit
You don’t need a professional mechanic’s arsenal, but a few specific items are critical:
- Basic Hand Tools: A good set of socket wrenches (8mm, 10mm, 13mm, 15mm are common for F-150 starters), ratchets, and combination wrenches.
- Extensions and Swivels: A set of 3″, 6″, and 12″ extensions, plus a few universal joints (“wobble” joints), are indispensable for reaching the bolts.
- Torque Wrench: This is non-negotiable. Starter mounting bolts must be torqued to the manufacturer’s specification (usually between 20-35 ft-lbs, but CHECK YOUR MANUAL). Overtightening can strip threads; undertightening risks the starter coming loose.
- Battery Terminal Pliers or Wrench: To disconnect the negative battery terminal. A 10mm or 13mm wrench is typical.
- penetrating Oil: Like PB Blaster or Kroil. Spray the old starter bolts 15-30 minutes before you start. They are often rusted in place, and this saves hours of aggravation and broken bolts.
- Flashlight/Headlamp: You will be working in dark, tight spaces.
- Gloves and Safety Glasses: Protect your hands from sharp metal edges and your eyes from debris.
- Jack and Jack Stands: As mentioned, a quality floor jack and certified jack stands rated for your truck’s weight are mandatory. Never use a scissor jack or bottle jack for standing under the vehicle.
- Transmission Jack or Helper: The starter can be surprisingly heavy (10-20 lbs). A transmission jack is ideal, but a sturdy floor jack with a block of wood on the saddle can work. Having a second person to guide and stabilize it is highly recommended.
Non-Negotiable Safety Protocol
This cannot be stressed enough. The starter is a high-current electrical component connected directly to the battery.
- DISCONNECT THE NEGATIVE BATTERY TERMINAL FIRST. Always. No exceptions. The positive cable on the starter is live whenever the battery is connected. Touching any metal part of the starter or the transmission with a tool while the battery is connected can cause a massive short circuit, sparks, and severe burns or tool damage. Disconnect the negative (black) cable from the battery post and tuck it away so it cannot accidentally touch the post.
- Ensure the Vehicle is Secure: After raising the truck, give the frame a firm shake. The jack stands must not shift. The wheels must be chocked.
- Use Proper Lifting Technique: Lift with your legs, not your back. Be aware of your head and limbs when positioning yourself under the vehicle.
- Support the Starter: Once the bolts are removed, the starter will not fall, but it will be hanging by the electrical wiring. Have your transmission jack or helper ready to support its weight immediately before you remove the second bolt. Do not let it hang by the wires.
- Handle with Care: The starter contains sensitive internal components and magnets. Dropping it can destroy it. Place it on a clean surface.
Diagnosing Starter Problems Before Replacement
Just because you found the starter doesn’t mean it’s bad. A few simple checks can save you from an unnecessary and expensive part replacement.
The Classic Symptoms of a Failed Starter
- Single Loud “Click”: You hear a solid *CLICK* from under the hood (usually the solenoid engaging) but the engine doesn’t turn over. This often means the starter motor itself is faulty, but it can also indicate a weak battery or poor connections at the battery or starter.
- Whirring/Grinding Noise: The starter spins but doesn’t engage the flywheel, or it engages and grinds. This can be a bad starter drive (Bendix gear), a missing or damaged flywheel tooth, or a misadjusted starter.
- Silence (No Click, No Sound): Nothing happens. This points to a complete electrical failure—a dead battery, a failed starter relay/fuse, a broken wire, or a faulty ignition switch. The starter itself could be an open circuit.
- Slow, Labored Cranking: The engine turns over very slowly. This is usually a battery or charging system issue, but a starter drawing excessive current due to internal shorts can also cause it.
Simple Bench Test (If You Remove It)
If you remove the starter, you can often test it at home with a set of jumper cables (and great care). Ensure the starter is mounted securely in a vise with soft jaws or padded with wood. Connect one jumper cable from the starter’s positive terminal (the large post) to the positive battery terminal. Connect the other jumper cable from the starter’s case (the metal housing) to the negative battery terminal. Use extreme caution; the starter will spin violently. Keep hands and clothing clear. If it spins robustly, it’s likely good. If it spins weakly, not at all, or smokes, it’s bad. This test is for the motor only and does not test the solenoid. A bad solenoid will often click but not engage the gear.
Pro Tip: Before you condemn the starter, perform a voltage drop test on the battery cables and ground straps while cranking. A high-resistance connection at the battery post, engine ground strap, or starter itself can mimic a bad starter. A healthy system should show less than 0.5 volts drop on the positive cable and less than 0.3 volts on the ground side during cranking. This is a more advanced diagnostic but very effective. For comprehensive electrical diagnostics, you might also want to check the location of other components, like the OBD2 port on a Dodge Ram 1500, to understand how different trucks handle diagnostic access, though the principles of electrical testing are universal.
Final Thoughts: To DIY or Not to DIY
Replacing the starter on a Ford F-150 is a classic intermediate DIY repair. It’s not as simple as an oil change, but it’s not as complex as an engine swap. The difficulty spectrum ranges from a straightforward 45-minute job (e.g., older 4.6L with good access) to a multi-hour, contortionist act requiring special tools (e.g., certain EcoBoost models with exhaust obstruction).
You should feel confident attempting this yourself if: You have basic mechanical aptitude, the right tools (especially a torque wrench and jack stands), a safe workspace, and your specific truck does not require major component removal like the exhaust manifold. You’ve watched a YouTube video for your exact year and engine, and the process looks manageable.
You should probably call a pro if: Your truck requires removing the exhaust manifold or a major crossmember, you are uncomfortable working completely under the vehicle, your bolts are severely rusted and you don’t have a torch or impact wrench, or you simply want the peace of mind and warranty that comes with professional service. A replacement at a shop will include the part and labor, typically ranging from $400 to $900+ depending on the model and access difficulty.
Ultimately, knowledge is power. You now know where your starter lives. You understand the variables—engine type, generation, and access points. You have a safety-first mindset and a tool list. Whether you grab your sockets or your phone to call a mechanic, you’re making an informed decision. Good luck, and may your F-150 roar back to life with that first successful turn of the key.
Frequently Asked Questions
What are the most common signs of a bad starter on an F-150?
The most frequent signs are a single loud click from the engine bay when turning the key, a whirring sound without engine cranking, or complete silence. Slow, labored cranking can also indicate a failing starter drawing too much power, though it’s more often a battery issue.
Can I replace the starter on my F-150 myself?
Yes, a competent DIYer with basic tools can replace it, especially on older models with good access. The difficulty increases significantly on newer EcoBoost models that may require under-truck work and potentially exhaust component removal. Always disconnect the battery first and torque the bolts to spec.
How much does a new starter for an F-150 cost?
A replacement starter motor for an F-150 typically costs between $150 and $400 for the part alone, depending on whether you buy OEM (Ford) or a quality aftermarket brand like Bosch or ACDelco. Labor costs at a shop add another $200 to $500, making the total job cost $400 to $900+.
Does my F-150 have a starter relay or fuse?
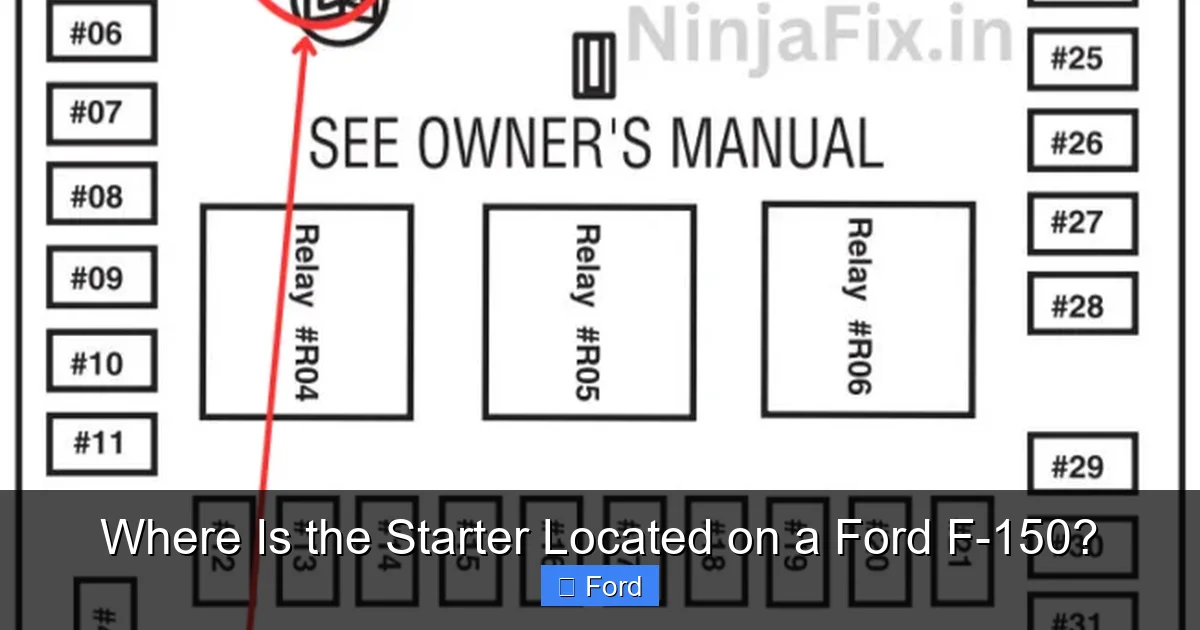
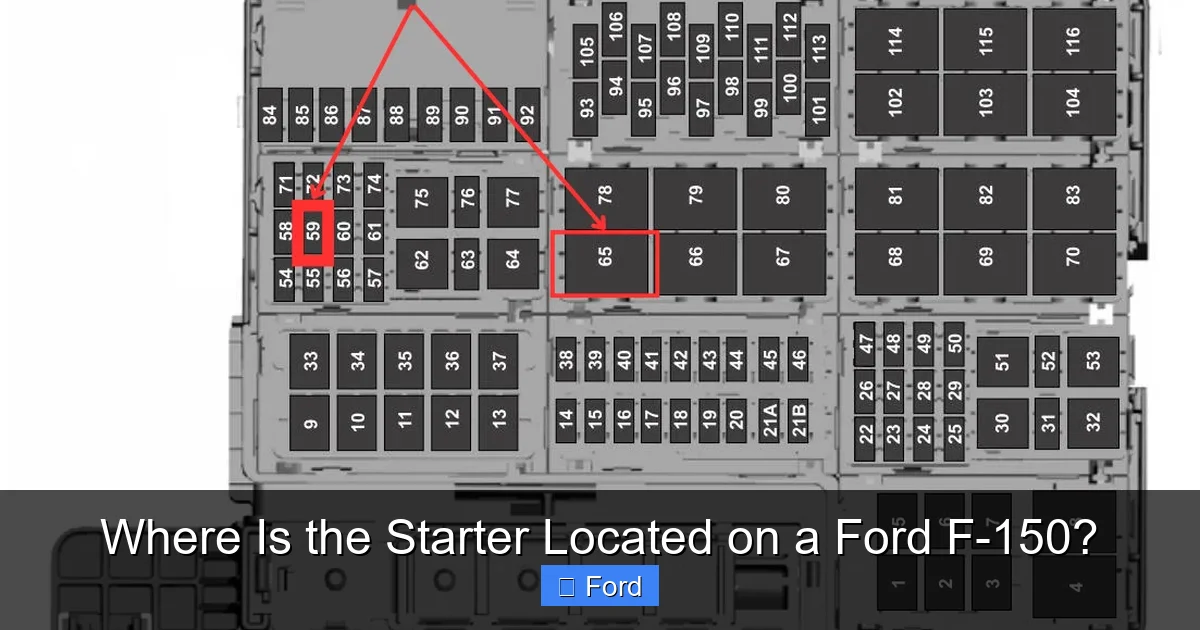
Yes, most modern F-150s have a starter relay in the under-hood fuse box. A failed relay can cause a no-start condition with no sound, mimicking a bad starter. It’s an inexpensive and easy part to check and replace before diagnosing the starter itself. The fuse box location is usually near the battery.
Why is my starter making a grinding noise?
A grinding noise usually means the starter’s drive gear (Bendix) is not disengaging from the engine’s flywheel after start-up, or the flywheel has damaged or missing teeth. It can also indicate the starter is improperly mounted, causing the gear to misalign. This condition can quickly damage the flywheel and requires immediate attention.
How long should a starter last on an F-150?
There’s no set mileage, but a starter on an F-150 typically lasts between 100,000 and 150,000 miles. Factors like climate (extreme heat/cold), driving habits (lots of short trips), and electrical system health can shorten its lifespan. When it fails, it’s often sudden and complete.