
How to Disconnect Dodge Electrical Connectors
Disconnecting Dodge electrical connectors doesn’t have to be frustrating. With the right tools, techniques, and a little patience, you can safely remove even the most stubborn connectors without damaging wires or components. This guide walks you through everything you need to know—from identifying connector types to avoiding common mistakes.
Key Takeaways
- Identify the connector type first: Dodge uses various connector styles, including push-pull, tab-lock, and slide-lock types. Knowing which one you’re dealing with prevents damage.
- Always disconnect the battery: Before working on any electrical system, disconnect the negative terminal to prevent short circuits or accidental airbag deployment.
- Use proper tools: A trim removal tool, flathead screwdriver, or dedicated connector release tool helps avoid breaking plastic clips or pins.
- Press release tabs gently: Most connectors have a locking tab that must be depressed before pulling. Forcing it can break the tab or damage the harness.
- Label and photograph connections: Take pictures or use labels when disconnecting multiple connectors to ensure correct reinstallation.
- Inspect for corrosion or damage: While disconnecting, check for signs of wear, moisture, or corrosion that could affect performance.
- Reconnect securely: Ensure connectors click into place fully to maintain proper electrical contact and prevent future issues.
📑 Table of Contents
- Introduction: Why Properly Disconnecting Dodge Electrical Connectors Matters
- Understanding Dodge Electrical Connector Types
- Safety First: Preparing to Disconnect Electrical Connectors
- Step-by-Step Guide to Disconnecting Dodge Electrical Connectors
- Common Challenges and How to Solve Them
- Tools That Make the Job Easier
- Reconnecting and Testing
- Model-Specific Tips for Popular Dodge Vehicles
- Conclusion: Master the Art of Disconnecting Dodge Electrical Connectors
Introduction: Why Properly Disconnecting Dodge Electrical Connectors Matters
Working on your Dodge vehicle’s electrical system—whether you’re replacing a sensor, installing new lights, or troubleshooting a warning light—often requires disconnecting electrical connectors. These small plastic housings may seem simple, but they’re critical to your car’s performance and safety. A single misstep can lead to broken clips, damaged wiring, or even system failures down the road.
Many DIYers and even some mechanics struggle with Dodge electrical connectors because they come in various designs, each with its own release mechanism. Some snap apart easily, while others require precise pressure or a specific tool. Without the right approach, you risk stripping pins, cracking housings, or creating intermittent connections that cause mysterious electrical gremlins.
The good news? With a little knowledge and the right technique, disconnecting these connectors becomes quick, safe, and stress-free. This guide will walk you through every step—from safety precautions to advanced tips for stubborn connectors—so you can work confidently on your Dodge Ram, Durango, Charger, Challenger, or any other model in the lineup.
Understanding Dodge Electrical Connector Types
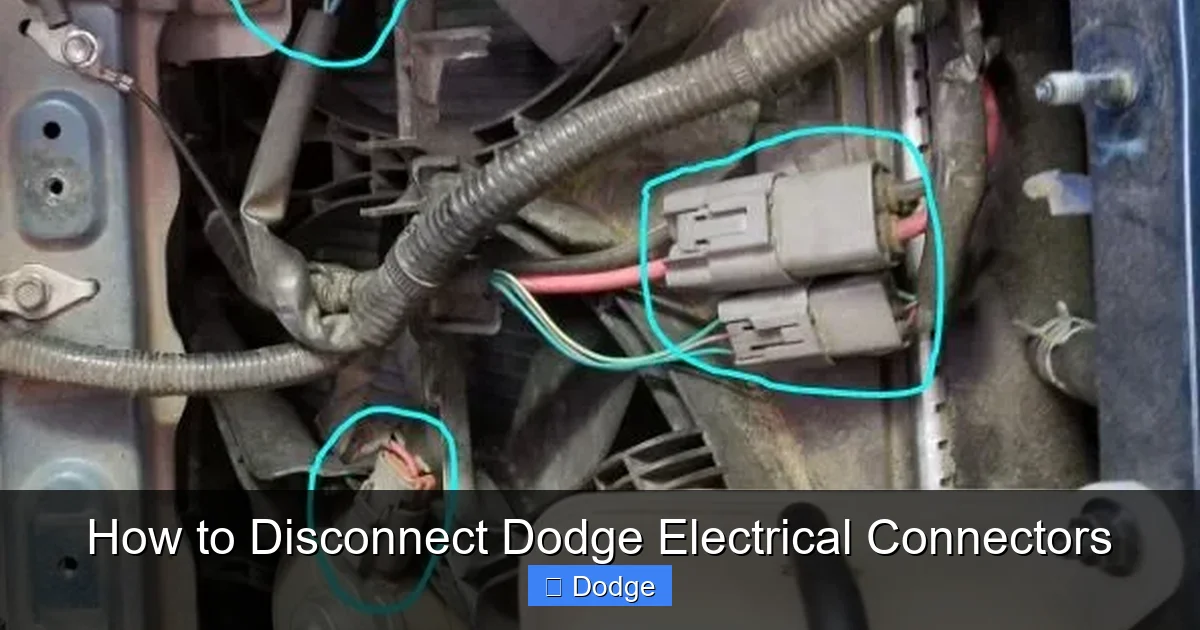
Visual guide about How to Disconnect Dodge Electrical Connectors
Image source: thecarhow.com
Before you even touch a connector, it’s essential to know what kind you’re dealing with. Dodge vehicles use a range of connector styles across different systems—engine bay, interior, underbody, and more. Using the wrong removal method can turn a simple job into a costly repair.
Push-Pull Connectors
These are among the simplest types. You simply grip the connector body and pull it straight out. There’s no visible tab or lever. Common examples include oxygen sensor connectors and some lighting harnesses. While easy to remove, they can sometimes feel “stuck” due to age or vibration. Never yank them—wiggle gently while pulling to break the seal.
Tab-Lock Connectors
The most common type in Dodge vehicles features a small plastic tab on top or side. To disconnect, press the tab down (or sideways) while pulling the connector away from the component. Examples include fuel injector connectors, mass airflow (MAF) sensors, and throttle position sensors. Be careful—these tabs are fragile and can snap if forced.
Slide-Lock or Lever-Actuated Connectors
Found on newer models like the Dodge Durango and Ram trucks, these connectors have a sliding lock mechanism. You must slide the outer sleeve or lever to the “unlock” position before pulling the connector apart. These are often used for high-current applications like alternators or transmission control modules. Forcing them without unlocking can damage internal pins.
Weather-Sealed Connectors
Used in under-hood or exterior locations, these connectors have rubber grommets or O-rings to prevent moisture ingress. They often require extra care during disconnection. Look for a secondary locking clip or seal retainer that must be removed first. Common on wheel speed sensors, ABS modules, and trailer wiring harnesses.
Multi-Pin Connectors (e.g., ECU or TCM)
Large connectors with dozens of pins, such as those connected to the engine control unit (ECU) or transmission control module (TCM), require special attention. They usually have a main locking tab and sometimes secondary latches. Always support the harness to avoid putting stress on the pins.
Safety First: Preparing to Disconnect Electrical Connectors
Visual guide about How to Disconnect Dodge Electrical Connectors
Image source: imgv2-2-f.scribdassets.com
Electrical work on any vehicle demands caution—especially on modern Dodges with complex electronics, airbags, and CAN bus systems. Skipping safety steps can lead to shocks, blown fuses, or even accidental deployment of safety systems.
Disconnect the Battery
This is non-negotiable. Always disconnect the negative terminal of the battery before starting any electrical work. Wait at least 15 minutes to allow capacitors in systems like airbags to discharge. This prevents accidental triggering and protects sensitive electronics from voltage spikes.
Wear Safety Gear
Use insulated gloves and safety glasses, especially when working near the engine or under the dashboard. Even with the battery disconnected, residual charge or accidental contact with live circuits (like those from an aftermarket accessory) can pose risks.
Work in a Clean, Well-Lit Area
Dirt, grease, and poor lighting increase the chance of mistakes. Use a flashlight or work lamp to clearly see connector details. Keep your workspace organized so tools and parts don’t get lost.
Refer to Your Service Manual
Every Dodge model has slight variations in wiring and connector design. Consult your vehicle’s factory service manual or a trusted repair database (like AllData or Mitchell1) for specific diagrams and procedures. This is especially important for hybrid or diesel models.
Step-by-Step Guide to Disconnecting Dodge Electrical Connectors
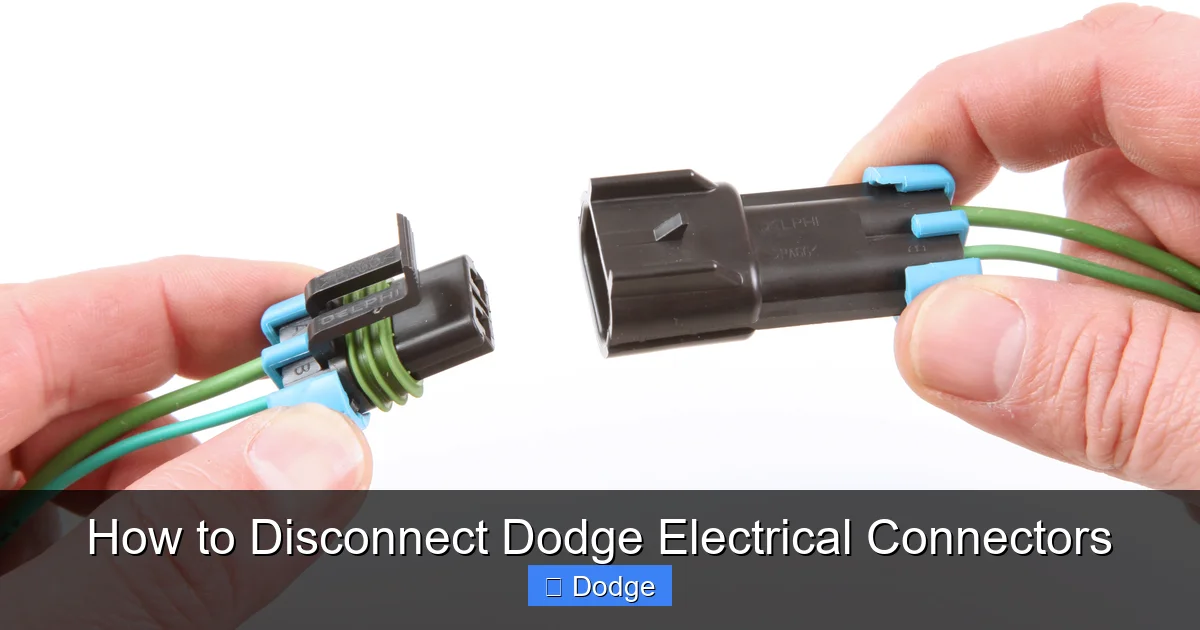
Visual guide about How to Disconnect Dodge Electrical Connectors
Image source: motortrend.com
Now that you’re prepared, let’s walk through the actual process. Whether you’re replacing a headlight bulb or diagnosing an engine code, these steps apply to nearly all Dodge connectors.
Step 1: Locate the Connector
Trace the wire harness from the component you’re servicing back to its connector. In tight spaces—like behind the dashboard or near the firewall—use a mirror or inspection camera if needed. Label the connector with tape or a marker if multiple similar ones are nearby.
Step 2: Identify the Locking Mechanism
Look closely at the connector. Is there a tab? A sliding sleeve? A secondary clip? Misidentifying the type is the #1 cause of broken connectors. If unsure, compare it to online photos or diagrams for your specific model year.
Step 3: Release the Lock
– For tab-lock connectors: Use your thumb or a flathead screwdriver (wrapped in tape to prevent scratches) to press the tab fully. Hold it down while pulling.
– For slide-lock types: Slide the outer collar toward the wire side until it stops. You’ll feel or hear a click.
– For push-pull: Simply grip and pull straight out—no tab to press.
Step 4: Pull Gently but Firmly
Once the lock is released, pull the connector straight out. Avoid twisting or bending the wires. If it doesn’t come out easily, double-check that the lock is fully disengaged. Sometimes a second, hidden latch exists.
Step 5: Inspect and Protect
After removal, inspect the connector and pins for corrosion, bent terminals, or melted plastic. Clean with electrical contact cleaner if needed. Cover the open end with a plastic bag or tape to prevent dirt and moisture from entering.
Common Challenges and How to Solve Them
Even experienced mechanics run into stubborn connectors. Here’s how to handle the most frequent issues without causing damage.
Stuck or Rusted Connectors
Over time, connectors can fuse together due to heat, vibration, or corrosion. Spray a small amount of electrical contact cleaner or silicone lubricant around the seam. Let it sit for a few minutes to penetrate. Then, wiggle the connector gently while pulling. Never use excessive force.
Broken Release Tabs
If a tab snaps off, don’t panic. You can often still disconnect the connector by inserting a thin flathead screwdriver into the gap where the tab was and prying slightly while pulling. For future reassembly, use zip ties or electrical tape to secure the connection if the lock is compromised.
Hard-to-Reach Connectors
Some connectors—like those behind the instrument cluster or under the intake manifold—are nearly impossible to reach by hand. Use needle-nose pliers with padded jaws or a flexible trim removal tool. A magnetic pickup tool can also help retrieve dropped screws or clips.
Multi-Wire Harnesses with Shared Clips
In some cases, multiple connectors are bundled together with a shared mounting clip. You may need to remove the entire harness bracket first. Take a photo before disassembly to remember the routing.
Aftermarket or Modified Wiring
If your Dodge has been modified (e.g., with a performance tuner or trailer brake controller), connectors may be spliced or extended. Be extra cautious—these modifications can create weak points or incorrect pinouts. Trace wires back to their original source if possible.
Tools That Make the Job Easier
Having the right tools saves time and prevents frustration. While you can get by with basic hand tools, investing in a few specialized items pays off in the long run.
Trim Removal Tools
These plastic pry tools prevent scratches and damage when accessing connectors behind panels. A set with various shapes (flat, angled, forked) is ideal.
Connector Release Tools
Available at auto parts stores, these small plastic or metal tools are designed to fit specific connector types. They apply even pressure to release tabs without slipping.
Electrical Contact Cleaner
A quick spray removes dirt, oil, and corrosion from pins and sockets. Use it before and after disconnection for optimal conductivity.
Needle-Nose Pliers with Insulated Handles
Useful for gripping small connectors or manipulating clips in tight spaces. Insulated handles add an extra layer of safety.
Flashlight or Headlamp
Essential for seeing into dark engine bays or under dashboards. A headlamp leaves both hands free.
Labeling Supplies
Masking tape and a permanent marker help you label connectors during complex jobs. Taking photos with your phone is also highly recommended.
Reconnecting and Testing
Disconnecting is only half the battle—proper reconnection ensures your repair lasts. Rushing this step can lead to loose connections, error codes, or component failure.
Ensure Clean, Dry Contacts
Before plugging in, wipe pins and sockets with a clean, dry cloth. If corrosion is present, use contact cleaner and a soft brush.
Align and Insert Correctly
Most connectors are keyed to fit only one way. Match the shape and orientation. Push firmly until you hear or feel a solid click. For slide-lock types, slide the collar back to the locked position.
Secure the Harness
Use zip ties or factory clips to route the harness away from hot surfaces, moving parts, or sharp edges. Loose wiring can chafe and cause shorts.
Reconnect the Battery and Test
After reassembly, reconnect the negative battery terminal. Turn on the ignition (but don’t start the engine) and check for warning lights. Start the vehicle and test the repaired system—lights, sensors, infotainment, etc.—to confirm everything works.
Clear Error Codes (If Needed)
If you were working on a sensor or module, use an OBD2 scanner to clear any stored trouble codes. Some systems require a drive cycle to reset fully.
Model-Specific Tips for Popular Dodge Vehicles
While the general principles apply across the lineup, certain Dodge models have quirks worth noting.
Dodge Ram Trucks (1500/2500/3500)
Ram trucks often use large, weather-sealed connectors under the hood and in the bed. The trailer wiring harness connector near the rear bumper is especially prone to corrosion. Disconnect it carefully and clean with dielectric grease upon reinstallation.
Dodge Charger and Challenger
These performance models have tightly packed engine bays. The MAF sensor and throttle body connectors are close to hot exhaust components. Allow the engine to cool before working, and use a mirror to see behind components.
Dodge Durango and Journey
SUVs like the Durango have complex wiring for all-wheel drive and suspension systems. The transfer case and ride height sensor connectors often use slide-lock mechanisms. Take your time to avoid damaging delicate pins.
Dodge Grand Caravan
Minivans have extensive interior wiring for power sliding doors, rear entertainment, and climate zones. Connectors under the seats and in the cargo area are frequently disturbed. Label them clearly during removal.
Conclusion: Master the Art of Disconnecting Dodge Electrical Connectors
Disconnecting Dodge electrical connectors doesn’t have to be a nerve-wracking experience. With the right preparation, tools, and techniques, you can handle any connector your vehicle throws at you—whether it’s a simple bulb socket or a multi-pin ECU harness.
Remember: safety comes first. Always disconnect the battery, identify the connector type, and use gentle, deliberate movements. Take photos, label parts, and inspect for damage. And when in doubt, consult your service manual or seek professional advice.
By following this guide, you’ll not only avoid costly mistakes but also gain confidence in tackling more advanced electrical projects. Your Dodge will run smoother, and you’ll save money by doing it yourself. So grab your tools, take a deep breath, and get to work—you’ve got this!
Frequently Asked Questions
Can I disconnect electrical connectors with the battery connected?
It’s strongly recommended to disconnect the negative battery terminal first. This prevents short circuits, protects sensitive electronics, and reduces the risk of accidental airbag deployment.
What if the connector tab breaks off?
If the release tab snaps, you can often still disconnect the connector by carefully prying the housing apart with a flathead screwdriver while pulling. For reinstallation, secure it with electrical tape or a zip tie if the lock is compromised.
Are all Dodge electrical connectors the same?
No. Dodge uses multiple connector types—push-pull, tab-lock, slide-lock, and weather-sealed—depending on the system and model year. Always identify the type before attempting removal.
How do I know if a connector is fully seated when reconnecting?
A properly connected connector will click into place and feel secure. Wiggle it gently—if it moves or feels loose, it’s not fully locked. Also, check for warning lights or system errors after startup.
Can I use WD-40 to loosen a stuck connector?
No. WD-40 is not designed for electrical contacts and can leave residue that harms conductivity. Use electrical contact cleaner or silicone-based lubricant instead.
Do I need special tools to disconnect Dodge connectors?
While not always required, tools like trim removal kits, connector release tools, and needle-nose pliers make the job easier and reduce the risk of damage. Basic tools work in a pinch, but specialized tools are worth the investment.


