
How to Remove the Back Seat in a Toyota Yaris
Contents
- 1 Key Takeaways
- 2 📑 Table of Contents
- 3 Why You Might Want to Remove the Back Seat in a Toyota Yaris
- 4 Understanding Your Toyota Yaris Model Year
- 5 Tools and Preparation: What You’ll Need
- 6 Step-by-Step Guide: Removing the Seat Cushion
- 7 Step-by-Step Guide: Removing the Backrest
- 8 Reinstalling the Back Seat: Tips for a Secure Fit
- 9 Common Mistakes to Avoid
- 10 Maintenance Tips for Long-Term Use
- 11 Conclusion
- 12 Frequently Asked Questions
Removing the back seat in a Toyota Yaris is simpler than you might think, and it can be incredibly useful for accessing hidden storage, installing car seats, or cleaning hard-to-reach areas. Whether you’re preparing for a long trip, installing child safety seats, or doing a deep clean, knowing how to remove the back seat gives you more flexibility and control over your vehicle’s interior.
Key Takeaways
- No special tools are required: Most Toyota Yaris models allow back seat removal using just your hands or basic household tools.
- Two-part removal process: The seat cushion and backrest are removed separately, each with its own mechanism.
- Check your model year: Procedures may vary slightly between 2006–2013 and 2014–2020 Yaris models, so confirm your version first.
- Access hidden compartments: Removing the seat reveals under-seat storage areas perfect for emergency kits or valuables.
- Safe reinstallation is crucial: Always ensure latches click securely when putting the seat back to maintain passenger safety.
- Use caution with seat belts: Avoid damaging retractor mechanisms when moving the seat assembly.
- Regular maintenance helps: Clean latches and hinges periodically to prevent rust or stiffness over time.
📑 Table of Contents
- Why You Might Want to Remove the Back Seat in a Toyota Yaris
- Understanding Your Toyota Yaris Model Year
- Tools and Preparation: What You’ll Need
- Step-by-Step Guide: Removing the Seat Cushion
- Step-by-Step Guide: Removing the Backrest
- Reinstalling the Back Seat: Tips for a Secure Fit
- Common Mistakes to Avoid
- Maintenance Tips for Long-Term Use
- Conclusion
Why You Might Want to Remove the Back Seat in a Toyota Yaris
The Toyota Yaris is known for its compact design, fuel efficiency, and practicality—especially in urban environments. But what many owners don’t realize is that this small car hides some clever engineering under its unassuming exterior. One of those features? The ability to remove the back seat. While it might seem like an odd thing to do, there are actually several practical reasons why you’d want to take out your Yaris’s rear seat.
First and foremost, removing the back seat gives you access to hidden storage compartments beneath the floor. These spaces are perfect for stashing emergency supplies, tools, or even valuables you don’t want left in plain sight. If you’ve ever struggled to fit bulky items into your Yaris—like camping gear, a folded stroller, or a large grocery haul—removing the seat cushion can dramatically increase your cargo space. It’s also incredibly helpful when installing rear-facing child car seats, as it allows you to get closer to the anchor points and ensure a secure fit.
Another common reason is cleaning. Over time, crumbs, dirt, and pet hair accumulate under the seats, and vacuuming through the gaps just doesn’t cut it. By removing the back seat, you can thoroughly clean every nook and cranny, improving air quality and hygiene inside your car. Plus, if you’re doing any interior repairs—like fixing a broken latch or replacing worn upholstery—having the seat out makes the job much easier.
Lastly, some Yaris owners remove the back seat temporarily for road trips or outdoor adventures where every inch of space counts. Whether you’re loading up bikes, coolers, or luggage, maximizing your cargo area can make a big difference in comfort and convenience.
Understanding Your Toyota Yaris Model Year

Visual guide about How to Remove the Back Seat in a Toyota Yaris
Image source: i0.wp.com
Before you start pulling apart your car’s interior, it’s essential to know which version of the Toyota Yaris you’re working with. The Yaris has gone through several generations since its introduction, and while the basic design principles remain consistent, there are subtle differences between model years that affect how the back seat is installed and removed.
The first-generation Toyota Yaris (sold in the U.S. from 2006 to 2013) features a split-folding rear seat with a 60/40 configuration. In this setup, the larger section (usually on the driver’s side) folds down independently from the smaller passenger-side section. The seat cushion is typically held in place by two spring-loaded levers located at the front edge, near the floor. These levers allow the cushion to tilt forward and lock into place when not in use.
Starting with the second generation (2014–2020), Toyota updated the interior design for a more modern look and improved ergonomics. While the overall removal process remains similar, some models introduced slight changes in latch placement or added additional safety features. For example, certain 2015+ Yaris models include integrated seat belt guides that require extra care during removal to avoid damaging the webbing or retractor mechanism.
It’s also worth noting that European and Asian market Yaris models (often called the Mazda2-based Yaris iA or Yaris Hybrid) may have different configurations. If you’re driving a newer Yaris (2021+), especially one imported from outside North America, double-check your owner’s manual or consult a Toyota dealer to confirm the correct procedure.
To identify your model year, check the vehicle identification number (VIN) on your dashboard or driver’s side door jamb. You can also look at the infotainment system, headlight design, or interior trim for visual clues. Once you’ve confirmed your generation, you’ll be better prepared to tackle the removal process with confidence.
Tools and Preparation: What You’ll Need
Visual guide about How to Remove the Back Seat in a Toyota Yaris
Image source: thecarseatlady.com
One of the best things about removing the back seat in a Toyota Yaris is that you don’t need a garage full of tools or professional mechanics’ expertise. In most cases, all you need are your hands—and maybe a flathead screwdriver or a soft cloth for extra grip. That said, a little preparation goes a long way in making the process smooth and stress-free.
Start by clearing out the back seat area. Remove any loose items like blankets, toys, or trash bags. If you have a child car seat installed, take it out first—this will give you more room to work and prevent accidental damage. Next, fold down the rear seatbacks if they’re upright. This not only gives you better access but also reduces strain on the hinges and latches.
For older Yaris models (pre-2014), you might find that the seat cushion levers are stiff or sticky due to dirt buildup. A quick wipe with a damp cloth can help loosen things up. Avoid using harsh chemicals or lubricants unless absolutely necessary, as they can degrade rubber components or leave residues that attract more dirt.
If you’re working in cold weather, give the car a few minutes to warm up. Plastic latches and metal springs can become brittle in freezing temperatures, increasing the risk of breakage. Conversely, in hot climates, avoid leaving the car in direct sunlight for too long—heat can warp plastic parts and make them harder to manipulate.
Safety is also important. Always wear closed-toe shoes and consider gloves to protect your hands from sharp edges or pinch points. Make sure the car is parked on level ground with the parking brake engaged. If you’re working alone, keep a towel or mat nearby to place the removed seat parts on—this prevents scratches and keeps everything clean.
Finally, have a plan for where you’ll store the removed seat components. The cushion and backrest aren’t heavy, but they are bulky. Lay them flat on a clean surface, preferably indoors, to avoid exposure to rain or UV damage. Labeling the parts (e.g., “driver side” or “passenger side”) can save confusion during reinstallation.
Step-by-Step Guide: Removing the Seat Cushion
Visual guide about How to Remove the Back Seat in a Toyota Yaris
Image source: paultan.org
Now that you’re prepared, let’s get into the actual removal process—starting with the seat cushion. This is usually the easier of the two parts to remove, and doing it first creates more space to work on the backrest.
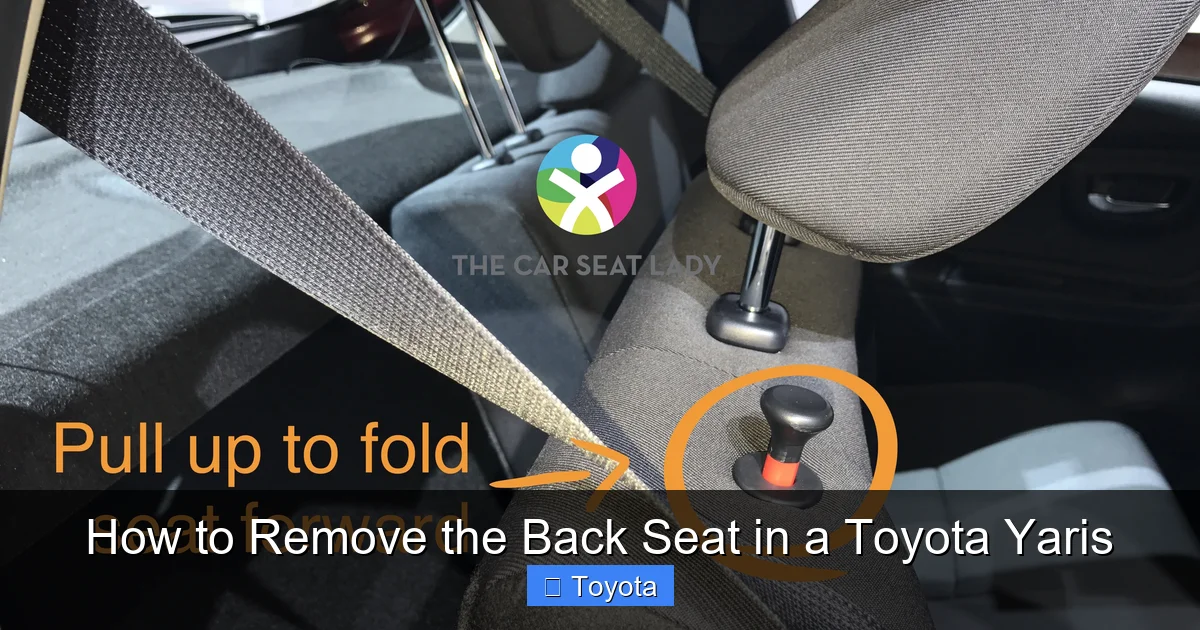
Locate the Release Levers
In most Toyota Yaris models, the seat cushion is secured by two spring-loaded release levers located at the front edge of the cushion, just above the floor mats. These levers are typically black or gray plastic and are recessed slightly into the seat base. On some models, they may be labeled with a small arrow or “PUSH” indicator.
To find them, kneel in front of the rear seat and look directly under the front edge of the cushion. You should see two small handles or tabs, one on each side. If you can’t see them clearly, use a flashlight or gently lift the front of the cushion with your fingers—they’re usually right where the cushion meets the floor.
Release the Latches
Once you’ve located the levers, grasp both firmly with your hands. You’ll need to pull them upward and outward simultaneously. Don’t worry—they’re designed to be operated by hand strength alone. As you pull, you should feel a slight resistance, followed by a satisfying “click” as the latches disengage.
If the levers feel stuck, don’t force them. Instead, wiggle them gently side to side while pulling. Sometimes dirt or debris can jam the mechanism. A quick spray of silicone-based lubricant (not oil-based, which can attract grime) can help if the problem persists.
Lift and Remove the Cushion
With both latches released, the entire seat cushion should lift freely. Grab the front edge and pull it straight up and toward you. The cushion is attached only at the front, so once the latches are open, it should come out easily. Be careful not to drag it across the floor, as this can scratch the upholstery or damage the plastic clips underneath.
Set the cushion aside on a clean, flat surface. If you’re planning to reinstall it later, note its orientation—most Yaris cushions are asymmetrical and won’t fit correctly if flipped.
Inspect the Under-Seat Area
With the cushion removed, you’ll now have full access to the space beneath. This is a great time to clean out any accumulated debris or check for signs of moisture, pests, or damage. Many Yaris owners use this area to store emergency kits, jumper cables, or spare fuses. Just remember to secure any loose items so they don’t rattle around while driving.
Step-by-Step Guide: Removing the Backrest
Now that the cushion is out of the way, it’s time to tackle the backrest. This part is a bit trickier because it’s connected to the car’s frame and may involve seat belts or wiring (in models with side airbags). But with patience and care, it’s totally doable.
Fold Down the Seatback
Start by folding the rear seatback forward. Most Yaris models have a release lever or strap located near the top of the seatback, either on the side or behind the headrest. Pull the lever or strap, and the seatback should tilt forward and lock into place. This gives you better access to the mounting points at the base.
Locate the Base Latches
At the bottom of the seatback, near where it connects to the car’s floor, you’ll find two or three large latches. These are usually metal hooks or brackets that lock into corresponding anchors on the chassis. Unlike the cushion levers, these require a bit more force to release.
On older models, you may need to lift the seatback slightly while pulling a hidden release cable. On newer models, there might be a visible lever or button near the latch. Refer to your owner’s manual if you’re unsure—Toyota often includes diagrams for this exact scenario.
Disconnect Seat Belts (If Necessary)
Here’s where things get a little more complex. If your Yaris has rear seat belts that route through the backrest (common in models with integrated child seat anchors), you’ll need to disconnect them before removing the seat. Look for a small plastic cover near the belt’s anchor point—pry it open gently with a flathead screwdriver.
Inside, you’ll see a bolt or clip holding the belt in place. Use a wrench or socket (usually 10mm or 12mm) to loosen it. Be extremely careful not to let the belt retract fully into the pillar—use a clothes pin or zip tie to hold it in place once disconnected.
If your model doesn’t have through-the-seat belts, you can skip this step. Always double-check your specific configuration before proceeding.
Lift and Remove the Backrest
With the latches released and belts disconnected (if applicable), lift the entire backrest upward and away from the car. It should come free with a firm but steady pull. Have a helper if possible—the backrest is awkward to handle alone due to its size and weight distribution.
Place it carefully on a soft surface to avoid scratching the fabric or damaging the frame.
Reinstalling the Back Seat: Tips for a Secure Fit
Once you’ve completed your task—whether it’s cleaning, storage, or repairs—it’s time to put everything back. Reinstallation is essentially the reverse of removal, but there are a few key points to ensure safety and functionality.
Reconnect Seat Belts First
If you disconnected the seat belts, reattach them before installing the backrest. Thread the belt through the correct path and tighten the anchor bolt securely. Make sure the retractor moves freely and the belt locks properly when pulled quickly.
Align and Lower the Backrest
Position the backrest so the base latches align with the chassis anchors. Lower it slowly until you hear a solid “click.” Give it a gentle tug to confirm it’s locked in place. Never assume it’s secure—always test it.
Replace the Seat Cushion
Slide the cushion back into position, making sure the front edge sits flush with the floor. Press down firmly on both sides until you hear the latches engage. Again, test by lifting slightly—if it moves, the latches aren’t fully seated.
Final Safety Check
Before driving, do a quick inspection:
– Are all latches clicked in?
– Are seat belts functioning correctly?
– Is the seat stable with no wobbling?
Never drive with an improperly installed seat—it could become a dangerous projectile in a crash.
Common Mistakes to Avoid
Even with clear instructions, it’s easy to make errors during the removal process. Here are some common pitfalls and how to avoid them:
– **Forcing stuck parts:** If a latch won’t budge, don’t yank it. Check for obstructions or use a lubricant. Forcing can break plastic components.
– **Ignoring seat belt routing:** Reconnecting belts incorrectly can disable airbags or cause injury. Always follow the original path.
– **Skipping the test:** Always verify that both cushion and backrest are securely locked before driving.
– **Storing parts improperly:** Leaving seat components in the rain or sun can fade fabric or warp frames.
– **Misidentifying model year:** Using the wrong procedure for your Yaris generation can lead to frustration or damage.
Maintenance Tips for Long-Term Use
To keep your Yaris’s rear seat system working smoothly for years, perform simple maintenance:
– Clean latches and hinges every 6 months with a damp cloth.
– Apply a small amount of silicone spray to stiff levers (avoid petroleum-based products).
– Check for rust or corrosion, especially in humid climates.
– Inspect seat belt webbing for fraying or damage during each removal.
A little care goes a long way in preserving your car’s functionality and resale value.
Conclusion
Removing the back seat in a Toyota Yaris isn’t just a niche skill—it’s a practical tool that enhances your car’s versatility. Whether you’re maximizing cargo space, deep-cleaning your interior, or ensuring a safe car seat installation, knowing how to do it correctly saves time, money, and hassle. With the right preparation, a clear understanding of your model, and attention to safety, you can complete the job in under 15 minutes—no mechanic required.
Remember: the key is patience and precision. Take your time, follow the steps, and always prioritize safety. Your Yaris may be small, but it’s packed with smart design features—and now you know how to unlock one of its best-kept secrets.
Frequently Asked Questions
Can I remove the back seat in a Toyota Yaris without tools?
Yes, in most cases you can remove the back seat using just your hands. The seat cushion releases via spring-loaded levers, and the backrest uses manual latches. Only seat belt reconnection may require a basic wrench.
Will removing the back seat affect my car’s safety?
As long as you reinstall it correctly and ensure all latches are secure, there’s no safety risk. However, never drive with an unlatched or missing seat, as it could become hazardous in a collision.
How often can I remove and reinstall the back seat?
You can remove and reinstall the seat as often as needed. The mechanisms are designed for repeated use, but avoid excessive force to prevent wear.
Is it legal to drive without the back seat?
In most regions, it’s legal to remove the back seat for personal use, but check local laws. Some areas require all factory seats to be present for inspections or rentals.
Can I store items under the seat after removal?
Yes! The under-seat area is perfect for storing emergency kits, tools, or valuables. Just secure items to prevent shifting while driving.
What if my seat latches are broken?
If a latch is damaged, contact a Toyota dealer or auto upholstery shop. Replacement parts are usually available, and professional repair ensures safety and proper function.


