How Can I Draw a Car?
Contents
- 1 Key Takeaways
- 2 📑 Table of Contents
- 3 How Can I Draw a Car? A Beginner’s Guide to Sketching Like a Pro
- 4 Why Drawing Cars Is Easier Than You Think
- 5 Step-by-Step Guide to Drawing a Car
- 6 Tips for Drawing Different Kia Models
- 7 Common Mistakes to Avoid
- 8 Practice Makes Perfect
- 9 Conclusion
- 10 Frequently Asked Questions
Drawing a car may seem tricky, but with simple steps and practice, anyone can master it. Whether you’re sketching a sleek Kia or your dream ride, this guide breaks it down into easy, doable parts.
Key Takeaways
- Start with basic shapes: Use circles, rectangles, and ovals to build the car’s foundation before adding details.
- Focus on proportions: Getting the wheel placement and body length right makes your drawing look realistic.
- Observe real cars: Study photos of Kia models like the Kia Sportage or Kia Seltos to understand design lines and features.
- Use light strokes first: Sketch lightly so you can erase and adjust without leaving marks.
- Add details gradually: Begin with windows, headlights, and wheels, then move to finer elements like door handles and grilles.
- Practice regularly: The more you draw, the more confident and skilled you’ll become.
- Have fun with it: Drawing should be enjoyable—don’t stress over perfection.
📑 Table of Contents
How Can I Draw a Car? A Beginner’s Guide to Sketching Like a Pro
So, you want to learn how to draw a car? Maybe you’re a Kia enthusiast who loves the bold lines of a Kia Telluride or the sporty flair of a Kia Stinger. Or perhaps you’re just curious about bringing your favorite vehicle to life on paper. Whatever your reason, drawing a car doesn’t have to be intimidating. With the right approach, even someone with zero experience can create a clean, recognizable sketch.
The truth is, every car—whether it’s a compact Kia Rio or a rugged Kia Sorento—is made up of simple geometric shapes. That’s the secret: break it down. Instead of trying to draw the whole car at once, start with basic forms like rectangles for the body, circles for the wheels, and ovals for the windows. This method takes the pressure off and helps you focus on one part at a time. And the best part? You don’t need fancy tools. A pencil, eraser, and a piece of paper are all you need to begin.
Why Drawing Cars Is Easier Than You Think
Visual guide about How Can I Draw a Car?
Image source: howtodrawforkids.com
Many people assume that drawing a car requires advanced artistic skills, but that’s simply not true. Cars are mechanical objects with predictable shapes and symmetry, which actually makes them one of the easier subjects to draw—once you know the tricks. Unlike drawing a human face, where proportions and expressions are subtle and complex, cars follow clear design rules. Manufacturers like Kia design their vehicles with balance, flow, and function in mind, and that structure works in your favor when sketching.
For example, look at the Kia K5. Its long hood, sloping roofline, and wide stance create a strong silhouette that’s easy to capture with a few well-placed lines. The key is to observe how the body panels connect, where the wheels sit in relation to the fenders, and how the windows frame the cabin. Once you understand these elements, you’ll find that drawing a car becomes less about artistry and more about construction—like building a model with paper and pencil.
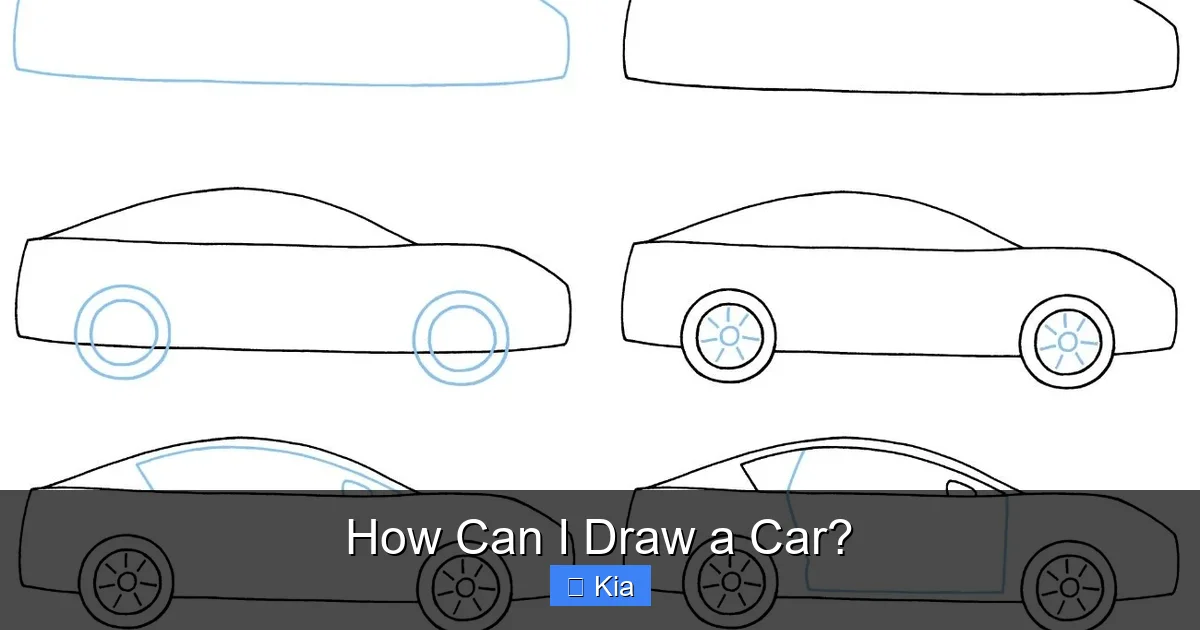
Start Simple: The Power of Basic Shapes
Before you dive into details, start with the foundation. Imagine your car as a collection of simple 3D forms. Begin by drawing a large rectangle for the main body. This will represent the passenger cabin. Then, add a smaller rectangle on top for the roof, slightly curved to mimic the slope of a real car. Next, sketch two large circles beneath the body for the wheels, making sure they’re evenly spaced and aligned.
Now, connect the wheels to the body with curved lines to form the fenders. These are the rounded sections that cover the tires. For a Kia model like the Kia Soul, the fenders are boxy and angular, while a Kia EV6 has smoother, more aerodynamic curves. Adjust your lines accordingly based on the car you’re drawing.
Once you have the basic structure, refine the shape. Round the corners of the body slightly to give it a more realistic look. Add a small rectangle at the front for the hood and another at the back for the trunk. At this stage, don’t worry about perfection—just focus on getting the overall proportions right.
Get the Proportions Right
Proportions are everything when it comes to drawing a car. A common mistake beginners make is placing the wheels too high or too low, which throws off the entire sketch. To avoid this, use a simple trick: divide your drawing into thirds. The bottom third should be reserved for the wheels and ground clearance. The middle third is the main body, and the top third includes the roof and windows.
For instance, in a Kia Seltos, the wheels sit about one-third up from the bottom, giving it a grounded, stable look. If you place the wheels too high, the car will appear floaty and unrealistic. Conversely, if they’re too low, it might look like it’s sinking into the ground.
Another tip is to use reference lines. Lightly draw a horizontal line across your paper to mark the center of the car. This helps you keep features like headlights, grilles, and door handles symmetrical. You can also draw vertical lines at the front and back to ensure the body is centered between the wheels.
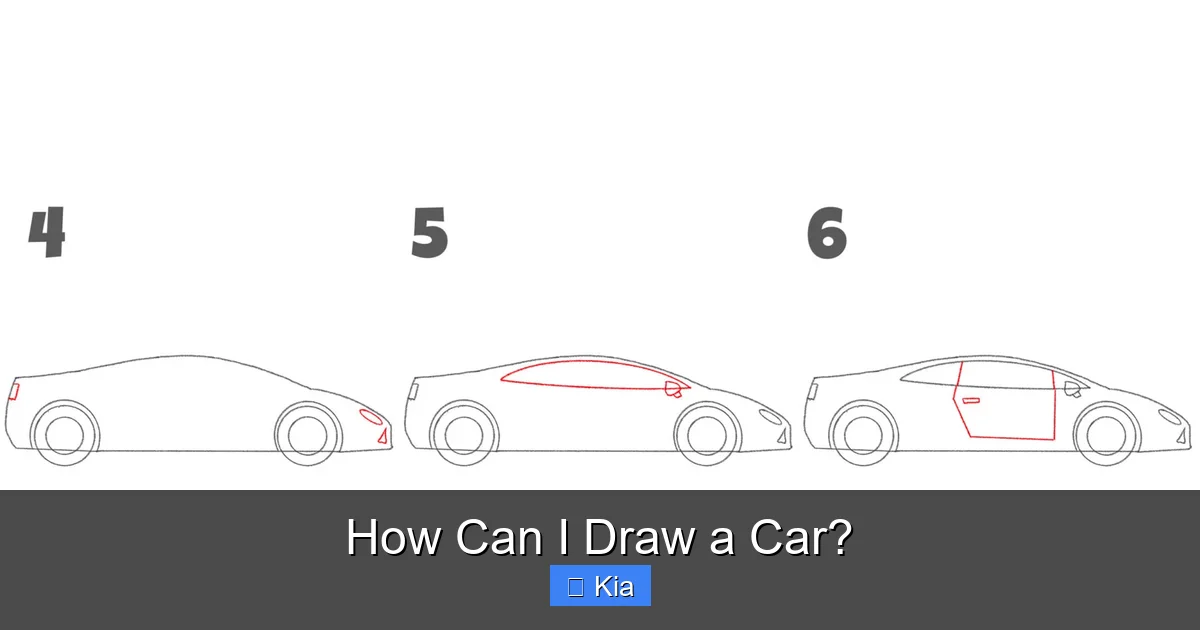
Step-by-Step Guide to Drawing a Car
Visual guide about How Can I Draw a Car?
Image source: i.pinimg.com
Now that you understand the basics, let’s walk through a simple step-by-step process to draw a car. We’ll use a Kia Sportage as our example, but you can adapt these steps to any model.
Step 1: Sketch the Basic Outline
Start by drawing a long, horizontal rectangle. This will be the main body of the car. Make it about two-thirds the length of your paper. Then, draw a smaller rectangle on top for the roof, slightly narrower than the base. Connect the two with curved lines on the sides to form the cabin.
Next, add two large circles beneath the body for the front and rear wheels. Make sure they’re the same size and evenly spaced. The front wheel should be closer to the front edge of the body, while the rear wheel sits closer to the back. This mimics the real-world placement of wheels on most SUVs.
Step 2: Define the Body and Fenders
Now, refine the shape of the car. Use smooth, flowing lines to connect the wheels to the body, creating the fenders. For the Kia Sportage, the fenders are slightly rounded but still have a muscular, athletic look. Avoid sharp angles unless you’re drawing a more boxy model like the Kia Telluride.
Add a curved line at the front to indicate the hood, and another at the back for the trunk. You can also sketch a small bump on the side to represent the door handle area. Keep your lines light so you can erase and adjust as needed.
Step 3: Add Windows and Windshield
Draw the windshield as a large, slanted rectangle at the front of the roof. Then, add side windows on both sides of the car. For the Kia Sportage, the rear windows are slightly smaller and taper toward the back. Make sure the windows are proportional to the body—too big, and the car looks cartoonish; too small, and it loses its character.
Don’t forget the rear window. Draw a smaller rectangle at the back, aligned with the roofline. You can add a slight curve to the top to match the Sportage’s sporty design.
Step 4: Draw the Wheels and Tires
Now it’s time to detail the wheels. Start by drawing a smaller circle inside each tire to represent the rim. Then, add spokes or patterns to make them look more realistic. Kia wheels often have a five-spoke design with a central hub, so you can mimic that with simple lines radiating from the center.
Add tread lines around the outer edge of the tires to show texture. You don’t need to draw every groove—just a few curved lines will suggest the pattern. This small detail makes a big difference in making your drawing look authentic.
Step 5: Add Headlights, Grille, and Other Features
The front of the car is where personality shines. For the Kia Sportage, draw two almond-shaped headlights on either side of the grille. The grille itself is typically a wide, horizontal bar with a honeycomb or mesh pattern. You can simplify this by drawing a few horizontal lines inside a rectangle.
Add fog lights below the headlights, and don’t forget the license plate area at the bottom. On the sides, sketch door handles and side mirrors. The mirrors should be small, rounded shapes attached to the front doors.
At the back, draw taillights that wrap around the corners of the car. The Kia Sportage has distinctive L-shaped taillights, so try to capture that shape. Add a small spoiler on the trunk if you want to enhance the sporty look.
Step 6: Refine and Shade
Once you’re happy with the outline, go over your lines with a darker pencil or pen to define the final shape. Erase any unnecessary guidelines, but leave some light lines for shading.
Shading adds depth and makes your drawing look three-dimensional. Use a soft pencil to add shadows under the car, beneath the wheels, and along the sides where light wouldn’t hit. For example, the underside of the hood and the area behind the wheels should be darker.
You can also shade the windows to show reflection. Use a gradient from light to dark, with the darkest area at the top. This mimics how real car windows reflect the sky.
Tips for Drawing Different Kia Models

Visual guide about How Can I Draw a Car?
Image source: drawcarz.com
Each Kia model has its own unique design, so adjusting your approach can help you capture its essence.
Drawing the Kia Stinger
The Kia Stinger is a sleek, low-slung sports car with a long hood and short rear deck. To draw it, start with a long, narrow rectangle for the body. The roof should slope dramatically toward the back, giving it a coupe-like appearance. The wheels are large and sit close to the corners, emphasizing its performance stance.
Focus on the aggressive front grille and sharp headlights. The Stinger’s design is all about speed and power, so use bold, confident lines.
Drawing the Kia Telluride
The Telluride is a bold, boxy SUV with a commanding presence. Start with a tall, rectangular body and a flat roof. The wheels are large but not overly sporty, and the fenders are squared off.
Pay attention to the wide grille and vertical headlights. The Telluride has a rugged, upscale look, so keep your lines clean and strong.
Drawing the Kia EV6
As an electric vehicle, the EV6 has a futuristic design with smooth curves and a low profile. Use flowing lines to capture its aerodynamic shape. The headlights are thin and wrap around the front, and the grille is minimal or absent.
Add details like the charging port on the front fender and the distinctive LED light bar at the rear.
Common Mistakes to Avoid
Even with the best intentions, beginners often fall into common traps. Here are a few to watch out for:
- Ignoring symmetry: Cars are symmetrical, so make sure both sides match. Use reference lines to keep features aligned.
- Overcomplicating details: Start simple. You can always add more detail later, but too much too soon can overwhelm your sketch.
- Skipping the planning phase: Rushing into details without a solid foundation leads to uneven proportions.
- Using dark lines too early: Always sketch lightly first. Dark lines are harder to erase and can ruin your drawing if you make a mistake.
- Not using references: Photos of real Kia models are your best friend. They show how light hits the surfaces and how parts connect.
Practice Makes Perfect
The more you draw, the better you’ll get. Set aside 10–15 minutes a day to sketch cars. Try drawing the same model from different angles—front, side, rear, and three-quarter view. This helps you understand the 3D shape and improves your spatial awareness.
You can also challenge yourself by drawing cars in motion. Add motion lines behind the wheels or blur the background to suggest speed. This adds dynamism and makes your drawing more exciting.
Don’t be afraid to make mistakes. Every artist starts somewhere, and even the pros had to learn the basics. The key is to keep going and enjoy the process.
Conclusion
Learning how to draw a car is a rewarding skill that combines observation, technique, and creativity. By starting with basic shapes, focusing on proportions, and gradually adding details, you can create realistic and stylish sketches of your favorite vehicles—whether it’s a Kia Sportage, Stinger, or EV6.
Remember, the goal isn’t perfection—it’s progress. Each drawing teaches you something new, and over time, you’ll develop your own style and confidence. So grab a pencil, find a reference photo, and start sketching. Who knows? Your next drawing might just inspire your dream car.
Frequently Asked Questions
What’s the easiest way to start drawing a car?
Start with basic shapes like rectangles and circles to form the body and wheels. This simple approach helps you build the car’s structure before adding details.
Do I need special tools to draw a car?
No, you only need a pencil, eraser, and paper. As you improve, you can try pens, markers, or digital tools, but basics are enough to begin.
How do I make my car drawing look realistic?
Focus on proportions, symmetry, and shading. Use reference photos of real Kia models to guide your lines and add depth with light and shadow.
Can I draw a car if I’m not good at art?
Absolutely! Drawing a car is about breaking it into simple parts. With practice, anyone can learn to sketch a recognizable vehicle.
What’s the best Kia model to practice drawing?
The Kia Sportage is great for beginners due to its balanced proportions and clear design lines. The Kia Soul is also fun because of its boxy shape.
How long does it take to learn how to draw a car?
With regular practice, you can draw a basic car in a few days. Mastering details and different angles may take weeks or months, but improvement comes quickly.