
How to Add Pictures to Uconnect from a Phone
Contents
- 1 Key Takeaways
- 2 📑 Table of Contents
- 3 Introduction: Personalize Your Drive with Uconnect
- 4 Understanding Uconnect and Photo Compatibility
- 5 Preparing Your Photos for Uconnect
- 6 Transferring Photos from Phone to USB Drive
- 7 Uploading and Viewing Photos on Uconnect
- 8 Troubleshooting Common Issues
- 9 Tips for a Better Photo Experience
- 10 Conclusion: Make Every Drive Personal
- 11 Frequently Asked Questions
Adding pictures to your Uconnect system from your phone is easier than you think. This guide walks you through every step—from compatibility checks to final uploads—so you can personalize your vehicle’s display with your favorite photos. Whether you’re a tech-savvy driver or just getting started, we’ve got you covered.
Key Takeaways
- Check Uconnect Compatibility: Not all Uconnect versions support photo uploads—verify your model and software version first.
- Use a USB Drive as a Bridge: Most Uconnect systems require photos to be transferred via USB, even when starting from your phone.
- Optimize Image Format and Size: Use JPEG files under 5MB with a resolution of 800×480 pixels for best results.
- Transfer Photos from Phone to USB: Use your phone’s file manager or a computer to copy images to a compatible USB drive.
- Safely Eject and Insert USB: Always eject the USB properly from your phone or computer to avoid data corruption.
- Navigate Uconnect Menu Carefully: Use the touchscreen or voice commands to access the photo viewer and select your images.
- Keep Software Updated: Regular Uconnect updates improve functionality and may add new photo features.
📑 Table of Contents
- Introduction: Personalize Your Drive with Uconnect
- Understanding Uconnect and Photo Compatibility
- Preparing Your Photos for Uconnect
- Transferring Photos from Phone to USB Drive
- Uploading and Viewing Photos on Uconnect
- Troubleshooting Common Issues
- Tips for a Better Photo Experience
- Conclusion: Make Every Drive Personal
Introduction: Personalize Your Drive with Uconnect
Imagine cruising down the highway, the sun setting behind the mountains, and on your dashboard screen, a photo of your family smiles back at you. That’s the kind of small joy that makes driving more than just getting from point A to point B. With the Uconnect infotainment system found in many Chrysler, Dodge, Jeep, and Ram vehicles, you can turn that dream into reality—by adding pictures to Uconnect from a phone.
Uconnect isn’t just about navigation, music, and hands-free calling. It’s also a canvas for personalization. Whether you want to display vacation snapshots, your pet’s latest antics, or a motivational quote, uploading photos to your Uconnect system adds a touch of home to your ride. And the best part? You don’t need to be a tech wizard to do it.
This guide will walk you through the entire process, from checking if your Uconnect system supports photo uploads to transferring images from your phone and setting them up on your dashboard screen. We’ll cover common pitfalls, pro tips, and troubleshooting advice so you can enjoy your custom photo gallery without frustration.
Understanding Uconnect and Photo Compatibility
Visual guide about How to Add Pictures to Uconnect from a Phone
Image source: i.ytimg.com
Before you start transferring photos, it’s important to understand what Uconnect is and whether your vehicle’s version supports image uploads. Uconnect is FCA’s (now Stellantis) proprietary infotainment system, available in various generations and screen sizes across multiple vehicle brands. Not all versions allow photo viewing, and even fewer support direct uploads from a phone.
Which Uconnect Versions Support Photos?
The ability to add pictures to Uconnect from a phone depends heavily on your system’s generation and software version. Generally, Uconnect 5 and newer systems (found in vehicles from 2020 onward) offer the best support for multimedia features, including photo viewing. Older systems like Uconnect 4 or 3 may have limited or no photo functionality.
To check your Uconnect version:
– Turn on your vehicle and go to the main menu.
– Tap “Settings” > “System Information” or “About.”
– Look for the software version (e.g., Uconnect 5.0, 4.3, etc.).
If your system is Uconnect 5 or newer, you’re in luck—photo uploads are likely supported. For older systems, you may still be able to view photos if they’re stored on a USB drive, but direct phone-to-Uconnect transfer isn’t typically available.
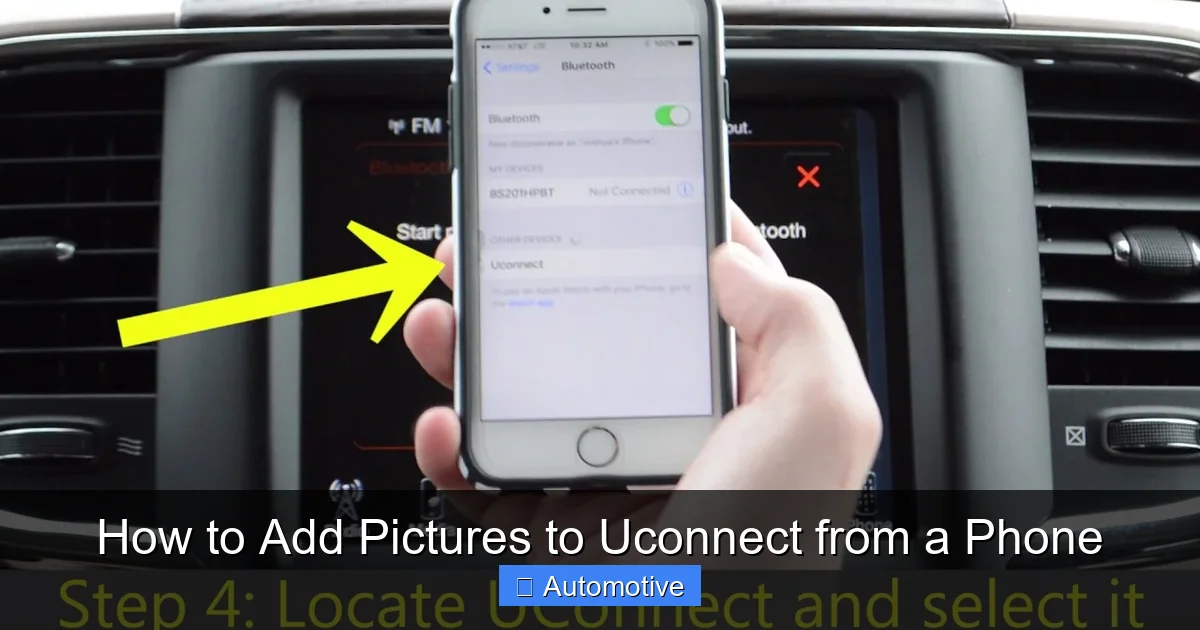
Why Can’t I Just Bluetooth My Photos?
You might be wondering: “Can’t I just send photos from my phone to Uconnect via Bluetooth?” Unfortunately, no. While Uconnect supports Bluetooth for calls and audio streaming, it doesn’t allow file transfers like photos or documents. This is a common limitation across most automotive infotainment systems for security and performance reasons.
Instead, the most reliable method is using a USB drive as an intermediary. You’ll transfer photos from your phone to a USB drive, then plug that drive into your vehicle’s USB port. From there, Uconnect can access and display the images.
Preparing Your Photos for Uconnect

Visual guide about How to Add Pictures to Uconnect from a Phone
Image source: i.ytimg.com
Now that you’ve confirmed your Uconnect system supports photo viewing, it’s time to prepare your images. Not all photo formats and sizes work well with Uconnect. Using the wrong file type or resolution can lead to errors, slow loading, or images that don’t display at all.
Recommended Image Formats and Sizes
Uconnect works best with JPEG (.jpg) files. While some systems may support PNG or BMP, JPEG is the most universally compatible and efficient format. Avoid HEIC (used by newer iPhones) unless you convert it first—Uconnect doesn’t natively support HEIC.
In terms of resolution, aim for 800×480 pixels. This matches the standard display resolution of most Uconnect screens and ensures your photos look sharp without overloading the system. Larger images (like those from modern smartphones) may need to be resized.
File size is also important. Keep each photo under 5MB. Larger files can cause lag or fail to load. If your photos are high-resolution, use a photo editing app or online tool to compress them without losing too much quality.
How to Resize and Convert Photos on Your Phone
Most smartphones don’t have built-in tools to resize photos to exact dimensions, but there are plenty of free apps that can help. Here are a few popular options:
– **Google Photos:** While it doesn’t resize, it can compress images when sharing. Use the “Share” option and select “Save to Drive” or “Send via Email” to reduce file size.
– **Photo & Picture Resizer (Android):** A free app that lets you resize images to specific dimensions like 800×480.
– **Image Size (iOS):** Available on the App Store, this app allows precise resizing and format conversion.
For example, if you have a photo from your iPhone that’s 4032×3024 pixels and 8MB in size, you’d:
1. Open the Image Size app.
2. Select the photo.
3. Set width to 800 and height to 480 (maintain aspect ratio if needed).
4. Choose JPEG format and medium quality.
5. Save the resized image to your Photos app.
Now you have a Uconnect-friendly version of your image.
Transferring Photos from Phone to USB Drive
Visual guide about How to Add Pictures to Uconnect from a Phone
Image source: medias.fcacanada.ca
Once your photos are properly formatted, the next step is getting them from your phone to a USB drive. This is the bridge between your mobile device and your Uconnect system.
Using a USB OTG Cable (Android)
If you have an Android phone, a USB On-The-Go (OTG) cable is the easiest way to transfer files directly to a USB drive. Here’s how:
1. Purchase a USB OTG cable (available online or at electronics stores).
2. Plug the micro-USB or USB-C end into your phone.
3. Plug your USB drive into the other end.
4. Your phone should recognize the drive. Open your file manager app (like Files by Google).
5. Navigate to your photos, select the ones you want, and copy them.
6. Paste them into the USB drive’s folder.
7. Safely eject the drive by tapping “Eject” in the file manager.
Now your photos are on the USB drive and ready for Uconnect.
Using a Computer as an intermediary (All Phones)
If you don’t have an OTG cable or prefer a more reliable method, use a computer:
1. Connect your phone to your computer via USB.
2. On your phone, select “File Transfer” or “MTP” mode when prompted.
3. Open your phone’s storage on the computer and locate your photos.
4. Copy the resized JPEG files to your desktop or a folder.
5. Insert your USB drive into the computer.
6. Copy the photos from your computer to the USB drive.
7. Safely eject the USB drive using the “Eject” option in your system tray (Windows) or drag to Trash (Mac).
This method works for both Android and iPhone users and reduces the risk of connection issues.
Tips for Organizing Your Photos on USB
To make it easier to find and display your photos on Uconnect, organize them in a simple folder structure:
– Create a folder named “Uconnect_Photos” on your USB drive.
– Inside, you can have subfolders like “Family,” “Vacation,” or “Pets.”
– Name your files clearly: “Beach_Sunset.jpg,” “Dog_Playing.jpg,” etc.
Avoid using special characters or spaces in file names—stick to letters, numbers, and underscores. This prevents compatibility issues.
Uploading and Viewing Photos on Uconnect
With your USB drive loaded and ready, it’s time to connect it to your vehicle and view your photos on the Uconnect screen.
Connecting the USB Drive to Your Vehicle
Locate the USB port in your vehicle. It’s usually in the center console, glove box, or near the dashboard. Plug in your USB drive firmly. Wait a few seconds for Uconnect to recognize it.
If the system doesn’t detect the drive:
– Try a different USB port (some vehicles have multiple).
– Ensure the USB drive is formatted as FAT32 (most are by default).
– Test the drive on a computer to confirm it’s working.
Accessing Photos Through the Uconnect Menu
Once the USB is recognized, follow these steps:
1. On the Uconnect home screen, tap “Media” or “Entertainment.”
2. Select “USB” or “USB Device.”
3. Navigate to your “Uconnect_Photos” folder.
4. Tap on a photo to view it full screen.
You can swipe left or right to browse through your images. Some systems allow you to set a photo as a background or screensaver, though this feature varies by model.
Using Voice Commands (If Supported)
On newer Uconnect systems with voice recognition, you can say:
– “Show photos from USB.”
– “Display image from folder Family.”
This hands-free option is great for safer driving, though it may not work with all folder or file names.
Troubleshooting Common Issues
Even with careful preparation, you might run into problems. Here are some common issues and how to fix them.
Photos Not Showing Up
If your images don’t appear:
– Double-check the file format—ensure they’re JPEG, not HEIC or PNG.
– Verify the resolution is 800×480 or close to it.
– Make sure the USB drive is properly inserted and recognized.
– Try reformatting the USB drive to FAT32 (back up data first).
Images Load Slowly or Freeze
This usually happens with large files. Resize your photos to under 5MB and ensure they’re not overly compressed, which can cause artifacts.
USB Drive Not Detected
Try a different USB drive—some brands or models aren’t compatible with Uconnect. Also, avoid USB hubs; plug directly into the vehicle’s port.
System Crashes or Restarts
This could indicate a software glitch. Restart your vehicle to reset Uconnect. If the problem persists, check for system updates via the Uconnect website or your dealership.
Tips for a Better Photo Experience
To get the most out of your photo uploads, keep these tips in mind:
– **Update Uconnect Regularly:** Visit the official Uconnect website to check for software updates. Newer versions often improve media support.
– **Use High-Contrast Images:** Photos with bright colors and clear subjects look best on the dashboard screen.
– **Avoid Sensitive Content:** Remember, your photos are visible to passengers and possibly passersby if your windows are down.
– **Rotate Photos Seasonally:** Swap out your gallery every few months to keep things fresh—summer beach shots, fall leaves, holiday memories.
– **Backup Your Photos:** Keep a copy of your Uconnect photos on your phone or cloud storage in case the USB drive fails.
Conclusion: Make Every Drive Personal
Adding pictures to Uconnect from a phone is a simple yet powerful way to personalize your vehicle. It turns a functional dashboard into a digital photo frame that reflects your life, memories, and style. While the process requires a few extra steps—like resizing images and using a USB drive—it’s well worth the effort.
By following this guide, you’ve learned how to check compatibility, prepare your photos, transfer them safely, and display them on your Uconnect screen. You’ve also gained troubleshooting skills to handle common issues and tips to enhance your experience.
So go ahead—load up those vacation snapshots, family portraits, or inspiring landscapes. Let your Uconnect system tell your story, one photo at a time. Whether you’re commuting to work or embarking on a road trip, your favorite images will be right there with you, turning every drive into a little adventure.
Frequently Asked Questions
Can I add pictures to Uconnect directly from my phone without a USB drive?
No, Uconnect does not support direct photo transfers from a phone via Bluetooth or Wi-Fi. You must use a USB drive as an intermediary to transfer images from your phone to the system.
What image format works best with Uconnect?
JPEG (.jpg) is the recommended format for Uconnect. Avoid HEIC, PNG, or BMP unless converted, as they may not be supported or could cause display issues.
What resolution should my photos be for Uconnect?
For optimal display, resize your photos to 800×480 pixels. This matches the standard screen resolution of most Uconnect systems and ensures clear, sharp images.
Why won’t my USB drive show up on Uconnect?
This could be due to incompatible formatting, a faulty USB drive, or a connection issue. Try reformatting the drive to FAT32, using a different USB port, or testing the drive on a computer first.
Can I set a photo as my Uconnect background?
Some newer Uconnect systems allow you to set a photo as a background or screensaver, but this feature varies by model and software version. Check your user manual or settings menu for options.
How often should I update my Uconnect software?
It’s a good idea to check for Uconnect updates every 6–12 months. Updates can improve performance, fix bugs, and add new features like enhanced photo support.


