How to Change the Gas Cap on a Ford F-150
Contents
- 1 Key Takeaways
- 2 📑 Table of Contents
- 3 Introduction: A Small Cap, A Big Impact
- 4 Understanding Your F-150’s Gas Cap: It’s Not Just a Lid
- 5 Tools and Preparation: Setting Yourself Up for Success
- 6 Step-by-Step: Removing the Old Gas Cap
- 7 Step-by-Step: Installing the New Gas Cap
- 8 Troubleshooting and Final Steps
- 9 Maintenance Tips and Best Practices
- 10 Frequently Asked Questions


Changing the gas cap on your Ford F-150 is a simple, inexpensive DIY task that can resolve check engine lights and prevent fuel system issues. You only need a few basic tools and the correct replacement cap. This guide walks you through identifying the right cap, safely removing the old one, and installing the new one correctly. Properly securing the cap is crucial to avoid evaporative emission system errors and ensure your truck runs efficiently.
Key Takeaways
- Correct Cap is Critical: Always use an OEM-specification or high-quality aftermarket gas cap designed for your specific F-150 model year and fuel type (gasoline or flex-fuel). Using the wrong cap will trigger errors.
- Simple Tools Required: You typically need no tools at all, as the cap is hand-tightened. A clean rag is useful for wiping the filler neck, and a flashlight can help in low light.
- Safety First: Perform the replacement on a cool engine, away from sparks or open flames. Gasoline vapors are flammable. Ensure the area is well-ventilated.
- Listen for the Click: After tightening the new cap, you should hear at least 3-5 distinct clicks. This indicates the sealing mechanism is properly engaged. Do not overtighten.
- Reset the System: After replacing the cap, the check engine light may stay on for a few drive cycles. You can often clear the code by driving normally for 50-100 miles, or use an OBD2 scanner for an immediate reset.
- Inspect the Seals: Before installing the new cap, check the filler neck opening for any debris, dirt, or damage. A clean seal surface is essential for a proper vacuum seal.
- Address Underlying Issues: If the check engine light for a loose gas cap returns immediately after replacement, inspect the filler neck or cap threads for damage, or there may be a larger EVAP system leak.
📑 Table of Contents
Introduction: A Small Cap, A Big Impact
Your Ford F-150 is a powerhouse of capability, built to work hard and go the distance. Yet, sometimes the most significant problems can stem from the smallest components. Take the humble gas cap—that unassuming plastic lid on your fuel filler neck. It plays a starring role in your truck’s evaporative emission control (EVAP) system, a network designed to capture harmful fuel vapors and prevent them from escaping into the atmosphere. When that cap fails, gets lost, or is improperly secured, it doesn’t just mean a minor inconvenience; it can trigger a persistent check engine light, cause your truck to fail an emissions test, and even lead to poor fuel economy as the computer struggles to manage fuel tank pressure.
Learning how to change the gas cap on a Ford F-150 is one of the most fundamental and empowering DIY automotive skills you can master. It takes less than five minutes, requires no special tools, and costs a fraction of what a dealership or mechanic would charge for the same simple fix. Whether your check engine light is glaring with a P0456 (Evaporative Emission System Leak Detected—Very Small Leak) or P0442 (Evaporative Emission System Leak Detected), or you’ve simply misplaced your cap, this complete guide will walk you through every step. We’ll cover how to identify the correct replacement cap for your specific model year, from the classic 2004-2008 models to the latest 2024 F-150, and ensure you install it perfectly to silence that warning light for good.
Understanding Your F-150’s Gas Cap: It’s Not Just a Lid
The Purpose of the EVAP System and Your Cap’s Role
To understand why your gas cap is so important, you need to grasp its role in the larger EVAP system. Modern vehicles, including every Ford F-150 since the late 1990s, are equipped with this sealed system. Its primary job is to trap gasoline vapors that naturally evaporate from the fuel tank. Instead of venting these hydrocarbons (which contribute to smog) into the air, the system stores them in a charcoal canister. Later, when the engine is running, these vapors are purged and burned in the combustion process.
Visual guide about How to Change the Gas Cap on a Ford F-150
Image source: i.ytimg.com
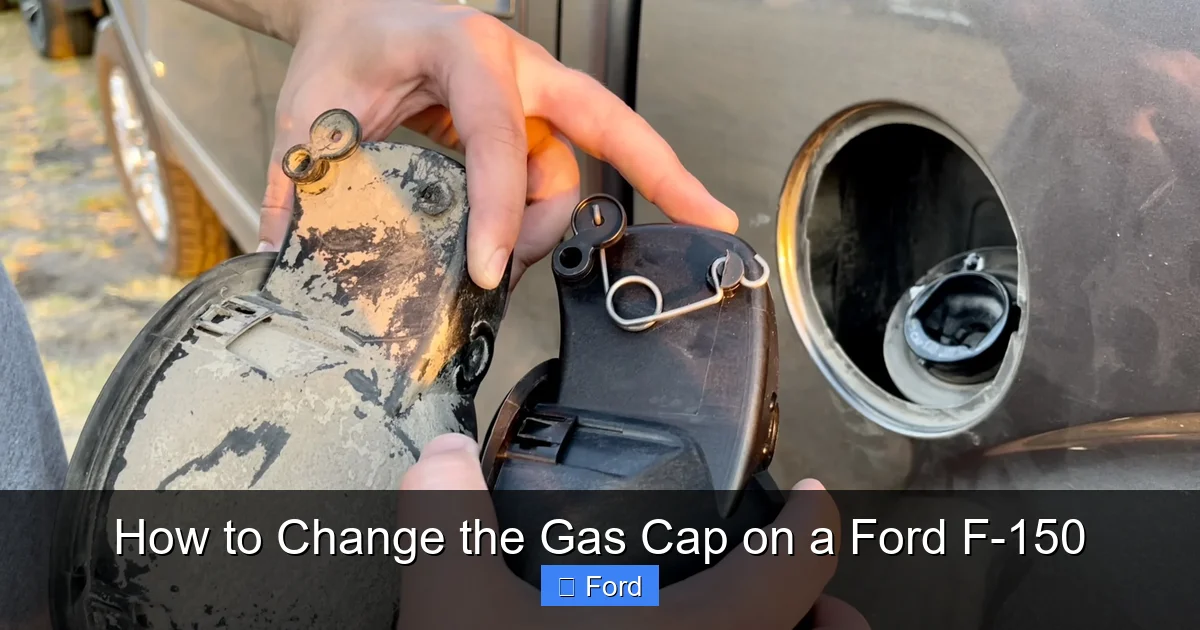
Your gas cap is the primary seal for this entire system. It contains a complex valve and sealing mechanism that allows fuel to flow in during filling but creates an airtight closure afterward. The cap also has a pressure relief valve to prevent tank over-pressurization. The truck’s onboard computer (PCM) constantly monitors the EVAP system for pressure integrity. If it detects a leak—often because the cap is loose, cross-threaded, missing, or has a degraded seal—it logs a diagnostic trouble code (DTC) and illuminates the check engine light. This is why a faulty gas cap is one of the most common causes of that pesky light.
Identifying Your F-150’s Gas Cap Type
Ford has used a few different gas cap designs across the F-150’s long production run. Identifying yours is the first step to getting the right replacement.
- Standard Screw-On Cap (Most Common): This is the traditional cap you twist to tighten. It’s found on the vast majority of F-150s, especially those from 2004-2020. It typically has a tether or retention strap that attaches it to the fuel door.
- Capless Fuel System (Later Models): Starting around the 2015-2017 model years and becoming standard on many newer trims (like the 2021+), Ford introduced a “capless” system. There is no removable cap. Instead, a spring-loaded door inside the filler neck seals automatically. You simply insert the fuel nozzle. If your F-150 has this, you do not have a traditional gas cap to replace. The issue may lie with the internal door mechanism or seal, which is a more complex repair.
- Flex-Fuel (E85) Cap: If your F-150 is a Flex-Fuel Vehicle (FFV), it has a distinct cap, usually yellow in color, labeled for use with E85 ethanol blends or gasoline. It’s crucial to use the correct cap for your fuel type, as the seals and pressure ratings can differ.
How to Check: Simply look at your filler neck. If you see a cap you can grip and turn, you have a screw-on type. If you see only a small, spring-loaded flap, you have a capless system. For screw-on types, note the color and any markings. A black cap is standard gasoline. A yellow cap indicates Flex-Fuel compatibility. The cap itself will also have part numbers stamped on it, which is the best way to find an exact match.
Tools and Preparation: Setting Yourself Up for Success
What You’ll Need (Spoiler: It’s Very Little)
The beauty of this job is its simplicity. Here’s your minimal tool list:
Visual guide about How to Change the Gas Cap on a Ford F-150
Image source: s3.amazonaws.com
- The New Gas Cap: This is the star of the show. We’ll discuss how to choose the right one in the next section. Have it ready before you start.
- A Clean Lint-Free Rag or Cloth: For wiping any dirt or debris from the filler neck opening. Dirt in the seal can cause leaks.
- Gloves (Optional): If you don’t like getting gasoline smell on your hands.
- Flashlight (Optional): Helpful if you’re working in a dark garage at night.
That’s it. No wrenches, no screwdrivers, no jack stands. This is a true beginner-friendly task.
Choosing the Correct Replacement Gas Cap
Using the wrong gas cap is the number one reason a replacement fails to fix the problem. Here’s how to get it right:
- OEM (Ford) Part Number: The foolproof method. Look at your old cap for a stamped part number, like “FOIA12345” or a numeric code. Search that number online for genuine Ford replacements or aftermarket equivalents. You can also call a Ford dealer’s parts department with your VIN for the exact part.
- Reputable Aftermarket Brands: Companies like Stant, Gates, and URO Parts manufacture high-quality caps that meet or exceed OEM specifications. Look for caps labeled as “OEM Replacement” or “Direct Fit” for your specific F-150 year and engine. Avoid generic “universal” caps; they rarely seal correctly.
- Cap Color and Labeling: Match the color and labeling exactly. A black cap for a standard gasoline engine. A yellow cap for a Flex-Fuel engine. The cap may also say “For E85/Gasoline” or have the Flex-Fuel logo.
- Where to Buy: Auto parts stores (AutoZone, Advance, O’Reilly), online retailers (Amazon, RockAuto), or directly from Ford. Expect to pay $10-$30 for a good quality cap. Genuine Ford caps can be $30-$50.
Pro Tip: If you’re unsure, take a clear photo of your old cap and the filler neck to a local auto parts store. Their staff can often match it visually and by part number.
Step-by-Step: Removing the Old Gas Cap
Safety Precautions Before You Begin
Gasoline is highly flammable. Before you touch anything, ensure:

Visual guide about How to Change the Gas Cap on a Ford F-150
Image source: m.media-amazon.com
- The engine is completely cool. Do not attempt this right after driving.
- You are working in a well-ventilated area, away from any open flames, sparks, or smoking materials.
- The area around the fuel filler is free of ignition sources.
The Removal Process
1. Locate the Fuel Filler Door: On your F-150, this is typically on the driver’s side (left side) near the rear quarter panel. Press the release button (usually on the door panel or floor) or use the key fob unlock button to pop it open. Some models have a manual door you just pull.
2. Expose the Cap: Once the fuel door is open, you’ll see the gas cap attached by a tether or sitting in a holder. If it’s on a tether, unscrew it counter-clockwise. If it’s in a holder, simply lift it straight out.
3. Handle with Care: Gas caps can sometimes be stuck due to pressure or old rubber seals. If it’s tight, apply steady, even pressure and turn. Do not use a tool for leverage, as you could damage the cap or filler neck. A gentle tap with the palm of your hand can sometimes break it free.
4. Inspect the Old Cap: Once removed, look at the cap’s sealing gasket (the rubber ring on the underside). Is it cracked, brittle, flattened, or missing? This is a clear sign of failure. Also, check the cap’s body for cracks. These are all reasons for an EVAP leak.
5. Clean the Filler Neck: Use your rag to wipe around the opening of the fuel filler neck. Remove any dirt, leaves, or debris. Pay special attention to the metal lip where the cap’s gasket will seat. A clean surface is non-negotiable for a good seal.
Step-by-Step: Installing the New Gas Cap
The Golden Rule: Listen for the Clicks
Installation is straightforward, but the technique matters. Here’s how to do it perfectly:
- Position the Cap: Align the cap’s tabs or lugs with the notches on the filler neck. Most caps are keyed to only fit one way. Do not force it or cross-thread it.
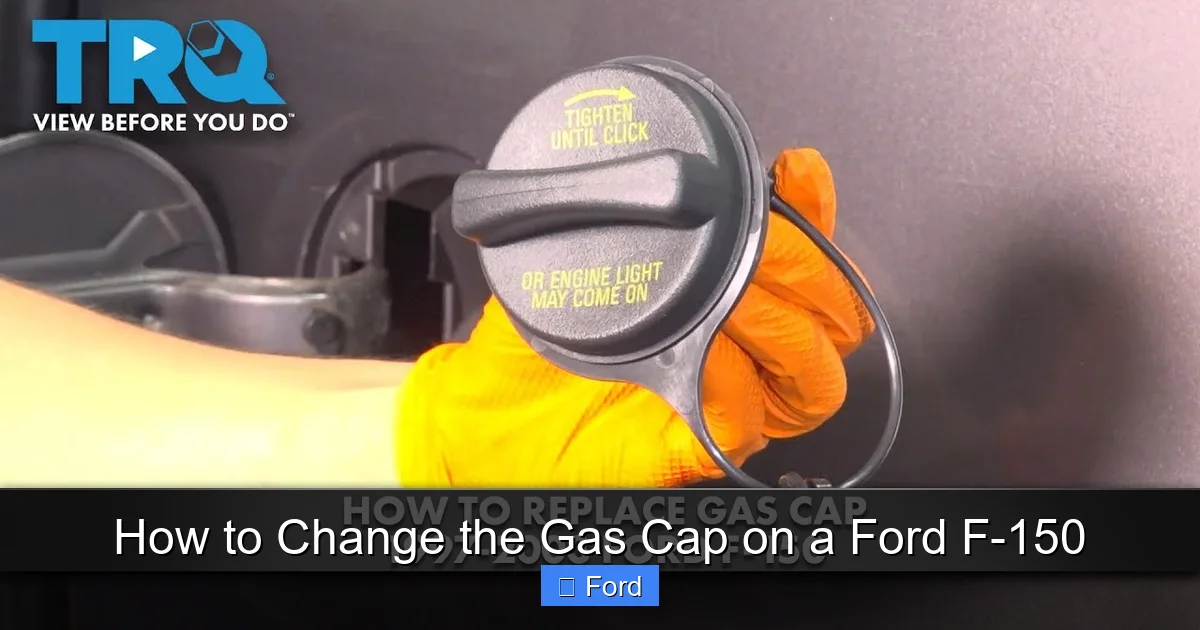
- Hand-Tighten Only: Place the cap on and turn it clockwise. Tighten it firmly with your hand until it is snug. You will feel resistance.
- Listen for the Clicks: Continue turning. You should hear a series of 3 to 5 distinct, audible clicks. These clicks indicate the cap’s internal ratcheting mechanism and sealing valves are fully engaged. This is the most important step. If you don’t hear clicks, the cap is not fully sealed.
- Stop Tightening: Once you hear the clicks, stop. Do not use a tool to tighten it further. Overtightening can damage the cap’s seal or the filler neck threads, causing leaks. The clicks mean it’s tight enough.
- Secure the Tether: If your cap has a tether strap, ensure it’s not tangled and is properly attached to the fuel door or filler neck. This prevents losing the cap.
- Close the Fuel Door: Shut the fuel filler door until it clicks into place.
Troubleshooting and Final Steps
What to Do If the Check Engine Light Stays On
After replacing the cap and driving normally, the check engine light should eventually go out on its own. The computer needs to complete a “drive cycle” and verify the EVAP system is sealed. This can take 50-100 miles of varied driving (including highway speeds and idle time).
If the light persists after several days of driving:
- Re-check the cap: Ensure you heard the clicks. Remove it and re-install it, listening carefully again.
- Inspect the filler neck: Look for any nicks, cracks, or debris that could prevent a seal.
- Consider other EVAP leaks: The gas cap is the most common culprit, but other components like the charcoal canister, purge valve, or vent solenoid can also fail. A persistent code may require professional diagnosis with a smoke machine.
- Clear the code: For an immediate light reset, you can use an OBD2 scanner to clear the trouble code. If it comes back immediately, the problem is still present. If it stays off, your fix was successful.
Important: Driving with an unresolved EVAP leak will cause your F-150 to fail an emissions (smog) test. Addressing it promptly is necessary for registration and environmental compliance.
Maintenance Tips and Best Practices
Your new gas cap is an investment in your truck’s health. Here’s how to make it last:
- Never Over-Tighten: Always rely on the click mechanism. Hand-tight plus clicks is sufficient.
- Keep It Clean: Wipe the cap’s sealing surface and the filler neck periodically with a clean rag. Dirt and grit act like sandpaper and degrade the seal.
- Don’t Lose It: Always replace the cap fully after fueling. The tether is there for a reason. A missing cap will trigger a code within a few drive cycles.
- Replace Proactively: Gas cap seals degrade over time due to heat, cold, and fuel exposure. Consider inspecting your cap every 2-3 years and replacing it preventatively if the seal looks worn, even if no light is on. It’s cheap insurance.
- Use Quality Fuel: While not directly related to the cap, using good-quality gasoline helps keep the entire fuel system, including the EVAP components, cleaner and longer-lasting.
By following this guide, you’ve not only saved yourself a service fee but also gained a deeper understanding of your F-150’s emissions system. This simple maintenance task is a cornerstone of being a proactive and knowledgeable truck owner. For other common F-150 maintenance items, like checking fluid levels or replacing filters, our library of guides has you covered. You might also find it interesting to see how gas cap designs vary across different brands; for instance, the process to open the gas tank on a Honda Civic involves a different fuel door mechanism entirely, though the cap replacement principle is similar.
Frequently Asked Questions
How do I know if my F-150’s gas cap is bad?
Common signs include a persistent check engine light with codes P0455, P0456, or P0442, a noticeable fuel vapor smell around the truck, decreased fuel economy, or a cap that won’t click or tighten properly. Visually inspect the cap’s rubber seal for cracks, brittleness, or if it’s missing entirely.
Can I use any gas cap on my Ford F-150?
No. You must use a cap that is specifically designed for your F-150’s model year and engine type. Using an incorrect cap, even from another Ford model, will likely cause an EVAP leak and trigger the check engine light. Always match the part number or use a reputable brand’s “direct fit” replacement for your specific truck.
My check engine light was on for a loose gas cap. I replaced it, but the light is still on. Why?
The computer needs to complete a drive cycle to verify the repair. Drive normally for 50-100 miles. If the light remains on, ensure you heard the clicks when tightening the new cap. If it still doesn’t go out, there may be another leak in the EVAP system (like a hose or canister) or the filler neck itself could be damaged.
Do I need to reset the check engine light after changing the gas cap?
Not necessarily. The system should self-clear after a few drive cycles once it confirms the leak is fixed. However, if you need the light off immediately for an inspection, you can use an OBD2 scanner to clear the code. If the code returns instantly, the repair was not successful.
My F-150 has a “capless” fuel system. How do I fix a leak?
If your truck has a capless system (no removable cap), the issue is with the internal spring-loaded door seal or its actuator. These are not simple DIY repairs and typically require replacing the entire filler neck assembly or the door mechanism, which is best handled by a professional mechanic.
How much does a replacement gas cap for an F-150 cost?
A quality aftermarket replacement cap typically costs between $10 and $30. A genuine Ford OEM cap usually ranges from $30 to $60. Given the low cost and high importance, it’s not a part to cheap out on; buy from a reputable brand or dealer to ensure proper fit and seal.