Gear Cycle With Disc Brake: Ultimate Guide
Discover the essential guide to understanding and maintaining your gear cycle with disc brakes for a superior riding experience.
In This Article
- 1 Key Takeaways
- 2 What is a Gear Cycle with Disc Brakes?
- 3 The Evolution of Bicycle Braking Systems
- 4 Disc Brakes Explained: How They Work
- 5 Why Choose a Gear Cycle with Disc Brakes?
- 6 Understanding Bicycle Gears
- 7 Maintaining Your Gear Cycle with Disc Brakes
- 8 Troubleshooting Common Disc Brake Issues
- 9 Tips for Gear Adjustment and Riding
- 10 Comparing Disc Brakes and Rim Brakes
- 11 Pro Tip:
- 12 Choosing the Right Gears and Brakes for Your Needs
- 13 The Future of Bicycle Braking Technology
- 14 Frequently Asked Questions (FAQ)
- 14.1 Q1: Are disc brakes really better than rim brakes?
- 14.2 Q2: How often do I need to replace disc brake pads?
- 14.3 Q3: Can I convert my bike from rim brakes to disc brakes?
- 14.4 Q4: What is “brake fade” on disc brakes?
- 14.5 Q5: How do I clean my disc brake rotors?
- 14.6 Q6: What’s the difference between mechanical and hydraulic disc brakes?
- 15 Conclusion
Key Takeaways
Understand disc brake mechanics for better stopping power.
Learn how to adjust gear cycles for optimal performance.
Identify common maintenance tasks for disc brake systems.
Gain confidence in troubleshooting disc brake issues.
Explore tips for maximizing the lifespan of your gear cycle.
Navigating the world of bicycles can feel like a complex journey, especially when you’re looking for a ride that offers superior control and performance. You might be eyeing a gear cycle with disc brakes, intrigued by their promise of enhanced stopping power. Many riders find the terminology and mechanics a bit confusing at first. But don’t worry, this guide is designed to simplify everything for you. We’ll break down exactly what a gear cycle with disc brakes is, why they’re a fantastic choice, and how to keep yours in top condition. Get ready to feel more confident on your next ride.
What is a Gear Cycle with Disc Brakes?
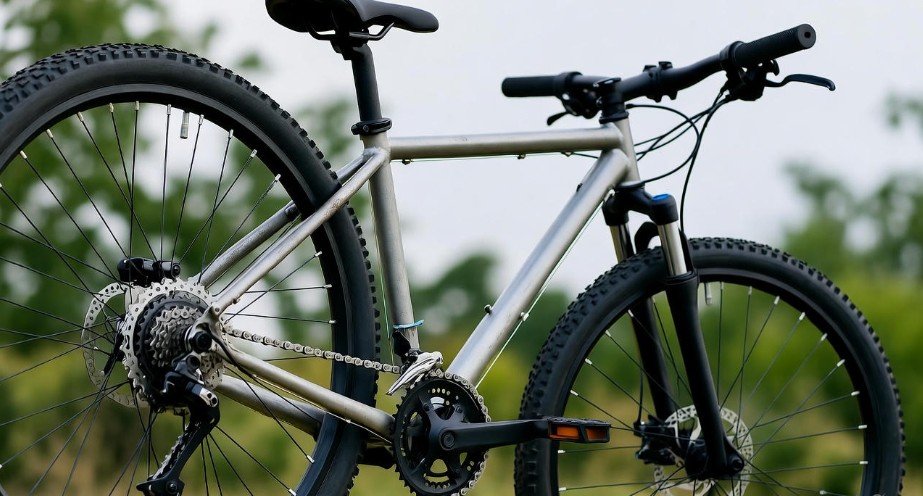
At its core, a gear cycle with disc brakes is a bicycle equipped with a system of gears to help riders tackle various terrains and a braking mechanism that utilizes rotors attached to the wheel hubs. Unlike traditional rim brakes, which squeeze the wheel’s rim, disc brakes employ calipers that clamp onto a metal disc (rotor) mounted on the wheel. This design offers several advantages, particularly in wet or muddy conditions. Understanding these components is the first step to appreciating their performance.
The Evolution of Bicycle Braking Systems
For decades, rim brakes were the standard on nearly all bicycles. They are simple, lightweight, and easy to maintain. However, their effectiveness is significantly reduced when the wheel rim is wet, dirty, or icy. This limitation led to the development and increasing popularity of disc brakes. Initially found on mountain bikes where extreme stopping power and all-weather performance are crucial, disc brakes have now become prevalent on road bikes, hybrid bikes, and even some commuter bikes. Their widespread adoption highlights their proven benefits.
Disc Brakes Explained: How They Work
Disc brake systems on bicycles generally fall into two main categories: mechanical and hydraulic. Both function by using a caliper to squeeze a rotor, but the way they actuate that squeeze differs.
Mechanical Disc Brakes
Mechanical disc brakes work similarly to traditional caliper brakes in that they use a shift cable to pull a lever. This lever then pulls a metal rod or cam inside the caliper, which pushes the brake pads against the rotor. They are generally less expensive and easier to repair in the field, as they don’t involve complex fluid systems.
Hydraulic Disc Brakes
Hydraulic disc brakes use a fluid (usually mineral oil or DOT fluid) to transmit force from the brake lever to the caliper. When you squeeze the lever, a piston in the master cylinder pushes fluid through a hose to the caliper. The fluid then pushes pistons in the caliper, which in turn push the brake pads against the rotor. This system offers superior stopping power, better modulation (finer control over braking force), and requires less hand effort compared to mechanical disc brakes. They also tend to be more self-adjusting as the brake pads wear.
Components of a Disc Brake System
Here’s a look at the key parts that make up a disc brake system:
| Component | Description |
|---|---|
| Rotor (Disc) | A metal disc mounted to the wheel hub. Rotors come in various sizes (measured in millimeters), with larger rotors generally providing more stopping power. |
| Brake Caliper | The housing that contains the brake pads and pistons. It mounts to the bicycle’s frame or fork and straddles the rotor. |
| Brake Pads | These are the friction material that grips the rotor. They can be made of organic (resin) or metallic (sintered) compounds, each offering different performance characteristics. |
| Brake Lever | Mounted on the handlebars, this is what you squeeze to activate the brakes. |
| Brake Cable (Mechanical) / Hose (Hydraulic) | The conduit that transmits force from the lever to the caliper. |
| Master Cylinder (Hydraulic) | Located within the brake lever assembly on hydraulic systems, it houses the fluid and pistons that initiate the braking action. |
| Bleed Ports (Hydraulic) | Small valves on the caliper and/or master cylinder used to remove air from the hydraulic system. |
Why Choose a Gear Cycle with Disc Brakes?
The decision to go with a gear cycle featuring disc brakes often comes down to the riding you plan to do. Here are the major advantages:
Superior Stopping Power
Disc brakes, especially hydraulic ones, offer significantly more stopping power than rim brakes. This is crucial for descending steep hills, stopping quickly in emergencies, and carrying heavier loads.
Consistent Performance in All Weather Conditions
One of the biggest draws of disc brakes is their reliability when wet. Unlike rim brakes, which rely on friction against a rim that can become slick with water or mud, disc brake rotors are less affected. This means more consistent braking power whether it’s raining, you’re riding through puddles, or encountering dusty trails.
Reduced Wheel Wear
Rim brakes wear down the rim of your wheel over time. Disc brakes operate independently of the rim, meaning your wheels will last longer and won’t need truing as frequently due to brake wear.
Better Modulation and Control
Hydraulic disc brakes, in particular, provide excellent modulation. This allows for a more precise feel at the lever, giving you finer control over how much braking force you apply. This can make for a smoother, more controlled ride, especially when navigating tricky sections or riding in traffic.
Understanding Bicycle Gears
A “gear cycle” means your bicycle has a system of gears that allow you to change the resistance you feel when pedaling. This is accomplished through a drivetrain system that typically includes:
The Drivetrain Explained
Crankset: This is where the pedals attach. It has one or more chainrings (front gears).
Chain: Connects the front chainrings to the rear cassette.
Cassette / Freewheel: A cluster of sprockets (rear gears) attached to the rear wheel hub.
Derailleurs (Front and Rear): Mechanisms that move the chain between the chainrings and cassette sprockets.
Shifters: Levers on the handlebars used to control the derailleurs.
How Gears Work Together
When you shift into a larger front chainring or a smaller rear sprocket, you are selecting a “harder” gear. This will require more effort to pedal but will allow you to go faster on flat or downhill terrain, or maintain speed with less effort. Conversely, shifting to a smaller front chainring or a larger rear sprocket creates an “easier” gear, requiring less pedaling effort and is ideal for climbing hills.
Maintaining Your Gear Cycle with Disc Brakes
Keeping your gear cycle with disc brakes in optimal condition involves regular maintenance of both the gear system and the brakes.
Essential Disc Brake Maintenance
Pad Wear Inspection: Regularly check the thickness of your brake pads. Most pads have a wear indicator line. If they’re thin, it’s time for replacement.
Rotor Inspection: Look for any signs of damage, deep scratches, or warping on the rotors. Ensure they are clean and free from oil or grease.
Cleaning: Use a degreaser and a clean cloth to clean rotors. Avoid getting degreaser or lubricants on the rotor surface itself, as this will contaminate the pads and reduce braking performance. Clean the calipers and pads gently with a dry brush.
Bleeding Hydraulic Brakes: Over time, air can get into hydraulic brake lines. This can make the brake lever feel spongy and reduce stopping power. Bleeding the system removes this air and replaces it with fresh fluid. This is a more advanced task, and many riders prefer to have it done by a bike shop. Refer to your brake manufacturer’s guide for specific instructions, such as those found on Shimano’s official support pages.
Tightening Bolts: Ensure all bolts securing the rotors to the hubs and the calipers to the frame/fork are tight.
Gear System Maintenance
Cleaning the Drivetrain: Regularly clean your chain, cassette, and chainrings to remove dirt and grit. A dirty drivetrain wears out faster and shifts poorly.
Lubrication: Apply a bicycle-specific chain lubricant after cleaning. Wipe off excess lube to prevent it from attracting dirt.
Cable Tension: Over time, gear cables can stretch, affecting shifting precision. Adjusting cable tension is a common and relatively simple maintenance task.
Derailleur Adjustment: If your gears aren’t shifting smoothly, the derailleurs may need adjustment. This involves fine-tuning limit screws and cable tension.
Troubleshooting Common Disc Brake Issues
Even with proper maintenance, you might encounter a few common issues. Here’s how to address them:
Spongy Brake Lever (Hydraulic Brakes)
Cause: Air in the brake line or low fluid level.
Solution: The system needs to be bled. If you’re not comfortable doing this yourself, take it to a bike shop.
Brakes Squealing or Grinding
Cause: Contaminated pads or rotors, worn-out pads, or rotor damage.
Solution:
Clean rotors with a dedicated disc brake cleaner or isopropyl alcohol.
Inspect pads. If they appear shiny or glazed, try lightly sanding them. If they are worn down to the metal backing or heavily contaminated, replace them.
Check rotors for any debris or signs of damage.
Brake Lever Feels Loose with Little Resistance
Cause: Worn brake pads, low fluid level (hydraulic), or excessive cable slack (mechanical).
Solution:
Replace worn brake pads.
For hydraulic brakes, check fluid level and consider bleeding.
For mechanical brakes, adjust cable tension.
Disc Rotor Rubbing Against Brake Pads When Not Braking
Cause: Misaligned caliper, bent rotor, or wheel not seated correctly.
Solution:
Loosen the caliper mounting bolts slightly, squeeze the brake lever firmly, and then retighten the bolts while holding the lever. This should center the caliper.
Check if the rotor is bent. Minor bends can sometimes be straightened with a rotor truing tool.
Ensure the wheel is properly seated in the dropouts.
Tips for Gear Adjustment and Riding
Proper gear usage can significantly enhance your cycling experience and reduce wear and tear on your bicycle.
Best Practices for Shifting Gears
Shift While Pedaling: Always pedal lightly when changing gears. Shifting with no pedaling pressure can cause the chain to skip or fall off.
Avoid Cross-Chaining: This occurs when you use the largest chainring in the front and the largest cog in the rear, or the smallest chainring in the front and the smallest cog in the rear. Cross-chaining puts the chain at an extreme angle, leading to increased wear and inefficient power transfer. Aim for a straighter chain line whenever possible.
Anticipate Hills: Shift to an easier gear before you start a steep climb, not when you’re already struggling.
Downshift for Stops: Shift to an easier gear before coming to a complete stop so you can get moving again easily.
Riding with Disc Brakes
Understand Braking Zones: Disc brakes can be very powerful. Practice braking in a safe, open area to get a feel for how much pressure is needed.
Brake Early and Smoothly: Especially on descents or in traffic, brake earlier and more smoothly to maintain control and avoid abrupt stops.
Be Mindful of Heat: After prolonged or heavy braking (like long descents), rotors and calipers can get very hot. Avoid touching them.
Comparing Disc Brakes and Rim Brakes
| Feature | Disc Brakes | Rim Brakes |
| :—————- | :——————————————– | :—————————————- |
| Stopping Power| Excellent, especially hydraulic | Good in dry conditions, fair in wet |
| All-Weather | Superior performance when wet or muddy | Performance significantly reduced when wet |
| Modulation | Excellent, especially hydraulic | Fair to good |
| Maintenance | Can be more complex (bleeding hydraulic) | Generally simpler |
| Cost | Typically more expensive | Generally less expensive |
| Wheel Wear | No impact on rim wear | Wears down the wheel rim over time |
| Weight | Slightly heavier systems | Lighter systems |
| Road Conditions| Ideal for all conditions, especially wet/muddy | Best for dry, clean conditions |
Pro Tip:
When cleaning your bike, always use specific bike cleaning products. Avoid using household cleaners or solvents that could damage paint or components, especially around your disc brake rotors and pads.
Choosing the Right Gears and Brakes for Your Needs
When selecting a gear cycle with disc brakes, consider these factors:
Types of Riding and Terrain
Commuting/City Riding: Mechanical disc brakes are a good, low-maintenance option. A wider range of gears (e.g., 2x or 3x drivetrains) can be helpful for varied urban commutes.
Road Cycling: Hydraulic disc brakes are popular for their power and modulation, allowing for confident braking in all conditions. Compact gearing (smaller chainrings) is common to aid in climbing.
Mountain Biking: Hydraulic disc brakes are essential for their stopping power and control on demanding trails. Robust gearing (often 1x drivetrains) is designed for steep climbs and technical descents.
* Gravel/Touring: A balance of durability, wide gear range, and all-weather braking is key, often leading to hydraulic disc brakes and versatile gearing.
Budget Considerations
Disc brake systems, particularly hydraulic ones, will generally increase the overall cost of a bicycle compared to one with rim brakes. However, the enhanced performance and safety benefits can be well worth the investment, especially for serious riders or those who ride in challenging conditions.
The Future of Bicycle Braking Technology
As bicycle technology continues to advance, we’re seeing ongoing refinements in disc brake systems. Manufacturers are constantly working on lighter, more powerful, and more durable rotors and calipers. The trend towards electronic shifting also integrates seamlessly with modern disc brake systems, offering even more precise and convenient gear changes. The development of more eco-friendly brake fluids is also on the horizon, aligning with a broader industry focus on sustainability. For the most up-to-date research on bicycle safety standards, you can refer to resources from organizations like the Consumer Product Safety Commission (CPSC).
Frequently Asked Questions (FAQ)
Q1: Are disc brakes really better than rim brakes?
For most riders, especially those who ride in varied weather conditions, on varied terrain, or who prioritize stopping power and control, disc brakes are generally considered better. Rim brakes are simpler and lighter but their performance is significantly compromised in wet or dirty conditions.
Q2: How often do I need to replace disc brake pads?
This depends on your riding habits, the terrain you ride on, and the type of pads. On average, organic (resin) pads might last 3,000-5,000 miles, while metallic (sintered) pads could last 6,000-10,000 miles or more. Always check for wear indicators or visible pad thickness.
Q3: Can I convert my bike from rim brakes to disc brakes?
This is generally not possible or practical. For a bike to be compatible with disc brakes, the frame and fork must have specific mounting points for the calipers, and the wheel hubs must be designed to accept rotors. Most bikes designed for rim brakes lack these features.
Q4: What is “brake fade” on disc brakes?
Brake fade is a temporary loss of braking power, usually caused by overheating. This can happen during long, steep descents where continuous braking generates a lot of heat. Using larger rotors and performance pads can help mitigate fade.
Q5: How do I clean my disc brake rotors?
Use a clean cloth with isopropyl alcohol (rubbing alcohol) or a dedicated disc brake cleaner. Ensure no oil or grease gets onto the rotor surface, as this will severely impact braking performance.
Q6: What’s the difference between mechanical and hydraulic disc brakes?
Mechanical disc brakes use a cable to actuate the brake pads, similar to rim brakes. Hydraulic disc brakes use fluid in a sealed system, offering more power, better modulation, and less hand effort.
Conclusion
A gear cycle with disc brakes represents a significant advancement in bicycle technology, offering riders enhanced safety, control, and performance across a wide range of conditions. By understanding how these systems work, performing regular maintenance, and knowing how to troubleshoot common issues, you can ensure your bicycle remains a reliable and enjoyable companion on all your journeys. Whether you’re tackling challenging mountain trails or simply commuting to work, a well-maintained gear cycle with disc brakes will provide you with the confidence to ride further and faster, knowing you have superior stopping power at your fingertips. Happy cycling!

