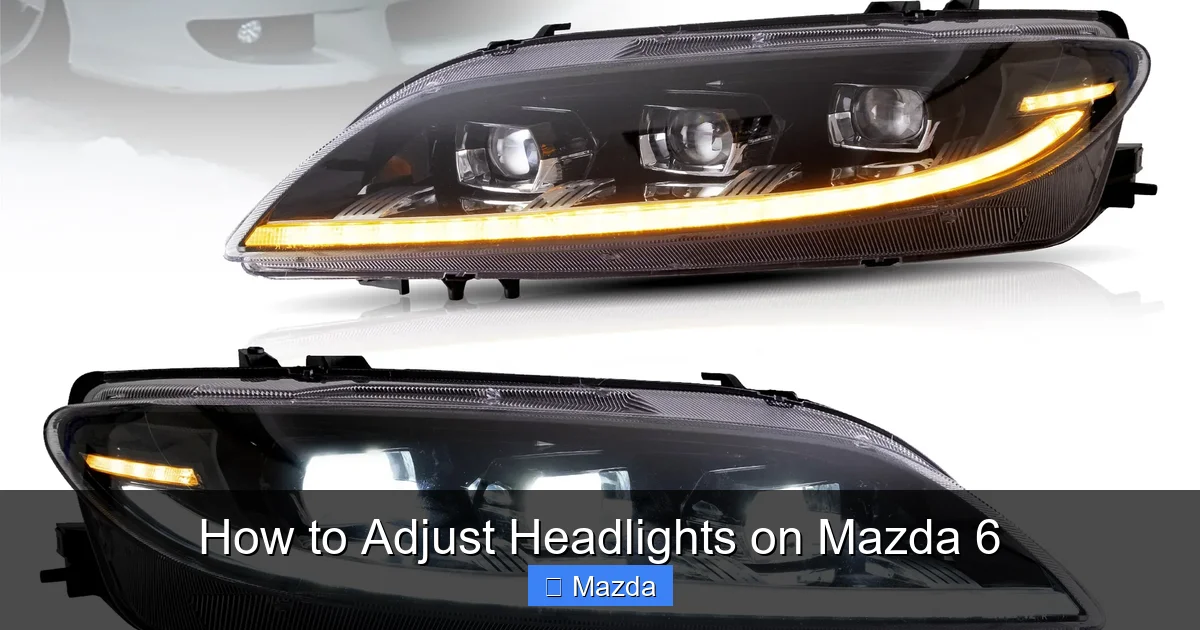
How to Adjust Headlights on Mazda 6
Contents
- 1 Key Takeaways
- 2 📑 Table of Contents
- 3 Why Proper Headlight Aim Matters on Your Mazda 6
- 4 Understanding Your Mazda 6 Headlight System (2023-2026)
- 5 Essential Tools and Preparation for the Job
- 6 Step-by-Step: Adjusting Your Mazda 6 Headlights
- 7 Common Issues, Troubleshooting, and When to Call a Pro
- 8 Integrating Headlight Checks into Your Mazda 6 Maintenance Routine
- 9 Conclusion: See the Road, Be Seen, Drive Safely
- 10 Frequently Asked Questions
Proper headlight alignment on your Mazda 6 is crucial for safe nighttime driving and legal compliance. Misaimed beams can blind other drivers or leave you with poor visibility. This guide provides a detailed, step-by-step process to adjust them yourself using common tools. Following these instructions ensures your lights are correctly aimed, saving you a trip to the mechanic and enhancing road safety for everyone.
Key Takeaways
- Safety First: Always adjust headlights on a level surface with properly inflated tires and a normal vehicle load for accurate results.
- Correct Tools: You typically only need a flathead screwdriver and a dark, flat wall or garage door. No special equipment is required.
- Two-Axis Adjustment: Mazda 6 headlights have separate screws for vertical (up/down) and horizontal (left/right) aiming. Adjust one at a time.
- Wall Method is Key: The standard method involves measuring and marking on a wall 25 feet away to create a reference line for the beam pattern.
- Test After Adjustment: Always verify your work by driving on a dark road to ensure the beams illuminate the road properly without glare.
- Bulb Change Requires Re-check: Whenever you replace a headlight bulb, you must re-check and likely readjust the aim, as new bulbs can shift slightly.
- Know When to Seek Help: If adjustments don’t hold or the headlight assembly is damaged, consult a professional for repair or recalibration.
📑 Table of Contents
- Why Proper Headlight Aim Matters on Your Mazda 6
- Understanding Your Mazda 6 Headlight System (2023-2026)
- Essential Tools and Preparation for the Job
- Step-by-Step: Adjusting Your Mazda 6 Headlights
- Common Issues, Troubleshooting, and When to Call a Pro
- Integrating Headlight Checks into Your Mazda 6 Maintenance Routine
- Conclusion: See the Road, Be Seen, Drive Safely
Why Proper Headlight Aim Matters on Your Mazda 6
Driving your Mazda 6 at night should be a confident, safe experience. A key part of that is having your headlights aimed perfectly. When your headlights are correctly adjusted, they light up the road exactly where you need to see, without dazzling oncoming drivers. It’s a simple thing that has a huge impact on safety and legality. For the 2023 through 2026 Mazda 6 models, the adjustment process is straightforward, but understanding why it’s important makes you more motivated to do it right.
Misaligned headlights are a common issue. They can happen after a minor accident, a bump in the road, or even just from regular wear and vibration over time. The most frequent cause, however, is replacing a headlight bulb. When you pop a new bulb in, it might not seat in the exact same position as the old one. This tiny shift can send your beam pattern wildly off-target. You might not even notice it sitting in the driver’s seat, but the effect on the road is dramatic—your high beams might point at the sky, or your low beams might shine directly into the eyes of other motorists.
Beyond being a serious safety hazard, improper headlight aim is illegal in all 50 states. Police officers can issue a fix-it ticket if they see your beams are too high or uneven. Furthermore, correct alignment maximizes the usable light output of your bulbs. Modern Mazda 6 headlights, especially on higher trims with LED or HID technology, are designed to project a very specific, sharp cutoff line. If that line is tilted up, you waste light illuminating the sky instead of the road. If it’s tilted down, you only see the first 30 feet in front of your car. Taking 20 minutes to check and adjust them is one of the easiest and most effective maintenance tasks you can perform.
The Real-World Consequences of Bad Aim
Let’s talk about what actually happens when your headlights are wrong. If the beams are aimed too high, they can blind oncoming drivers. That bright flash in someone’s rearview mirror isn’t just annoying; it causes temporary night blindness for the other driver, creating a dangerous situation for everyone. You might also get flashed by other drivers who think you’re the one with high beams on. Conversely, if the aim is too low, you’re essentially driving with your lights half-off. You won’t see pedestrians, animals, road signs, or curve warnings until they’re right in front of you. This drastically reduces your reaction time. Uneven aim, where one light points higher than the other, creates an unbalanced field of vision and can be just as disorienting as a single misaligned beam. For a sedan like the Mazda 6, which is often used for commuting and family trips, having reliable, well-aimed illumination is non-negotiable.
Understanding Your Mazda 6 Headlight System (2023-2026)
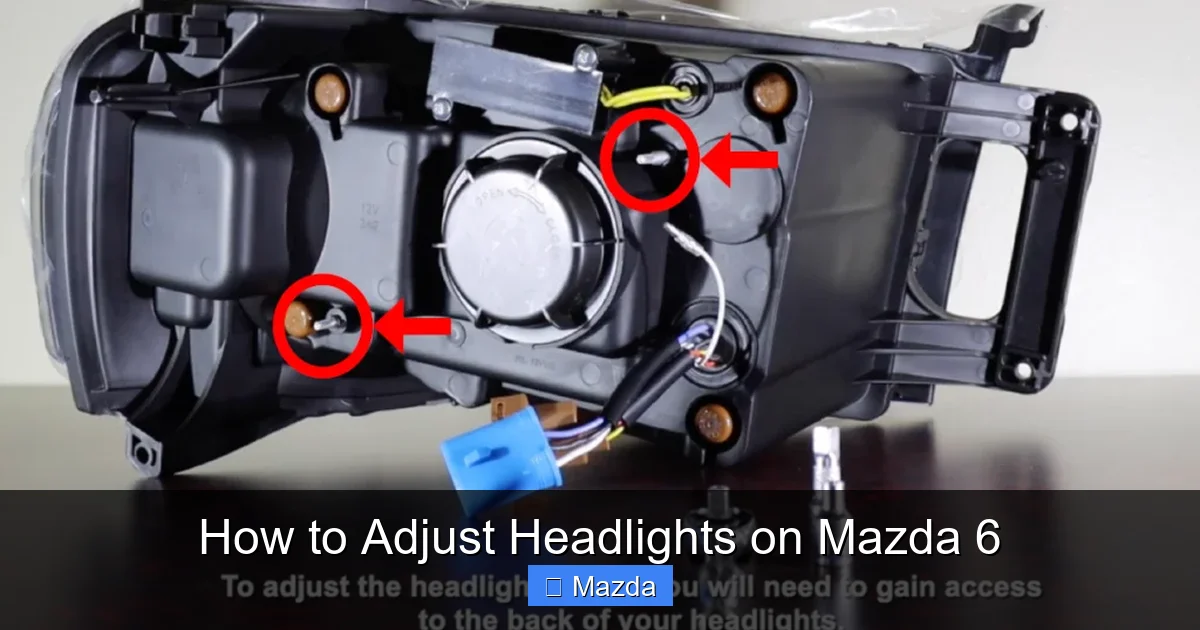
Before you touch a screw, it helps to know what you’re looking at. The Mazda 6 has undergone subtle updates through its model years, but the fundamental headlight adjustment mechanism has remained consistent for the last few generations. Whether you have a 2023 Sport model with halogen bulbs or a 2026 Premium with standard LED projectors, the adjustment points are in the same general location. The system consists of the headlight assembly bolted to the front fender and radiator support, and behind the plastic trim, you’ll find two small adjustment screws or knobs.
Visual guide about How to Adjust Headlights on Mazda 6
Image source: d3vl3jxeh4ou3u.cloudfront.net
These adjusters are typically accessible from the engine compartment, behind the headlight housing. One screw controls the vertical aim (tilting the beam up and down). The other controls the horizontal aim (pivoting the beam left and right). They are often different colors or shapes to help you distinguish them—for example, a silver Phillips-head screw for vertical and a black Torx for horizontal. On some newer trims with complex LED arrays, the entire module might pivot, but the principle is identical. It’s important to note that Mazda 6 models equipped with Adaptive Front-lighting System (AFS), which swivels the headlights around corners, will have a separate electronic calibration process. This manual adjustment guide is for the static base aim. If your AFS light is on, you may need a professional scan tool after physical adjustment.
Familiarizing yourself with your specific engine bay layout is the first step. Pop the hood and locate the back of each headlight assembly. You’ll likely see a large rubber boot covering the electrical connector—carefully unplug that if you need more room to work, but it’s usually not necessary. The adjustment screws are typically near the top or outer corner of the assembly, sometimes under a small plastic cover that pried off with a trim tool. Take a moment to turn each screw by hand to feel which direction moves the beam. This “feel test” with the lights on (pointed at a safe surface) can be very informative before you start the precise alignment process.
Halogen vs. LED/HID: Does It Change the Process?
The good news is that the physical adjustment process is virtually identical whether you have traditional halogen bulbs or advanced LED/HID projectors. The screws do the same job: they pivot the entire lighting unit. However, the reference point for your beam pattern differs slightly. Halogen reflectors produce a broader, less defined beam pattern with a gradual hot spot. LED and HID projectors create a very sharp, clean cutoff line with a distinct bright rectangle or trapezoid shape on the wall. When you’re checking your aim against the wall line, you’re looking for the position of that sharp cutoff for projectors, and the top of the main beam for halogens. The goal for both is to have that cutoff line hit the specified marks on your reference tape. So, your steps remain the same; just your visual reference on the wall might look a little different.
Essential Tools and Preparation for the Job
Adjusting your headlights is a minimalist’s delight. You don’t need a lift, specialty tools, or a mechanic’s license. The entire process can be done with items you likely already have around the house. However, having the right tools and a proper setup is what separates a frustrating guess-and-check session from a precise, one-time adjustment. Rushing into this without preparation often leads to over-correction and wasted time.
Visual guide about How to Adjust Headlights on Mazda 6
Image source: cdn.shopify.com
The absolute essentials are: a flathead screwdriver (or the specific size socket/bit if your adjusters require it—inspect them first), a dark, flat, vertical surface (a garage door, a plain wall, or a large piece of cardboard), a tape measure, and some masking or painter’s tape. You’ll also need a way to mark on that wall. A pencil or a small piece of tape works. If your driveway or street is flat and you have a dark stretch of road, you can use that for the final test, but a controlled wall environment is mandatory for the initial alignment. It’s also a good idea to have a friend or family member to help operate the lights and give you a second pair of eyes from inside the car.
Preparation goes beyond gathering tools. You must prepare the vehicle itself. The headlight aim is calibrated for the car being on a level surface with a normal load. If you have a heavily loaded trunk or the car is parked on a significant hill, your adjustments will be wrong as soon as you drive on flat ground with an empty car. Therefore, find the flattest piece of pavement you can. Inflate all tires to the manufacturer’s recommended PSI (found on the driver’s door jamb sticker). Remove any unnecessary heavy items from the trunk. Close all doors and the hood firmly. Finally, ensure your headlight switch is in the “ON” position with the low beams activated—never adjust with high beams, as the pattern is different and the process won’t translate.
Setting Up Your “Alignment Wall”
The wall method is the industry standard for DIY headlight aiming because it’s repeatable and accurate. You need to create a reference line on the wall that matches your Mazda 6’s specified headlight height and spacing. Here’s how to set it up perfectly:
- Find the Right Spot: Park your Mazda 6 on level ground, exactly 25 feet (7.6 meters) away from a flat, vertical wall. Measure this distance from the front bumper to the wall. This distance is critical—it’s the standard used in most factory service manuals.
- Measure Your Car’s Headlight Height: Measure from the center of your low beam headlight bulb (you can estimate this by finding the center of the headlight lens on the front of the car) straight down to the ground. Write this number down. For a typical Mazda 6, this is usually between 24 and 30 inches.
- Transfer the Measurement to the Wall: Take that same height measurement and mark it on the wall. This horizontal line represents the “ground level” your headlights should be aimed at. Use masking tape for a long, straight line.
- Mark the Vehicle Centerline: Now, find the center point of your car. Measure the distance between the outer edges of your two headlight lenses on the front bumper. Divide that number by two. From the center of your car (you can use the driver’s side front wheel as a rough center reference), measure that half-distance inward toward the car’s center and place a vertical piece of tape on the wall. This is your centerline reference. You will later measure from this line to the center of each headlight’s beam pattern on the wall.
- Final Check: With the car parked straight (tires centered), your low beams on, you should see two distinct beam patterns on the wall. The top of the main beam (the brightest part) should be just at or slightly below your horizontal “ground” line. The inner edges of the beams should be roughly aligned with your centerline reference or slightly inward. This is your starting point before fine-tuning with the adjustment screws.
Step-by-Step: Adjusting Your Mazda 6 Headlights
Now for the main event. With your car properly positioned and your wall reference lines marked, you’re ready to make the adjustments. This process is methodical. You will adjust one headlight at a time, and you’ll adjust the vertical aim first, then the horizontal. It’s crucial to only turn the screws in small increments—a quarter-turn at a time—then go back to the wall to check. The adjusters are sensitive. Over-rotating them can cause the beam pattern to jump and become frustrating to re-center.
Visual guide about How to Adjust Headlights on Mazda 6
Image source: aws.alpharexusa.com
Begin with the driver’s side (left side in the US) headlight. The passenger side will have a slightly different aim—its beam is typically aimed a little more inward to avoid dazzling oncoming drivers, a concept called “headlight aim bias.” Your wall markings will account for this. Have your helper sit in the driver’s seat with the keys, ready to turn the lights on and off. You will be standing at the wall, observing the beam pattern, and then going back to the car to make adjustments. Communication is key. A two-way radio or cell phone can help if your wall is far away, but shouting usually works fine in a quiet neighborhood.
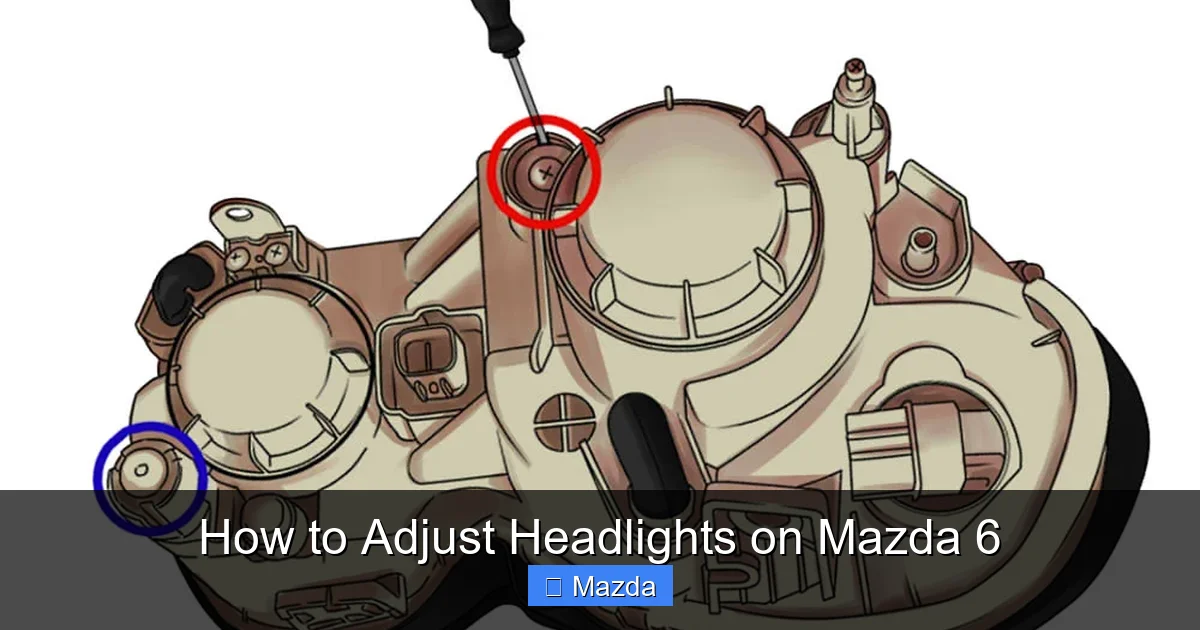
Locating the Adjustment Screws
With the hood open, look at the back of the headlight assembly. You are searching for two small screws or knobs. One is for vertical (up/down) adjustment. It is usually located at the top or top-center of the housing. The other is for horizontal (left/right) adjustment and is typically on the outer side (the side closest to the fender or grille). They may have plastic caps. Use your flathead screwdriver to gently pry off any caps. Identify which is which before you start. A quick test: turn the suspected vertical screw clockwise and look at the beam on the wall. If the beam moves up, you’ve found it. If it moves sideways, that’s the horizontal screw. Note the direction of movement for each screw. This knowledge saves countless trips back and forth. On some Mazda 6 models, the adjusters are Torx screws (star-shaped), so you might need a Torx bit instead of a flathead.
Performing the Vertical Adjustment
The vertical aim is the most critical for safety. The goal is to get the top of the low beam cutoff line to hit your pre-measured “ground level” line on the wall. Here is the precise procedure:
- Turn on the low beams. Ensure no other lights are on. Your helper should have the car in “Park” with the parking brake set.
- Observe the beam pattern. Stand at the wall and look at the driver’s side beam. You’ll see a sharp cutoff line at the top of the illuminated area. There will also be a bright hotspot in the upper part of the beam. The reference is the top of this sharp cutoff line.
- Compare to your tape line. Is the cutoff line above, below, or right on your horizontal reference tape?
- Make an adjustment. If the beam is too high (cutoff line above the tape), you need to lower it. Locate the vertical adjustment screw on the driver’s side headlight. Turn it in the direction that lowers the beam (you determined this in your earlier test—often clockwise lowers it, but verify). Turn it only 1/4 to 1/2 a turn.
- Re-check on the wall. Have your helper turn the lights back on. Go back to the wall and see the new position. Repeat steps 3-5 until the top of the cutoff line is exactly on your reference line, or just a half-inch below it. For most specifications, the top of the beam should be no more than 2 inches above the horizontal centerline of the headlight itself when measured at 25 feet. Your wall line method achieves this.
Important Note for the Passenger Side: Once the driver’s side is perfect, move to the passenger side. Its vertical aim should be set to the same height as the driver’s side. However, its horizontal aim will be different. The passenger beam’s cutoff line should be aimed slightly more to the right (inward toward the center of the road) to avoid glare for oncoming traffic. Your wall’s centerline reference will help with this.
Performing the Horizontal Adjustment
With vertical aim set for both sides, it’s time to fine-tune the horizontal spread. The goal is to have the beams centered on the road, with the passenger side’s beam aimed slightly more inward than the driver’s side. This creates a “V” pattern that illuminates the right shoulder and curb without blinding drivers.
- Use your centerline reference. Look at the beam pattern on the wall. Find the point where the sharp cutoff line meets the inner edge of the beam. This is the “toe” of the beam.
- Aim the driver’s side. The driver’s side (left) beam’s inner cutoff should be just to the right of your car’s centerline reference tape on the wall. It should be centered on the lane, not pointing straight ahead like a laser. A slight inward angle is correct and standard. Use the horizontal adjuster to move it until the inner edge is aligned with or just to the right of the centerline mark.
- Aim the passenger side. The passenger’s side beam’s inner cutoff should be aimed further to the right (more inward) than the driver’s side. It should be clearly to the right of the centerline reference, illuminating the right side of the road and curb. There is no specific number of inches, but the passenger beam’s cutoff should be visibly more “toed-in” than the driver’s beam. This is normal and correct.
- Check for symmetry. Step back and look at both beams together. They should form a gentle “V” shape, with the point of the V aimed down the center of your lane. There should be no dark patches in the middle of your field of view, and the beams should not cross over each other aggressively.
After making horizontal adjustments, it’s good practice to quickly re-check the vertical aim on both sides, as moving the headlight horizontally can sometimes cause a very slight vertical shift. A final 1/4-turn tweak might be needed.
The Final Road Test
Your wall alignment is done, but the real test is on the road. Before you declare victory, you must drive your Mazda 6 on a dark, empty road or rural highway. This verifies that the static wall aim translates to dynamic, real-world lighting.
- Find a long, straight, unlit stretch of road.
- Turn on your low beams and drive at a moderate speed (around 40-50 mph).
- Observe the beam pattern on the road. The light should be distributed evenly, with a sharp cutoff at the top that doesn’t wash out your view of distant signs. The right side should illuminate the shoulder and any reflective markers.
- Pay special attention to the behavior of the beams on curves. They should stay planted on the road, not swing excessively.
- Also, test your high beams. They should come on as a separate, much taller and wider pattern. They don’t need the same precise aim as low beams but should not be wildly off.
- Most importantly, if another car approaches from the opposite direction, your low beams should not cause them to flash their lights at you. If they do, your beams are likely still too high or not toed-in enough on the passenger side. Return to the wall and lower the vertical aim slightly or adjust the passenger horizontal aim more inward.
Common Issues, Troubleshooting, and When to Call a Pro
You followed all the steps, but something still feels off. Or maybe your adjustments don’t seem to hold. Don’t panic; there are common pitfalls and solutions. First, understand that the adjustment screws are not meant for major corrections. If your headlight assembly is physically damaged, bent from a collision, or the screws are stripped, no amount of turning will fix it. The housing itself must be straight. If the beam pattern looks twisted or one corner is significantly higher than the other regardless of screw position, the assembly is likely misaligned on its mounting points and needs professional straightening or replacement.
Another frequent issue is a “wandering” aim. If you adjust the screws, the beam looks perfect on the wall, but after a week of driving, it’s off again. This usually means the adjustment screw clamp is worn or the headlight retaining bolts are loose. The vibration of the road slowly rotates the assembly back to its misaligned position. The fix is to tighten all mounting bolts to specification (consult your owner’s manual or a service manual for torque specs) and possibly use a thread-locking compound on the adjuster screws. This is a more involved repair best handled with the car on a level surface and possibly with the front end slightly raised for access.
For Mazda 6 models with LED or HID headlights, a new problem can arise: a warning light on the dash. The Mazda 6’s computer monitors headlight leveling. If it detects the headlights are physically adjusted far outside a certain range, it may illuminate a “Headlight System Malfunction” or “Check AFS” light. After you make your manual adjustments, this light should go out after a few drive cycles. If it persists, the system may need a electronic recalibration using a professional scan tool to reset the headlight position sensors. This is not something the average DIYer can do at home. Similarly, if your adaptive swiveling headlights (AFS) are not working correctly after a bulb change or impact, it requires both mechanical aim and electronic calibration.
Signs You Might Need Professional Help
While headlight adjustment is a perfect DIY task, there are clear boundaries. Seek a professional technician if:
- You see physical damage to the headlight housing or the mounting points on the fender.
- The adjustment screws are stripped, broken, or missing.
- A dashboard warning light related to the headlights or AFS system remains on after you’ve completed the physical adjustment and driven the car.
- You are uncomfortable working under the hood or lack a safe, dark place to perform the wall test.
- The beam pattern is extremely erratic, with multiple hot spots or a “swirl” pattern, which indicates an internal reflector or lens issue, not an aim issue.
For most minor aim corrections after a bulb change, you are fully capable. But knowing your limits is part of being a responsible car owner. A professional alignment at a dealership or reputable shop typically costs between $50 and $100 and takes 30 minutes. They use a specialized headlight aiming machine that is even more precise than the wall method and can also perform the necessary electronic calibrations for advanced systems.
Integrating Headlight Checks into Your Mazda 6 Maintenance Routine
Think of headlight adjustment not as a one-time fix, but as a regular check-up item. Just as you periodically check your tire pressure or engine oil, your headlight aim should be verified at least once a year, or anytime you experience a significant jolt (like hitting a deep pothole or curb). It’s also a mandatory check after any headlight bulb replacement. Making this part of your seasonal maintenance routine ensures you never drive with compromised visibility.
When you’re already under the hood doing other tasks, take an extra five minutes to glance at your headlight assemblies. Are they clean? Dirt and grime on the lens can scatter light and reduce effectiveness, mimicking the symptoms of poor aim. A simple cleaning with automotive plastic cleaner and a microfiber cloth can restore clarity. Also, while you’re there, check the condition of the wiring harness and connectors. Look for corrosion or fraying. A poor electrical connection can cause a headlight to be dim, which might be mistaken for an aim problem.
This holistic approach to lighting maintenance connects to other simple DIY checks. For instance, while ensuring your Mazda 6’s lights are aimed correctly, you might also want to verify that all other exterior lights—turn signals, brake lights, and reverse lights—are functioning. A burned-out bulb is a hazard. If you’re comfortable with basic electrical checks, you can test these easily. If you find a bulb is out, replacing it is often similar in process to replacing a headlight bulb, though access might be from inside the trunk or behind a panel. Resources like our guide on how to check tire pressure on a Honda Civic share the same philosophy of proactive, simple maintenance that keeps your car safe and reliable. The principles of checking a system’s status and performing a basic adjustment are universal across vehicle maintenance.
Conclusion: See the Road, Be Seen, Drive Safely
Adjusting the headlights on your Mazda 6 is one of the most impactful yet overlooked DIY maintenance tasks you can perform. It directly correlates to your safety, the safety of others, and your legal standing as a driver. With the methodical wall-reference technique, a flathead screwdriver, and a little patience, you can achieve professional-grade alignment in your own driveway. Remember the core principles: prepare the car and the workspace perfectly, adjust one axis at a time in small increments, and always verify with a real-world road test.
The 2023-2026 Mazda 6 is a fantastic car for commuting and cruising, and its lighting system is designed to be serviceable. Don’t let a simple misalignment rob you of the confidence you should feel when driving at night. Take control of this aspect of your vehicle’s upkeep. Bookmark this guide, gather your tools on a weekend, and give your headlights the attention they deserve. A few minutes of work translates to countless miles of safer, clearer nighttime driving. You’ll not only see the road better, but you’ll also contribute to a safer driving environment for everyone sharing it with you. Now, pop that hood, find those adjustment screws, and get those beams perfectly aligned.
Frequently Asked Questions
What tools do I absolutely need to adjust my Mazda 6 headlights?
You only need a few common items: a flathead screwdriver (or the correct size Torx/Phillips bit if your adjusters require it), a measuring tape, masking tape, and a dark, flat vertical wall or garage door. A helper to operate the lights from inside the car is also highly recommended but not strictly mandatory.
How long does the entire adjustment process take?
For someone doing it for the first time, allow about 45 minutes to an hour. This includes setup, measuring for the wall reference, making adjustments, and the final road test. Once you’re familiar with the location of the screws and the process, you can likely complete it in 20-30 minutes.
Is it safe to adjust my headlights myself, or could I damage something?
It is completely safe and designed for DIY. The adjustment screws are meant to be turned. The only risk is over-tightening or forcing a screw that is already at its limit, which could strip the head. Always turn them gently and feel for resistance. Do not use excessive force. You cannot damage the headlight by adjusting it incorrectly; you can only make the aim worse, which you can then correct.
How often should I check my Mazda 6’s headlight aim?
You should check and adjust your headlight aim at least once a year as part of routine maintenance. You must also check it immediately after replacing any headlight bulb, as the new bulb can shift the aim. Additionally, if you experience a significant impact (hitting a curb or pothole) or notice a change in your nighttime visibility, you should re-check it.
What are the most obvious signs that my headlights are misaligned?
The primary signs are: other drivers flashing their high beams at you (your beams are too high), you can’t see more than 50 feet ahead on a dark road (your beams are too low), or one headlight appears significantly brighter or pointed in a different direction than the other. You might also notice your high beams seem ineffective or that you’re constantly compensating by looking to the side of the road.
How much does professional headlight adjustment cost if I don’t want to DIY?
At a dealership or independent repair shop, a basic headlight aim adjustment typically costs between $50 and $100. This is a quick service (30-45 minutes). If your vehicle has advanced adaptive systems that require electronic calibration after the mechanical adjustment, the cost may be higher, potentially $100-$150. It’s often bundled with other basic services.