
How to Reset Maintenance Light on 2006 Toyota Corolla
Contents
- 1 Key Takeaways
- 2 📑 Table of Contents
- 3 Understanding Your 2006 Toyota Corolla’s Maintenance Light
- 4 The Step-by-Step Manual Reset Method (The Key & Button Technique)
- 5 Alternative Method: Using an OBD2 Scan Tool
- 6 When and Why You Should Actually Reset the Light
- 7 Troubleshooting: What to Do If the Light Won’t Reset
- 8 Beyond the Reset: Comprehensive 2006 Corolla Maintenance
- 9 Conclusion: A Simple Task for a Trusted Companion
- 10 Frequently Asked Questions
The maintenance required light on your 2006 Toyota Corolla is a simple oil change reminder, not a故障 warning. You can reset it yourself in under 30 seconds using just your ignition key and trip meter button, no tools needed. This guide provides the exact, model-specific steps to turn off that persistent wrench icon after you’ve performed the necessary service.
Key Takeaways
- The light is a maintenance reminder: The “MAINT REQD” light on a 2006 Corolla is an oil change timer based on mileage and engine conditions, not an indication of a current problem.
- Reset only after service: Always perform the required oil and filter change, and address any other scheduled maintenance, before resetting the light to avoid engine damage.
- Two primary methods exist: You can reset it manually via the odometer/trip meter button (the most common method) or use an OBD2 scan tool that has a maintenance reset function.
- No special tools for manual reset: The key-only method requires no tools, making it accessible for any owner. The OBD2 method is useful if the manual procedure fails.
- The process is universal for this generation: The steps are identical for all 2006 Toyota Corolla trims (CE, S, LE) with the standard instrument cluster.
- If it won’t reset, investigate: A light that immediately returns after a reset or won’t reset at all may indicate a deeper electrical issue or a faulty odometer switch assembly.
- Resetting clears the interval: The reset tells the car’s computer to start the countdown (typically 5,000 miles) for the next maintenance reminder.
📑 Table of Contents
- Understanding Your 2006 Toyota Corolla’s Maintenance Light
- The Step-by-Step Manual Reset Method (The Key & Button Technique)
- Alternative Method: Using an OBD2 Scan Tool
- When and Why You Should Actually Reset the Light
- Troubleshooting: What to Do If the Light Won’t Reset
- Beyond the Reset: Comprehensive 2006 Corolla Maintenance
- Conclusion: A Simple Task for a Trusted Companion
Understanding Your 2006 Toyota Corolla’s Maintenance Light
That little wrench icon illuminated on your dashboard isn’t trying to annoy you—it’s your 2006 Toyota Corolla’s way of being a responsible partner. Unlike a check engine light, which signals a fault, the “MAINT REQD” light is a straightforward, mileage-based service reminder. It’s programmed to illuminate after a predetermined interval, usually around 5,000 miles, to notify you that it’s time for an oil change and other scheduled maintenance items. It’s a helpful nudge from your car’s computer, the Engine Control Unit (ECU), which tracks your driving conditions and mileage to calculate when service is due.
Many owners mistakenly panic when they see this light, thinking it indicates a serious mechanical issue. This is not the case. It is a purely informational reminder. However, ignoring it is not advisable. Regular oil changes are the single most important maintenance task for prolonging your Corolla’s legendary reliability. The light’s purpose is to help you stay on top of this critical service. Once you’ve completed the oil change and any other checklist items (like tire rotation or air filter inspection), you must manually reset the light to restart the service interval timer. This article will guide you through that simple reset process.
The Step-by-Step Manual Reset Method (The Key & Button Technique)
This is the standard, factory-prescribed method for resetting the maintenance required light on a 2006 Toyota Corolla. It requires no tools, no scan tools, and takes less than 30 seconds. The entire procedure is performed using your ignition key and the trip meter/odometer reset button on your instrument cluster. It’s designed to be owner-friendly. Before you begin, ensure your car is parked safely, the parking brake is set, and the engine is off.
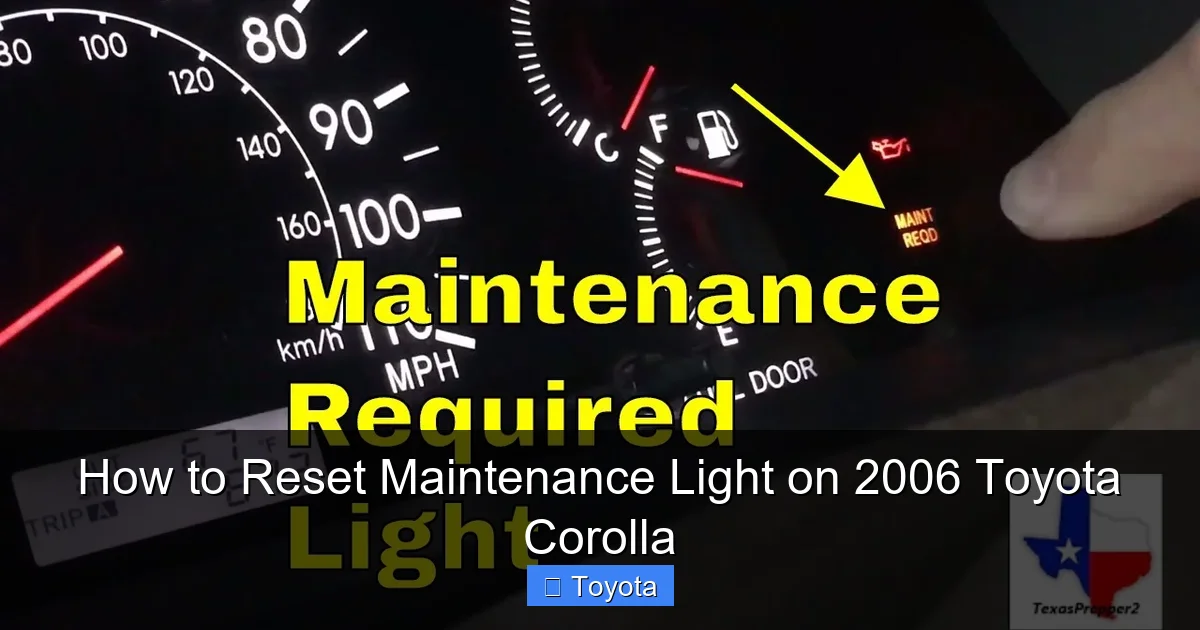
Visual guide about How to Reset Maintenance Light on 2006 Toyota Corolla
Image source: i.ytimg.com
Detailed, Sequential Instructions
Follow these steps precisely. The sequence and timing are important for the car’s computer to recognize the reset command.
- Turn the ignition to the “OFF” position. Remove the key from the ignition if it is inserted.
- Press and hold the trip meter/odometer reset button. This is the small button, often labeled “ODO/TRIP,” located on your dashboard near the speedometer and fuel gauge. You will need to press and hold it down continuously.
- While holding the button, turn the ignition key to the “ON” position. Do not start the engine. Turn the key to the position where your dashboard lights come on (the “run” or “ignition on” position). You should see the “MAINT REQD” light still illuminated.
- Continue holding the reset button. After about 5-10 seconds, you should see the maintenance light begin to blink. It may blink a few times or go out completely. The odometer display may also show a series of zeros or dashes.
- Release the reset button. Once the light has blinked or gone out, you can release the button.
- Turn the ignition “OFF” and then back “ON.” To confirm the reset was successful, turn the key to the OFF position, wait a second, and then turn it back to the ON position. The maintenance required light should be off. If it is still on, repeat the process, ensuring you hold the button long enough in step 4.
Pro Tip: If your Corolla has a multi-function display that shows trip A, trip B, and odometer, make sure it is on the odometer (total mileage) display before you start the process. Some models require the display to be on the odometer reading for the reset to be recognized. If the light returns after a few drive cycles, the procedure may not have been completed correctly, or there could be an underlying electrical issue with the button itself.
Alternative Method: Using an OBD2 Scan Tool
While the manual key-and-button method is free and effective, some owners prefer or require an alternative. This is where an OBD2 (On-Board Diagnostics) scan tool comes in. Not all basic code readers have the capability to reset maintenance lights; they are primarily for reading and clearing diagnostic trouble codes (DTCs). You need a scan tool that specifically includes a “Maintenance Reset” or “Service Light Reset” function for Toyota vehicles. Many mid-range and professional-grade tools, as well as some advanced Bluetooth adapters paired with smartphone apps, offer this feature.
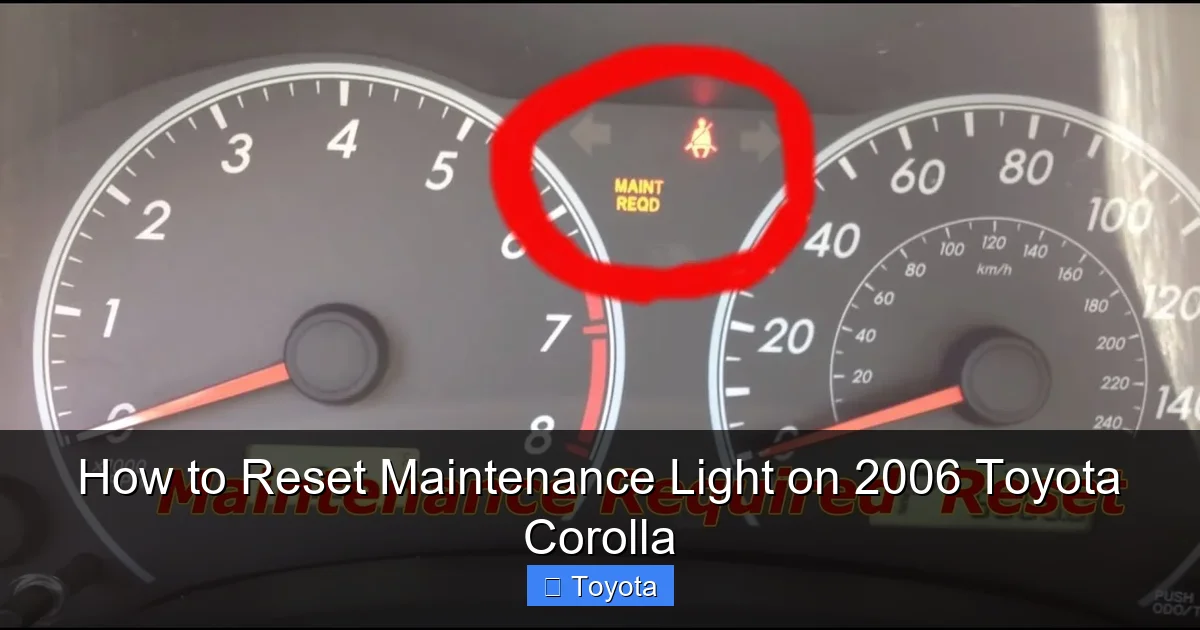
Visual guide about How to Reset Maintenance Light on 2006 Toyota Corolla
Image source: i.ytimg.com
How to Perform the OBD2 Reset
If you have the appropriate tool, the process is straightforward.
- Locate the OBD2 port. This is a standardized 16-pin connector, usually found under the dashboard, just to the left of the steering column, or near the center console. It may have a plastic cover.
- Connect your scan tool. Plug the OBD2 connector into your car’s port. Ensure the tool is powered on (some draw power from the car’s OBD2 port).
- Turn the ignition to the “ON” position. Do not start the engine.
- Navigate the tool’s menu. On your scan tool, use the menu to select the “Maintenance Reset,” “Service Light Reset,” or “Oil Light Reset” option. You may need to select your vehicle make (Toyota) and model (Corolla) and year (2006) first.
- Follow the on-screen prompts. The tool will guide you. It may ask you to confirm that the required service (e.g., “Oil & Filter”) has been performed. Confirm and execute the reset.
- Verify the reset. The tool should display a “Reset Successful” or similar message. You can then disconnect the tool and check your dashboard. The light should be extinguished.
Important Note: If your basic code reader doesn’t have this function, it cannot reset the light. You would need to purchase a more advanced tool or fall back to the manual method. This method is particularly useful if the physical trip meter button on your steering column is broken or unresponsive, which can happen over time due to wear and tear.
When and Why You Should Actually Reset the Light
Resetting the light is the final step in a maintenance cycle, not the first. It is a signal to your car’s computer that the service has been completed. Resetting it before performing the oil change or other work is counterproductive and potentially harmful. Here’s the correct sequence of events.
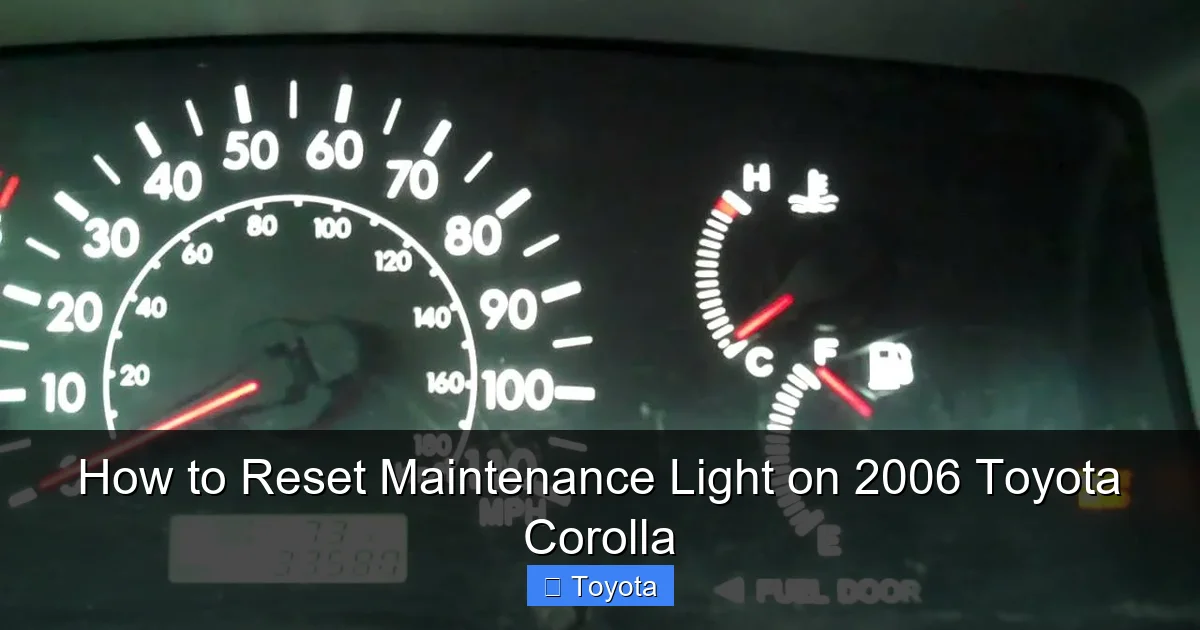
Visual guide about How to Reset Maintenance Light on 2006 Toyota Corolla
Image source: i.ytimg.com
The Responsible Maintenance Cycle
Think of the maintenance light as the starting pistol for your service interval. When it comes on, your action plan should be:
- 1. Acknowledge the Reminder: The light means your Corolla is likely due for an oil and filter change. For a 2006 model, also consult your owner’s manual for the full scheduled maintenance list at that mileage interval (e.g., 30k, 60k, 90k services). These often include inspecting belts, hoses, brakes, tires, and fluids.
- 2. Perform the Service: Take your Corolla to a trusted mechanic or, if you’re a DIYer, perform the oil change yourself. Use the correct oil grade (likely 5W-20 or 5W-30 for a 2006) and a quality filter. Address all other items on the checklist for that service interval.
- 3. Reset the Light: After the new oil is in the pan and the service is complete, use one of the methods described above to reset the maintenance required light. This action tells the car’s internal computer, “The service is done. Start counting miles for the next reminder.”
- 4. Record the Service: Note the date, mileage, and what was done in your personal vehicle log or on the service sticker in your door jamb. This is your permanent record, separate from the car’s temporary reminder system.
By following this cycle, you maintain the integrity of your maintenance schedule and ensure your Corolla’s engine receives the timely lubrication it needs for a long life. The light is a tool for you, not a diagnostic gauge for the car’s health. Its state (on or off) tells you nothing about oil pressure or engine temperature in real-time.
Troubleshooting: What to Do If the Light Won’t Reset
Occasionally, you might follow the manual reset procedure perfectly, but the light remains on or comes back on after a short drive. Don’t panic; there are logical explanations and solutions. First, ensure you performed the steps correctly and that your odometer was displaying the total mileage (not a trip A or B reading) when you started. If the problem persists, consider these possibilities.
Common Issues and Solutions
- Faulty or Worn Reset Button: The physical button on the instrument cluster can fail due to age, dirt, or mechanical wear. If pressing it feels sticky or unresponsive, this is likely the culprit. The OBD2 scan tool method would bypass this faulty switch and is the recommended fix.
- Electrical or ECU Glitch: Sometimes, the car’s computer needs a full reset. After attempting the manual procedure, disconnect the negative battery terminal for about 10 minutes. Reconnect it, and then try the reset procedure again. This clears any residual memory that might be preventing the reset command from being accepted. Warning: Disconnecting the battery may also reset radio presets and clock settings.
- Underlying Electrical Problem: In rarer cases, a persistent light that won’t reset could point to a problem with the instrument cluster itself or a wiring issue to the ECU. If both the manual method and a professional scan tool cannot reset the light, a visit to a mechanic or an auto electrician is warranted to diagnose the source of the power or signal interruption.
- You Have a Different Light: Double-check that you are dealing with the “MAINT REQD” light. A 2006 Corolla also has a separate “Check Engine” light (an engine icon) and an “Oil Pressure” warning light (an oil can icon). The procedures for these lights are entirely different and often indicate a problem that needs diagnosis before clearing. Our guide specifically addresses the maintenance required wrench light. If you’re dealing with a check engine light, the process is more complex and requires addressing the underlying fault first.
Beyond the Reset: Comprehensive 2006 Corolla Maintenance
Resetting the light is a tiny piece of the ownership puzzle for a 2006 Toyota Corolla. This generation is famous for its durability, but that longevity is directly tied to consistent, proper maintenance. The maintenance light is just the tip of the iceberg. When it illuminates, it’s your cue to review the full maintenance schedule for your specific mileage. Your owner’s manual is the ultimate authority, but here is a general overview of what a typical service interval might include for a high-mileage 2006 Corolla.
What to Inspect and Replace at Major Intervals
Beyond the oil change, a complete service should include:
- Tire Rotation and Pressure Check: Rotate tires every 5,000 to 7,000 miles to ensure even wear. Check pressure monthly.
- Air Filter Inspection/Replacement: The engine air filter should be inspected at every oil change and replaced if dirty. A clogged filter reduces fuel economy and performance.
- Cabin Air Filter: Often overlooked, this filter should be replaced every 15,000-30,000 miles to keep your HVAC system clean and your cabin air fresh.
- Fluid Checks: Check and top off coolant, brake fluid, power steering fluid (if applicable), and windshield washer fluid.
- Brake Inspection: Have brake pads, rotors, and calipers inspected for wear. Brakes are a critical safety system.
- Spark Plugs: For a 2006 Corolla with the 1ZZ-FE engine, spark plugs are typically replaced every 120,000 miles, but checking them at major services is good practice.
- Timing Belt/Chain: This is critical. The 2006 Corolla’s 1ZZ-FE engine has a timing chain, not a belt. Timing chains are generally considered “lifetime” parts but should still be inspected for tension and wear during major services. Do not confuse this with models that have timing belts, which require replacement at strict intervals (e.g., every 60k-90k miles) to prevent catastrophic engine failure.
- Drive Belts: Inspect the serpentine belt(s) for cracks, fraying, or glazing. Replace as needed.
Adhering to a comprehensive maintenance schedule, not just resetting the light, is what will allow your 2006 Corolla to comfortably surpass 200,000, 300,000, or even more miles. The reset is simply the final administrative step that confirms the work was done.
Conclusion: A Simple Task for a Trusted Companion
Your 2006 Toyota Corolla has earned its reputation as one of the most reliable and economical cars ever built. Part of that reliability comes from owners who heed its simple service reminders. Resetting the maintenance required light is a quick, empowering task that signifies you’ve completed the essential work to keep your car running smoothly. It’s a small ritual that pays huge dividends in longevity and performance.
Remember the core principle: the light is a timer, not a trouble sensor. Always perform the necessary service first. Then, use the straightforward manual method—turn the key, press the button, watch it blink—to clear the reminder and start the clock anew. If the manual method fails, an OBD2 scan tool with the right function is your backup. By understanding this system and committing to the full maintenance schedule, you’re not just turning off a light; you’re actively participating in the legacy of a car that was built to go the distance. Now, go enjoy that clear dashboard and the peace of mind that comes with a well-maintained vehicle.
Frequently Asked Questions
What does the “MAINT REQD” light mean on a 2006 Toyota Corolla?
It is a maintenance reminder light programmed to illuminate after a set mileage interval (typically 5,000 miles) to notify you that an oil change and other scheduled maintenance are due. It is not a warning of a current mechanical fault.
Can I reset the maintenance light without changing the oil?
Technically yes, using the steps provided, but you should never do this. The light is a reminder that your engine needs fresh oil and filter. Resetting it without performing the service will cause the light to come back on after a short distance and, more importantly, risks engine damage from old, depleted oil.
How often should the maintenance light come on?
For a 2006 Corolla, the light is designed to illuminate approximately every 5,000 miles after the last reset, assuming you follow the standard oil change interval. The car’s computer may adjust this slightly based on driving conditions.
Why did my maintenance light come back on immediately after I reset it?
This usually means the reset procedure was not performed correctly. Common reasons include not holding the trip meter button long enough, not having the odometer display active when starting, or a faulty trip meter button. Re-read the step-by-step instructions carefully or try the OBD2 scan tool method.
Is there a difference between the maintenance light and the check engine light?
Yes, absolutely. The maintenance required light (wrench icon) is a simple service timer. The check engine light (engine icon) indicates the ECU has detected a fault in the engine, emissions, or transmission system that needs diagnosis. They are separate systems with different meanings and reset procedures.
Will disconnecting the battery reset the maintenance light?
No. Disconnecting the battery will reset the car’s memory for radios and clocks, and may clear some electronic settings, but it will not reset the maintenance required light. This light’s timer is stored in non-volatile memory within the ECU that is not cleared by a simple battery disconnect. You must use the specific key-and-button or OBD2 reset procedure.


