
Where to Place Jack on Toyota Corolla
Contents
- 1 Key Takeaways
- 2 📑 Table of Contents
- 3 Understanding the Importance of Correct Jack Placement
- 4 Front Jacking Point: Lifting the Front End Safely
- 5 Rear Jacking Point: Lifting the Rear of the Corolla
- 6 Side Jacking Points: Using Rocker Panels and Reinforced Zones
- 7 Tools and Equipment You’ll Need
- 8 Safety Tips and Common Mistakes to Avoid
- 9 Model-Specific Considerations
- 10 Step-by-Step Guide: How to Safely Lift Your Corolla
- 11 Conclusion
- 12 Frequently Asked Questions
Knowing where to place jack on Toyota Corolla is crucial for safe lifting and tire changes. Using the wrong spot can damage your car’s frame or cause accidents. This guide shows you the correct jacking points, tools, and safety tips for every Corolla model.
If you’ve ever found yourself staring under your Toyota Corolla, wondering where to place jack on Toyota Corolla without damaging the car or risking injury, you’re not alone. Whether you’re changing a flat tire, rotating tires, or performing routine maintenance like oil changes or brake inspections, lifting your Corolla correctly is essential. The last thing you want is to crack the oil pan, bend the frame, or worse—have the car collapse while you’re underneath it.
The Toyota Corolla is one of the most popular compact sedans in the world, known for its reliability, fuel efficiency, and low maintenance costs. But even the most dependable car needs proper care when it comes to lifting. Unlike trucks or SUVs with high ground clearance, the Corolla sits low to the ground, which means you have less room to work and must be extra careful about where you place your jack. Using the wrong jacking point can lead to structural damage, fluid leaks, or even personal injury.
In this comprehensive guide, we’ll walk you through exactly where to place jack on Toyota Corolla for safe and effective lifting. We’ll cover the front, rear, and side jacking points, explain the tools you’ll need, and share practical tips to make the process smooth and stress-free. Whether you’re a first-time DIYer or a seasoned car enthusiast, this guide will help you lift your Corolla with confidence.
Key Takeaways
- Use factory-designated jacking points: Toyota designs specific reinforced areas under the Corolla for safe lifting—never guess or improvise.
- Front jacking point is under the radiator support: Located behind the front bumper, this central point lifts the entire front end safely.
- Rear jacking point is under the rear differential or crossmember: For rear-wheel lifts, use the sturdy crossmember near the exhaust system.
- Side jacking points are along the rocker panels: Look for notched or marked areas near the front and rear doors—these are reinforced for jack stands.
- Always use a rubber or padded jack pad: Prevents scratches and protects the underbody from damage during lifting.
- Never lift on plastic, suspension parts, or fuel lines: These components can crack or break, leading to costly repairs or safety hazards.
- Use jack stands for stability: Never rely solely on a hydraulic jack—always support the car with jack stands when working underneath.
📑 Table of Contents
- Understanding the Importance of Correct Jack Placement
- Front Jacking Point: Lifting the Front End Safely
- Rear Jacking Point: Lifting the Rear of the Corolla
- Side Jacking Points: Using Rocker Panels and Reinforced Zones
- Tools and Equipment You’ll Need
- Safety Tips and Common Mistakes to Avoid
- Model-Specific Considerations
- Step-by-Step Guide: How to Safely Lift Your Corolla
- Conclusion
Understanding the Importance of Correct Jack Placement
Lifting a car might seem simple—just slide a jack under and pump it up, right? Not quite. The Toyota Corolla, like all modern vehicles, has specific reinforced areas designed to handle the weight and pressure of a jack. These are called jacking points, and they’re strategically placed to distribute the load evenly and protect the vehicle’s underbody.
Using the wrong spot—like the oil pan, suspension arms, or plastic skid plates—can cause serious damage. For example, placing a jack directly under the engine oil pan might crack it, leading to oil leaks and expensive repairs. Similarly, lifting on a control arm or sway bar can bend suspension components, affecting your car’s alignment and handling.
Safety is another major concern. If the jack slips or the car isn’t properly supported, it can fall unexpectedly. This is especially dangerous if you’re working underneath the vehicle. That’s why it’s critical to use the correct jacking points and always support the car with jack stands.
The good news? Toyota has made it easier than ever to identify the right spots. Most Corolla models have clearly marked or notched areas under the rocker panels, and the front and rear have designated lift points for service. In the next sections, we’ll break down each of these locations in detail.
Front Jacking Point: Lifting the Front End Safely
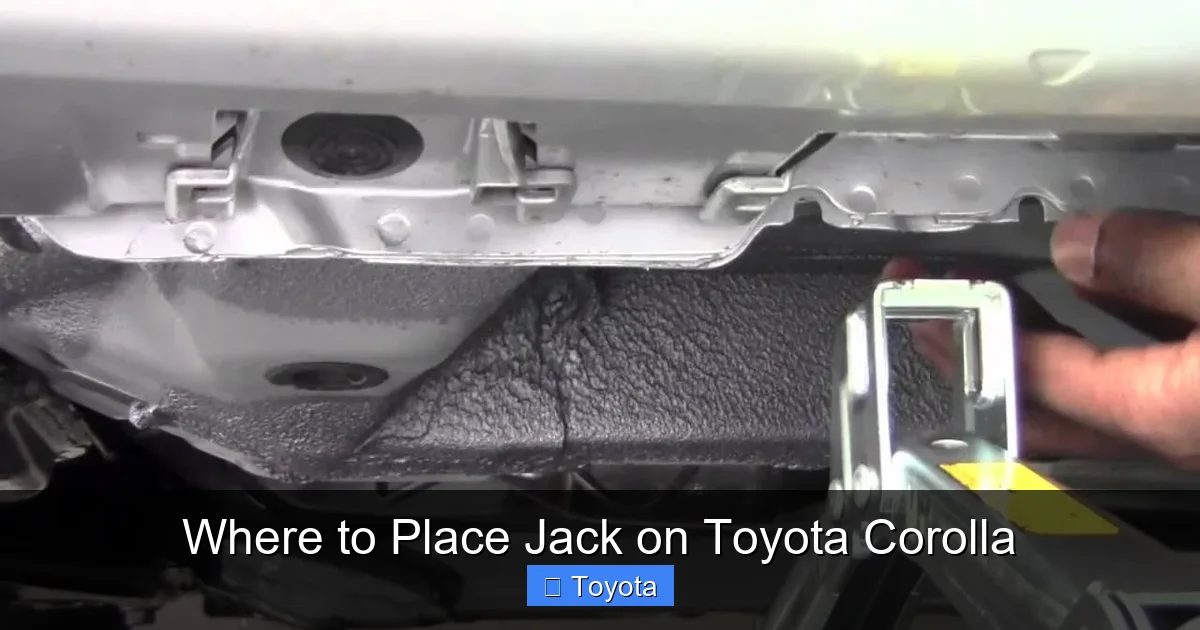
Visual guide about Where to Place Jack on Toyota Corolla
Image source: thecarhow.com
When you need to lift the front of your Toyota Corolla—whether to change a front tire or access the engine bay—the correct jacking point is crucial. The primary front jacking point is located under the radiator support, just behind the front bumper. This is a strong, reinforced crossmember designed to handle the weight of the engine and front suspension.
How to Locate the Front Jacking Point
To find this spot, kneel in front of your Corolla and look under the bumper. You’ll see a flat, sturdy metal beam running horizontally across the front of the car. This is the radiator support, and it’s the ideal place to position your jack. On most Corolla models (especially from 2009 onward), there’s often a small notch or indentation on the underside of this beam, indicating the exact center point.
If you’re using a floor jack, slide it forward until the jack pad aligns with this central notch. Make sure the jack is centered—off-center lifting can cause the car to tilt or slip. For added safety, place wheel chocks behind the rear tires to prevent rolling.
Tips for Safe Front Lifting
– Always use a jack with a rubber or padded pad to protect the metal surface.
– Lift slowly and steadily—don’t rush the process.
– Once the front wheels are off the ground, place jack stands under the reinforced side jacking points (we’ll cover these next) before working under the car.
– Never work under a car supported only by a hydraulic jack.
For example, if you’re changing a front tire, lift the front end using the radiator support, then lower the car onto jack stands placed under the front side jacking points near the front wheels. This gives you stable, secure access to remove the tire and perform repairs.
Rear Jacking Point: Lifting the Rear of the Corolla
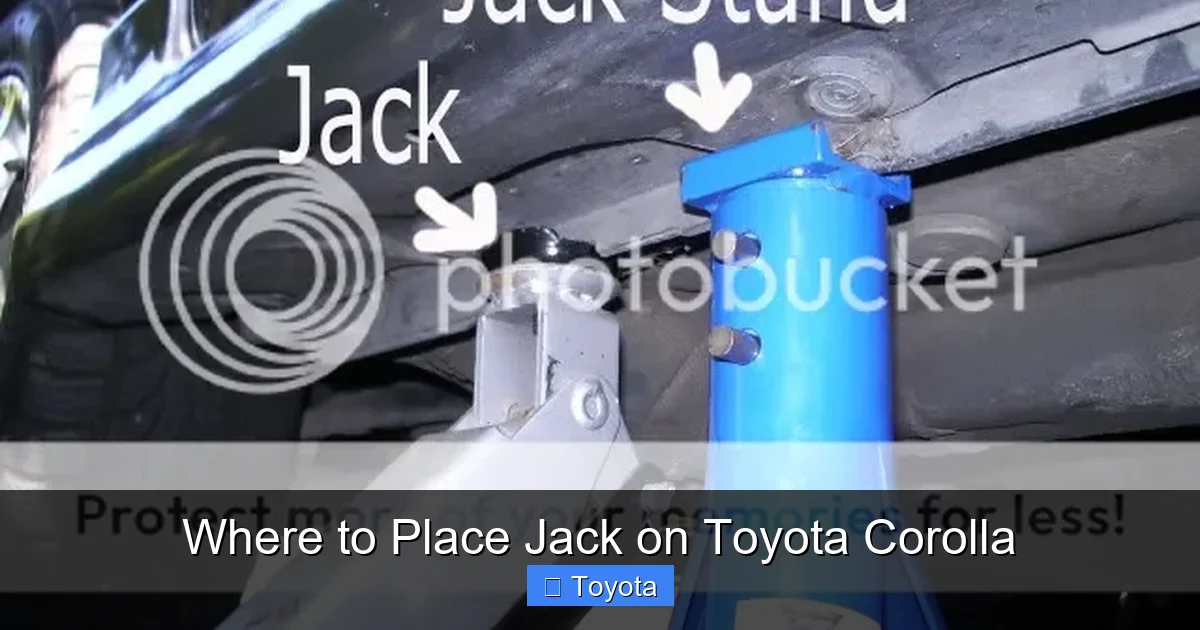
Visual guide about Where to Place Jack on Toyota Corolla
Image source: i679.photobucket.com
Lifting the rear of your Toyota Corolla requires a different approach. The rear doesn’t have a central crossmember like the front, so you’ll need to use the rear differential (on manual transmission models) or the rear suspension crossmember. On most Corolla models, the best rear jacking point is the sturdy metal crossmember located just ahead of the rear axle.
Finding the Rear Jacking Point
To locate this spot, crawl under the rear of the car and look for a thick, horizontal metal beam running between the rear suspension arms. This crossmember is part of the rear subframe and is designed to handle lifting forces. It’s usually located just behind the fuel tank and near the exhaust system.
Avoid placing the jack directly on the fuel tank, exhaust pipes, or rear bumper. These components aren’t built to support weight and can be easily damaged. Instead, center your jack under the crossmember, ensuring it’s aligned with the vehicle’s centerline.
Best Practices for Rear Lifting
– Use a low-profile jack if your Corolla has limited ground clearance.
– Lift slowly and check that the car is level—rear-heavy lifting can cause instability.
– Once lifted, place jack stands under the rear side jacking points near the rear wheels.
– If you’re lifting both front and rear, do one end at a time to maintain balance.
For instance, if you’re rotating your tires and need to lift the rear, position the jack under the rear crossmember, lift until the wheels clear the ground, then secure the car with jack stands. This allows you to safely remove and swap the rear tires.
Side Jacking Points: Using Rocker Panels and Reinforced Zones

Visual guide about Where to Place Jack on Toyota Corolla
Image source: ourhometools.com
The side jacking points are perhaps the most commonly used locations when working on a Toyota Corolla. These are the reinforced areas along the rocker panels—the long metal strips that run between the front and rear wheels, just below the doors. Toyota designs these zones with notches, markings, or thicker metal to indicate where jack stands or a jack can be safely placed.
Identifying the Side Jacking Points
Look along the bottom edge of your Corolla, near the front and rear doors. You’ll notice small notches or stamped arrows in the metal. These are the factory-designated jacking points. On many Corolla models (especially from 2014 onward), these notches are clearly visible and often labeled in the owner’s manual.
For example, the front side jacking point is usually located just behind the front wheel, under the front door. The rear side jacking point is just ahead of the rear wheel, under the rear door. These spots are reinforced to handle the car’s weight when lifted from the sides.
How to Use Side Jacking Points Safely
– Always position jack stands or a jack directly under these notched areas.
– Never place jack stands on uneven or soft ground—use a flat, solid surface like concrete.
– If using a jack to lift from the side, do so slowly and ensure the car is stable before placing jack stands.
– For tire changes, lift one side at a time. For example, to change the front right tire, lift the front using the radiator support, then place a jack stand under the front side jacking point on the right side.
A practical tip: If you’re using jack stands, make sure they’re rated for at least 2 tons and are fully extended to match the height of the jacking point. This prevents the car from slipping off the stands.
Tools and Equipment You’ll Need
Having the right tools makes all the difference when lifting your Toyota Corolla. Here’s a list of essential equipment to ensure a safe and efficient process:
Hydraulic Floor Jack
A quality floor jack is the backbone of any car lifting job. Look for one with a lifting capacity of at least 1.5 to 2 tons—more than enough for a Corolla, which typically weighs between 2,800 and 3,100 pounds. A low-profile jack is ideal for the Corolla’s low ground clearance.
Jack Stands
Never rely on a jack alone. Jack stands provide stable, secure support. Use at least two stands, and make sure they’re placed on the reinforced side jacking points. Adjustable stands allow you to customize the height for different tasks.
Rubber or Padded Jack Pads
These attach to your jack and protect the car’s underbody from scratches and dents. They also provide better grip, reducing the risk of slipping.
Wheel Chocks
Place these behind the tires that remain on the ground to prevent the car from rolling. Even a slight incline can cause the vehicle to shift, so chocks are a must.
Torque Wrench and Lug Wrench
While not directly related to jacking, these tools are essential for safely removing and tightening lug nuts after lifting.
Owner’s Manual
Your Corolla’s manual contains diagrams and instructions specific to your model year. It’s a valuable resource for confirming jacking points and torque specifications.
Safety Tips and Common Mistakes to Avoid
Lifting a car might seem straightforward, but small mistakes can lead to big problems. Here are some safety tips and common pitfalls to avoid when placing jack on Toyota Corolla:
Never Lift on Unreinforced Areas
Avoid placing the jack under the oil pan, transmission, suspension arms, or plastic underbody panels. These components aren’t designed to bear weight and can crack or deform under pressure.
Always Use Jack Stands
Hydraulic jacks can fail due to leaks or mechanical issues. Jack stands are a passive safety measure—they don’t rely on pressure and provide reliable support.
Check the Ground Surface
Lift your Corolla on a flat, level, and solid surface. Avoid gravel, grass, or uneven pavement, which can cause the jack to shift or sink.
Lift One End at a Time
If you need to lift both front and rear, do it one end at a time. Lifting diagonally or unevenly can cause the car to tip or become unstable.
Double-Check Jack Placement
Before lifting, visually confirm that the jack is centered and positioned correctly. A quick check can prevent accidents.
Don’t Rush
Take your time. Rushing increases the risk of errors. Lift slowly, monitor the car’s position, and make adjustments as needed.
Model-Specific Considerations
While the general jacking principles apply to most Toyota Corolla models, there are slight variations depending on the year and trim. Here’s a quick breakdown:
2009–2013 Corolla
These models have clearly marked side jacking points with notches under the rocker panels. The front jacking point is under the radiator support, and the rear uses the crossmember near the rear suspension.
2014–2019 Corolla
Toyota updated the underbody design, adding more visible markings and reinforced zones. The side jacking points are easier to identify, and the front and rear lift points remain consistent.
2020–2024 Corolla
The latest models feature improved underbody protection and clearer jacking indicators. Some trims include plastic skid plates, but the reinforced metal points remain accessible.
Always refer to your owner’s manual for model-specific guidance. If you’re unsure, consult a Toyota service center or online forums for your exact year and trim.
Step-by-Step Guide: How to Safely Lift Your Corolla
Here’s a simple, step-by-step process to safely lift your Toyota Corolla:
1. Park on a flat, level surface and engage the parking brake.
2. Place wheel chocks behind the tires that will remain on the ground.
3. Locate the correct jacking point (front, rear, or side) based on your task.
4. Position the jack under the designated spot, ensuring it’s centered.
5. Lift the car slowly until the wheels clear the ground.
6. Place jack stands under the reinforced side jacking points.
7. Lower the car onto the jack stands and gently shake to test stability.
8. Perform your maintenance or repair.
9. When done, lift the car slightly, remove the jack stands, and lower the car.
10. Remove the jack and wheel chocks.
Conclusion
Knowing where to place jack on Toyota Corolla isn’t just about convenience—it’s about safety, protection, and peace of mind. By using the factory-designated jacking points, you avoid costly damage and reduce the risk of accidents. Whether you’re lifting the front, rear, or sides, always follow the guidelines, use the right tools, and prioritize stability.
The Toyota Corolla is built to last, and with proper care—including correct lifting techniques—it will continue to serve you reliably for years to come. So the next time you need to change a tire or perform maintenance, remember: take your time, use the right spots, and always support your car with jack stands. Your Corolla—and your safety—will thank you.
Frequently Asked Questions
Where is the safest place to put a jack on a Toyota Corolla?
The safest place to put a jack on a Toyota Corolla is at the factory-designated jacking points: under the radiator support for the front, the rear crossmember for the rear, and the notched areas along the rocker panels for side lifting. These spots are reinforced to handle the car’s weight.
Can I jack up a Corolla from the oil pan?
No, never jack up a Corolla from the oil pan. The oil pan is made of thin aluminum or steel and can crack under pressure, leading to oil leaks and expensive repairs. Always use the reinforced jacking points instead.
Do I need jack stands when lifting my Corolla?
Yes, you should always use jack stands when lifting your Corolla. Hydraulic jacks can fail, and working under a car supported only by a jack is extremely dangerous. Jack stands provide stable, reliable support.
How high should I lift my Corolla to change a tire?
Lift your Corolla just high enough for the tire to clear the ground—usually 2 to 4 inches. There’s no need to lift it excessively high, as this increases the risk of instability.
Are the jacking points the same on all Corolla models?
While the general locations are similar across most Corolla models, there may be slight differences depending on the year and trim. Always consult your owner’s manual for model-specific guidance.
What should I do if I can’t find the jacking points on my Corolla?
If you can’t locate the jacking points, check your owner’s manual or look for notches or markings under the rocker panels. You can also visit a Toyota service center for assistance or search online forums for your specific model year.


