Can I Replace a Car Thermostat Myself?
Contents
- 1 Key Takeaways
- 2 📑 Table of Contents
- 3 Can I Replace a Car Thermostat Myself?
- 4 What Does a Car Thermostat Do?
- 5 Signs Your Thermostat Needs Replacing
- 6 Tools and Parts You’ll Need
- 7 Step-by-Step Guide to Replacing Your Thermostat
- 8 Common Mistakes to Avoid
- 9 When to Call a Professional
- 10 Final Thoughts
- 11 Frequently Asked Questions
Replacing a car thermostat yourself is doable for most DIYers with basic mechanical skills. With the right tools, clear instructions, and attention to detail, you can save money and gain confidence in maintaining your vehicle.
Key Takeaways
- Yes, you can replace a car thermostat yourself: Most thermostats are accessible and don’t require advanced tools, making this a beginner-friendly repair.
- Save money on labor costs: A mechanic might charge $150–$300; doing it yourself costs only $10–$30 for the part.
- Use the correct thermostat: Match the temperature rating (e.g., 195°F) and design to your vehicle’s specifications.
- Drain coolant safely: Always cool the engine first and use a drain pan to avoid spills and burns.
- Check for leaks after installation: Refill coolant properly and run the engine to test for leaks and proper operation.
- Know when to call a pro: If you’re unsure about hose routing, coolant type, or gasket sealing, seek help to avoid engine damage.
- Prevent future issues: Replace the thermostat every 50,000–100,000 miles or at the first sign of overheating or poor heat output.
📑 Table of Contents
Can I Replace a Car Thermostat Myself?
So, your car’s heater isn’t blowing warm air, or maybe the engine is running hotter than usual. You pop the hood, do a little research, and discover the thermostat might be the culprit. Now you’re wondering: Can I replace a car thermostat myself?
The short answer? Yes—most of the time. Replacing a car thermostat is one of the more approachable DIY automotive repairs, especially if you’re comfortable with basic tools and have a little patience. It doesn’t require a lift, specialized equipment, or years of experience. But like any repair, it’s not just about swapping parts. It’s about doing it right to avoid bigger problems down the road.
In this guide, we’ll walk you through everything you need to know: what a thermostat does, how to tell if it’s failing, the tools you’ll need, step-by-step instructions, and tips to avoid common mistakes. Whether you’re a weekend warrior or a total beginner, this repair is within your reach—if you take it seriously.
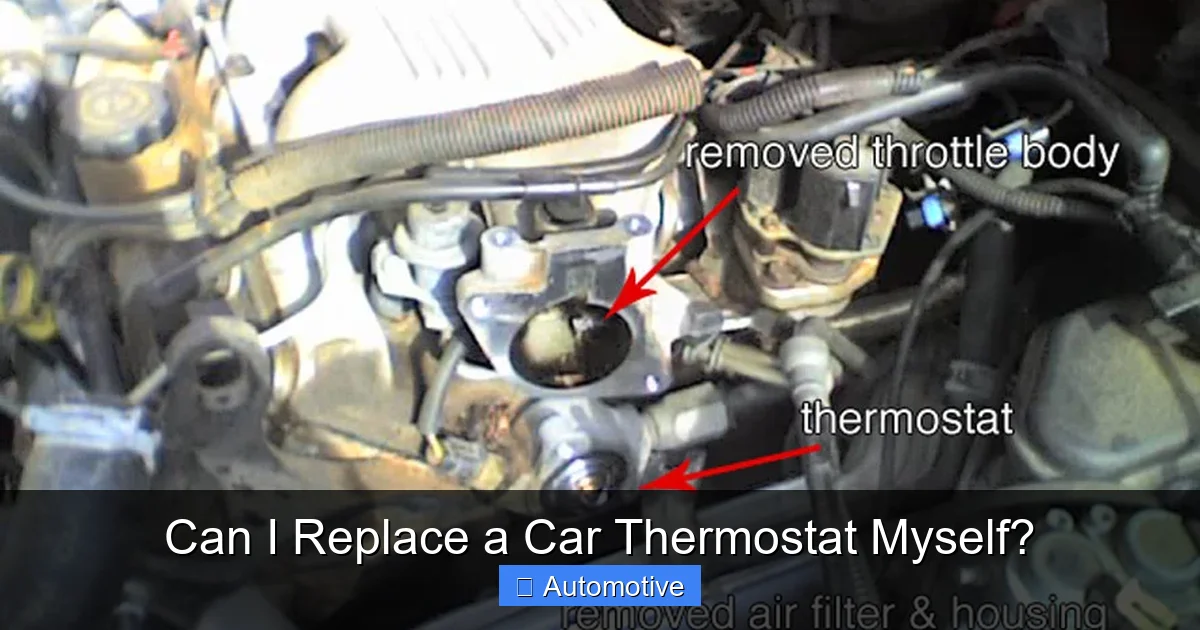
What Does a Car Thermostat Do?
Visual guide about Can I Replace a Car Thermostat Myself?
Image source: s3.amazonaws.com
Before you dive into replacing anything, it helps to understand what the thermostat actually does. Think of it as the gatekeeper of your engine’s cooling system. When your engine is cold, the thermostat stays closed, blocking coolant from flowing into the radiator. This allows the engine to warm up faster, which improves fuel efficiency and reduces wear.
Once the engine reaches its optimal operating temperature—usually around 195°F (90°C)—the thermostat opens, allowing coolant to circulate through the radiator, where it’s cooled by airflow. This keeps the engine from overheating during normal driving.
Without a working thermostat, your engine might run too cold (causing poor fuel economy and increased emissions) or too hot (risking serious damage like warped cylinder heads or blown head gaskets). A stuck-open thermostat means the engine never warms up properly. A stuck-closed one can cause rapid overheating, especially in traffic or under load.
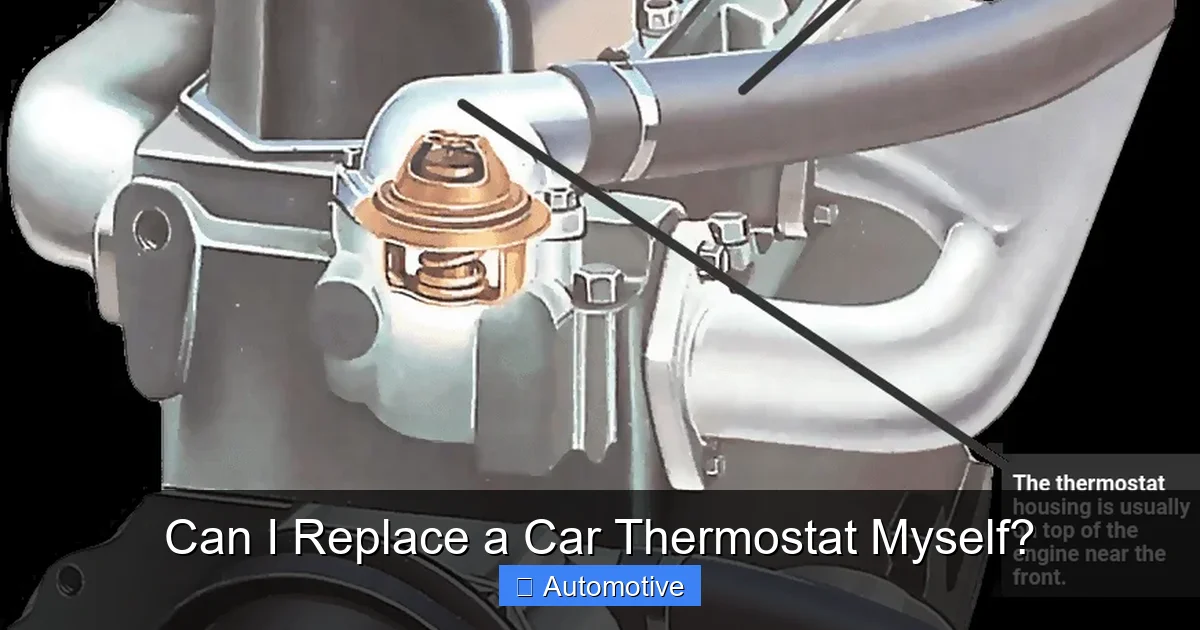
Most modern cars use a wax-pellet thermostat housed in a metal or plastic housing, usually located where the upper radiator hose connects to the engine. Some vehicles have it near the water pump or integrated into the intake manifold. Knowing where yours is located is the first step toward a successful DIY replacement.
Signs Your Thermostat Needs Replacing
Visual guide about Can I Replace a Car Thermostat Myself?
Image source: wikihow.com
How do you know if your thermostat is bad? Look for these common symptoms:
Engine Overheating
If your temperature gauge spikes into the red or you see steam coming from under the hood, a stuck-closed thermostat could be to blame. The coolant can’t reach the radiator, so heat builds up quickly.
Poor or No Heat from the Vents
Your car’s heater relies on hot coolant flowing through a small radiator (the heater core) inside the dashboard. If the thermostat is stuck open, the engine never gets warm enough to produce heat. You’ll notice cold air even when the engine has been running for a while.
Temperature Gauge Fluctuations
A healthy engine should maintain a steady temperature once warmed up. If your gauge swings between cold and hot, the thermostat may be opening and closing erratically.
Coolant Leaks Around the Thermostat Housing
Over time, the gasket can degrade, or the housing may crack, leading to leaks. You might see green, orange, or pink coolant pooling near the thermostat or dripping onto the ground.
Check Engine Light and Diagnostic Codes
Some vehicles monitor coolant temperature and may trigger a check engine light if the engine isn’t reaching the expected temperature range. A scan tool might show codes like P0128 (coolant thermostat below regulating temperature).
If you’re experiencing one or more of these issues, it’s worth inspecting the thermostat. But don’t assume it’s the only problem—radiator clogs, water pump failure, or low coolant can mimic thermostat symptoms. Always check the basics first: coolant level, radiator condition, and fan operation.
Tools and Parts You’ll Need
Visual guide about Can I Replace a Car Thermostat Myself?
Image source: theblackurbantimes.com
One of the reasons replacing a thermostat is DIY-friendly is that it doesn’t require a long list of specialized tools. Here’s what you’ll typically need:
Basic Hand Tools
- Socket wrench set (usually 8mm–19mm sockets)
- Screwdrivers (flathead and Phillips)
- Pliers (needle-nose and regular)
- Ratchet and extension bars
Drain and Refill Supplies
- Drain pan (at least 2–3 quarts capacity)
- Funnel
- Coolant (check your owner’s manual for the correct type—often ethylene glycol-based, pre-mixed or concentrate)
- Distilled water (if mixing coolant concentrate)
Safety Gear
- Safety glasses
- Gloves (nitrile or rubber to protect from coolant)
- Shop rags or paper towels
Replacement Parts
- New thermostat (match the temperature rating and design)
- New gasket or O-ring (often included with the thermostat)
- Coolant (if topping off or replacing)
Optional but Helpful
- Torque wrench (to tighten bolts to spec)
- Coolant funnel with spill-proof design
- Jack and jack stands (if the thermostat is hard to reach)
- Flashlight or work light
Always consult your vehicle’s repair manual or an online resource like AllData or Mitchell1 for torque specs and part numbers. Using the wrong thermostat—say, a 180°F instead of a 195°F—can cause performance issues or trigger check engine lights.
Step-by-Step Guide to Replacing Your Thermostat
Now for the main event: replacing the thermostat yourself. Follow these steps carefully, and take your time. Rushing can lead to mistakes, leaks, or even engine damage.
Step 1: Let the Engine Cool Completely
Never work on a hot engine. Coolant can be scalding, and opening the system under pressure can cause serious burns. Wait at least 2–3 hours after driving, or overnight if possible.
Step 2: Locate the Thermostat Housing
Open the hood and look for the upper radiator hose. It usually connects to a metal or plastic housing on the engine block or intake manifold. That’s your thermostat housing. Some cars have it near the water pump or behind the timing cover—check your manual if you’re unsure.
Step 3: Drain the Coolant
Place the drain pan under the radiator. Open the radiator drain plug (usually at the bottom) or loosen the lower radiator hose clamp to let coolant flow out. You don’t need to drain the entire system—just enough to prevent a mess when you remove the housing.
Pro tip: If your car has a coolant reservoir, you can also siphon coolant from there to reduce spillage.
Step 4: Remove the Thermostat Housing
Use your socket wrench to remove the bolts securing the housing. There are usually 2–4 bolts. Be gentle—some housings are plastic and can crack if over-tightened or forced.
Once the bolts are out, carefully pry the housing loose. It may be stuck due to old gasket material. Use a flathead screwdriver to gently separate it, but avoid damaging the mating surface.
Step 5: Remove the Old Thermostat
Lift out the old thermostat. Note its orientation—most have a small flange or jiggle pin that must face the radiator (outward). Take a photo or make a mental note so you install the new one the same way.
Inspect the old thermostat. If it’s stuck open or closed, that confirms the problem. Also check for corrosion, debris, or damage to the housing.
Step 6: Clean the Housing and mating Surface
Use a scraper or fine sandpaper to remove old gasket material from both the housing and engine block. Wipe everything clean with a rag. Any leftover debris can cause leaks.
Step 7: Install the New Thermostat
Place the new thermostat into the housing or engine block, ensuring it’s oriented correctly. Apply a thin layer of gasket sealant if recommended (some gaskets are pre-coated). Install the new gasket or O-ring.
Step 8: Reattach the Housing
Carefully align the housing and hand-tighten the bolts. Then use a torque wrench to tighten them to the manufacturer’s specification (usually 7–15 ft-lbs). Over-tightening can crack plastic housings.
Step 9: Refill the Coolant
Close the radiator drain or reattach the lower hose. Use a funnel to slowly add coolant to the radiator or reservoir. Fill to the “Full” or “Cold” line. If you’re using concentrate, mix it 50/50 with distilled water.
Step 10: Bleed the Cooling System
This step is crucial. Air pockets can cause overheating. Start the engine with the radiator cap off (if applicable) and let it run until the thermostat opens. You’ll see coolant level drop as air escapes. Top off as needed.
Some cars require a specific bleeding procedure—like opening a bleed screw or running the heater on high. Check your manual.
Step 11: Test Drive and Check for Leaks
Take a short drive to reach operating temperature. Monitor the temperature gauge. After parking, check under the car for leaks. Also, feel the upper and lower radiator hoses—both should be warm once the thermostat opens.
If everything looks good, you’ve successfully replaced your thermostat!
Common Mistakes to Avoid
Even simple repairs can go wrong if you’re not careful. Here are some common pitfalls and how to avoid them:
Installing the Thermostat Backwards
This is the #1 mistake. If the thermostat is upside down or facing the wrong way, it won’t open properly. Always double-check the orientation before tightening bolts.
Over-tightening Bolts
Plastic housings crack easily. Use a torque wrench and follow specs. If you don’t have one, tighten bolts snugly—don’t crank them.
Skipping the Gasket
Some people reuse old gaskets or skip the new one entirely. This almost guarantees a leak. Always use a new gasket or O-ring.
Not Bleeding the System
Air trapped in the cooling system can cause hot spots and overheating. Take the time to bleed it properly.
Using the Wrong Coolant
Mixing coolant types (e.g., Dexcool with green ethylene glycol) can cause sludge and corrosion. Stick to the manufacturer’s recommendation.
Ignoring Other Issues
A bad thermostat might be a symptom of a larger problem, like a failing water pump or clogged radiator. Inspect the whole system while you’re in there.
When to Call a Professional
While replacing a thermostat is generally DIY-friendly, there are times when it’s better to leave it to the pros:
– If the thermostat is buried deep in the engine (e.g., under the intake manifold or timing cover), the job becomes much more complex.
– If you’re not confident working with coolant or electrical components.
– If your car has a pressurized cooling system or requires special tools to bleed.
– If you’ve tried the repair and still have overheating or no heat issues.
A mechanic can diagnose related problems and ensure the job is done right. But for most front-wheel-drive cars and trucks, the thermostat is accessible and straightforward.
Final Thoughts
So, can you replace a car thermostat yourself? Absolutely—if you’re prepared, patient, and follow the steps carefully. It’s a great way to save money, learn about your vehicle, and gain confidence in your mechanical abilities.
Just remember: safety first. Let the engine cool, wear gloves and glasses, and dispose of old coolant properly (it’s toxic to pets and the environment). Take your time, double-check your work, and don’t skip the bleeding process.
With a little effort, you’ll have a properly functioning cooling system, reliable heat in the winter, and peace of mind knowing you tackled the job yourself.
Frequently Asked Questions
How much does it cost to replace a car thermostat?
The thermostat itself costs $10–$30, while labor at a shop can add $100–$250. Doing it yourself saves most of that cost, requiring only the part and basic tools.
How long does it take to replace a thermostat?
For a first-timer, plan on 1–2 hours. Experienced DIYers can do it in under an hour. Complex setups may take longer.
Can I drive with a bad thermostat?
It’s not recommended. A stuck-closed thermostat can cause overheating and engine damage. A stuck-open one reduces fuel efficiency and heating performance.
Do I need to replace the coolant when changing the thermostat?
Not always, but it’s a good idea if the coolant is old, dirty, or low. Top off with the correct type and consider a full flush every 50,000–100,000 miles.
What happens if I install the thermostat backwards?
The thermostat may not open properly, causing overheating. Always check the orientation—most have a flange or jiggle pin that must face outward.
Can a bad thermostat cause the check engine light to come on?
Yes. Some vehicles monitor coolant temperature and will trigger a code (like P0128) if the engine doesn’t reach the expected temperature, indicating a stuck-open thermostat.