
Can You Test a Car Battery with a Multimeter?
Contents
- 1 Key Takeaways
- 2 📑 Table of Contents
- 3 Can You Test a Car Battery with a Multimeter?
- 4 Why Testing Your Car Battery Matters
- 5 What You’ll Need to Test a Car Battery
- 6 Step-by-Step Guide to Testing a Car Battery with a Multimeter
- 7 Common Mistakes to Avoid When Testing
- 8 When to Replace Your Car Battery
- 9 Tips for Maintaining a Healthy Car Battery
- 10 Conclusion
- 11 Frequently Asked Questions
You absolutely can test a car battery with a multimeter—and it’s one of the easiest ways to check if your battery is healthy or on its last legs. With just a few simple steps, you can measure voltage, detect weak cells, and avoid unexpected breakdowns. This guide walks you through everything you need to know.
Key Takeaways
- Yes, a multimeter can test a car battery: It measures voltage to determine charge level and overall health.
- Ideal resting voltage is 12.6V or higher: Anything below 12.4V suggests the battery may be undercharged or failing.
- Test with the engine off and on: Compare resting and running voltages to assess alternator performance.
- Clean terminals before testing: Corrosion can interfere with accurate readings and electrical flow.
- Use the correct multimeter settings: Set to DC voltage (20V range) for safe and precise measurements.
- Interpret results carefully: A low voltage doesn’t always mean a bad battery—consider age, temperature, and load tests.
- Regular testing prevents breakdowns: Checking your battery every few months helps catch issues early.
📑 Table of Contents
- Can You Test a Car Battery with a Multimeter?
- Why Testing Your Car Battery Matters
- What You’ll Need to Test a Car Battery
- Step-by-Step Guide to Testing a Car Battery with a Multimeter
- Common Mistakes to Avoid When Testing
- When to Replace Your Car Battery
- Tips for Maintaining a Healthy Car Battery
- Conclusion
Can You Test a Car Battery with a Multimeter?
If your car has been slow to start lately, or the dashboard lights flicker when you turn the key, you might be wondering: *Is my battery dying?* Before you rush to buy a new one—or worse, get stranded on the side of the road—there’s a simple, affordable tool that can give you answers fast: the multimeter.
Yes, you absolutely can test a car battery with a multimeter. In fact, it’s one of the most reliable and accessible methods for checking battery health at home. Whether you’re a seasoned DIYer or a total beginner, using a multimeter to test your car battery is easier than you think. And the best part? It only takes a few minutes.
A multimeter measures electrical properties like voltage, current, and resistance. When it comes to car batteries, we’re mostly interested in voltage—specifically, the direct current (DC) voltage output. This tells us how much charge the battery is holding and whether it’s capable of starting your engine. By comparing your readings to standard benchmarks, you can determine if your battery is healthy, needs a recharge, or should be replaced.
In this guide, we’ll walk you through everything you need to know about testing a car battery with a multimeter. From choosing the right tool to interpreting your results, we’ll cover the steps, safety tips, and common pitfalls to avoid. By the end, you’ll be able to confidently check your battery’s health and take action before it leaves you stranded.
Why Testing Your Car Battery Matters
Car batteries don’t last forever. Most last between three to five years, depending on climate, driving habits, and maintenance. But unlike other car parts that show obvious signs of wear—like squeaky brakes or a check engine light—a failing battery can sneak up on you. One day your car starts fine; the next, it won’t turn over at all.
That’s why regular testing is so important. A simple multimeter check can reveal problems long before they become emergencies. For example, if your battery voltage drops below 12.4 volts when the engine is off, it may not have enough power to start your car in cold weather. Or if the voltage drops dramatically when you turn on the headlights or AC, it could signal internal damage or aging cells.
Testing also helps you avoid unnecessary expenses. Many people assume a slow start means a bad battery, but it could just be a loose connection or a failing alternator. By using a multimeter, you can isolate the issue and make informed decisions about repairs or replacements.
Plus, knowing how to test your battery gives you peace of mind. Whether you’re preparing for a long road trip or just want to stay on top of car maintenance, this skill is invaluable. And since multimeters are inexpensive and widely available, there’s no reason not to add this to your DIY toolkit.
What You’ll Need to Test a Car Battery
Before you start, make sure you have the right tools and a safe environment. Here’s what you’ll need:
A Digital Multimeter
The most important tool is a digital multimeter (DMM). These are affordable, easy to use, and widely available at hardware stores, auto parts shops, or online. Look for one with a DC voltage setting—most basic models will do. Avoid analog multimeters, as they’re less accurate and harder to read.

Visual guide about Can You Test a Car Battery with a Multimeter?
Image source: shutterstock.com
Visual guide about Can You Test a Car Battery with a Multimeter?
Image source: shutterstock.com
Safety Gear
Always wear safety glasses and gloves when working near a car battery. Batteries contain sulfuric acid and can produce explosive hydrogen gas, so it’s better to be safe. Also, remove any jewelry, especially rings or bracelets, which can cause short circuits.
Cleaning Supplies
Corrosion on battery terminals can interfere with your readings. Have a wire brush, baking soda, and water on hand to clean the terminals if needed. A clean connection ensures accurate voltage measurements.
A Helper (Optional)
If you plan to test the battery while the engine is running, having someone help you start the car can make the process easier and safer. But it’s not required—you can do it solo with a little extra caution.
Basic Understanding of Car Batteries
Most car batteries are 12-volt lead-acid types. They have six cells, each producing about 2.1 volts when fully charged. Understanding this helps you interpret your multimeter readings correctly.
Once you’ve gathered your tools, find a well-ventilated area to work. Park your car on a flat surface, turn off the engine, and engage the parking brake. Open the hood and locate the battery—it’s usually a rectangular box with two terminals (positive and negative).
Step-by-Step Guide to Testing a Car Battery with a Multimeter
Now that you’re prepared, let’s walk through the actual testing process. We’ll cover two key tests: the resting voltage test (engine off) and the running voltage test (engine on). These give you a complete picture of your battery’s health.
Step 1: Prepare the Multimeter
Turn on your multimeter and set it to measure DC voltage. Look for the symbol that looks like a “V” with a straight line (—) or the letters “DCV.” Most multimeters have a 20V range—select that. This setting allows you to measure up to 20 volts, which is perfect for a 12V car battery.

Visual guide about Can You Test a Car Battery with a Multimeter?
Image source: thepowerfacts.com
Step 2: Identify the Battery Terminals
The positive terminal is usually marked with a “+” sign and may have a red cover or cable. The negative terminal is marked with a “–” and often has a black cable. Make sure you can clearly identify them before connecting the probes.
Step 3: Connect the Multimeter Probes
Touch the red (positive) probe to the positive terminal and the black (negative) probe to the negative terminal. Make sure the probes make solid contact—don’t just rest them on the surface. Hold them steady to get a stable reading.
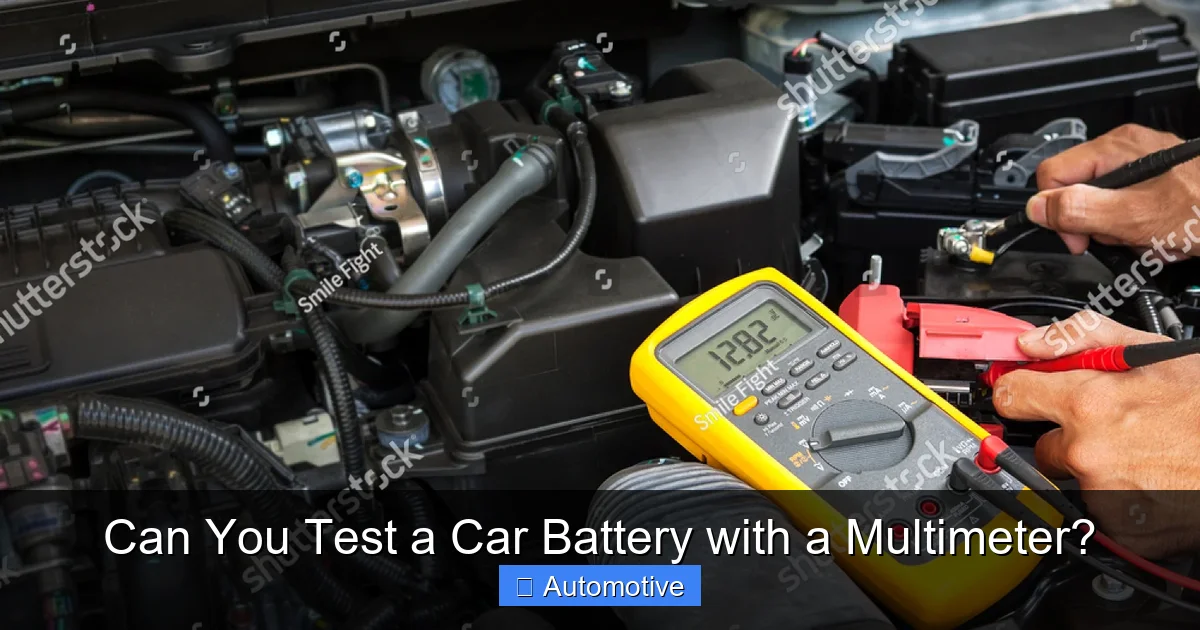
Step 4: Read the Voltage (Engine Off)
With the engine off and all lights and accessories turned off, check the multimeter display. This is your resting voltage. Here’s what the numbers mean:
- 12.6V to 12.8V: Fully charged and healthy battery.
- 12.4V to 12.5V: About 75% charged—still acceptable but may need charging soon.
- 12.2V to 12.3V: About 50% charged—likely needs a recharge.
- Below 12.0V: Severely discharged or failing battery.
If your reading is below 12.4V, consider charging the battery before testing again. A low reading doesn’t always mean the battery is bad—it could just be drained from leaving lights on or cold weather.
Step 5: Test Under Load (Optional but Recommended)
To check how the battery performs under stress, turn on the headlights and let them run for about two minutes. Then, retest the voltage. If it drops below 12.0V, the battery may struggle to start the engine, especially in cold weather.
Step 6: Test with the Engine Running
Now, start the car and let it idle. With the engine running, retest the voltage at the battery terminals. You should see a reading between 13.7V and 14.7V. This indicates the alternator is charging the battery properly.
- Below 13.7V: Alternator may not be charging effectively.
- Above 14.7V: Overcharging—could damage the battery over time.
If the voltage doesn’t increase when the engine is running, the alternator or voltage regulator might be faulty. This is a common cause of battery failure, even if the battery itself is fine.
Step 7: Interpret the Results
Compare your readings to the benchmarks above. A healthy battery should show:
- 12.6V or higher when the engine is off.
- 13.7V to 14.7V when the engine is running.
If your battery passes both tests, it’s likely in good condition. If not, consider recharging it or having it professionally tested.
Common Mistakes to Avoid When Testing
Even simple tasks can go wrong if you’re not careful. Here are some common mistakes people make when testing a car battery with a multimeter—and how to avoid them.
Using the Wrong Multimeter Setting
Always use the DC voltage setting, not AC. Car batteries produce direct current, not alternating current. Using the wrong setting will give you inaccurate or meaningless readings.
Testing on a Dirty or Corroded Terminal
Corrosion acts as an insulator, blocking the flow of electricity. This can lead to false low readings. Clean the terminals with a wire brush and a baking soda solution (1 tablespoon baking soda + 1 cup water) before testing.
Not Letting the Battery Rest
If you’ve just driven the car, the battery may show a higher voltage due to surface charge. Wait at least one hour after turning off the engine before testing. This allows the voltage to stabilize and gives a true reading of the battery’s state.
Ignoring Temperature Effects
Cold weather reduces battery performance. A battery that reads 12.4V in winter may act like it’s at 12.0V. If you live in a cold climate, consider testing more frequently and keeping the battery warm when possible.
Misinterpreting Low Voltage as a Bad Battery
A low reading doesn’t always mean the battery is dead. It could be discharged from leaving lights on, a parasitic drain, or simply age. Try charging the battery fully and retesting before replacing it.
Not Testing the Alternator
Many people assume a dead battery means the battery is bad. But if the alternator isn’t charging it properly, the battery will drain over time. Always test both the battery and the charging system.
When to Replace Your Car Battery
So, your multimeter shows a low voltage—does that mean it’s time for a new battery? Not necessarily. But here are some signs that replacement is likely needed:
Age of the Battery
Most car batteries last 3–5 years. Check the manufacture date on the battery label. If it’s more than four years old, it’s nearing the end of its life, even if it tests okay now.
Repeated Low Readings
If your battery consistently reads below 12.4V after a full charge, it may have lost its ability to hold a charge. This is a sign of internal damage or sulfation.
Slow Engine Crank
When you turn the key, does the engine crank slowly or hesitate? This is a classic sign of a weak battery, especially if the lights dim when starting.
Swollen or Leaking Battery Case
Physical damage like bulging sides or leaks indicates internal failure. These batteries are dangerous and should be replaced immediately.
Frequent Jump-Starts
If you’ve needed jump-starts more than once in a few months, the battery is likely failing. Even if it holds a charge temporarily, it won’t last.
Failed Load Test
Auto parts stores offer free load tests that simulate starting conditions. If your battery fails this test, it’s time for a replacement—even if the multimeter reading looks okay.
Tips for Maintaining a Healthy Car Battery
Testing is important, but prevention is even better. Here are some tips to keep your battery in top shape:
Drive Regularly
Batteries recharge while driving. Short trips don’t give the alternator enough time to fully recharge the battery. Aim for at least 20–30 minutes of driving a few times a week.
Turn Off Accessories When Idling
Using the radio, AC, or lights while the engine is off drains the battery quickly. Avoid long idling with accessories on.
Keep Terminals Clean
Check the terminals every few months and clean off any corrosion. A clean connection ensures efficient charging and starting.
Use a Battery Maintainer
If you don’t drive often, consider a battery maintainer or trickle charger. These devices keep the battery charged without overcharging it.
Check the Charging System
A faulty alternator or voltage regulator can damage your battery. Have your charging system checked during routine maintenance.
Protect from Extreme Temperatures
Heat accelerates battery degradation, while cold reduces performance. Park in a garage when possible, and consider a battery insulator in cold climates.
Conclusion
Testing a car battery with a multimeter is a smart, simple, and cost-effective way to stay ahead of battery problems. With just a few minutes and a basic tool, you can check your battery’s voltage, assess its health, and avoid unexpected breakdowns.
Remember, a healthy battery should read around 12.6 volts when the engine is off and 13.7 to 14.7 volts when it’s running. Clean terminals, proper multimeter settings, and regular testing are key to accurate results. And if your battery is more than four years old or showing signs of weakness, don’t wait—replace it before it leaves you stranded.
By making battery testing a regular part of your car maintenance routine, you’ll save time, money, and stress in the long run. So grab your multimeter, pop the hood, and take control of your car’s electrical health today.
Frequently Asked Questions
Can I test a car battery with a multimeter while the engine is running?
Yes, you can and should test the battery with the engine running to check the alternator’s charging performance. A healthy system should show 13.7V to 14.7V when the engine is on.
What multimeter setting do I use for a car battery?
Set your multimeter to DC voltage (DCV) and select the 20V range. This allows you to safely and accurately measure the 12V output of a car battery.
Is 12.4 volts a bad battery?
Not necessarily. 12.4V means the battery is about 75% charged. It may still work, but it’s best to recharge it and retest. If it drops quickly, the battery could be failing.
How often should I test my car battery?
Test your battery every 3–6 months, especially before winter or long trips. Older batteries (over 3 years) should be checked more frequently.
Can a multimeter tell if a battery is completely dead?
Yes. If the multimeter reads below 11.5V, the battery is likely deeply discharged or dead. It may not start the car and should be recharged or replaced.
Do I need to disconnect the battery to test it?
No, you don’t need to disconnect the battery. Just make sure the engine is off (for resting voltage) or on (for charging voltage) and connect the probes to the terminals.


