Which Side of the Car Battery Is Positive
Contents
- 1 Key Takeaways
- 2 📑 Table of Contents
- 3 Understanding Car Battery Basics
- 4 How to Identify the Positive Terminal
- 5 Common Battery Layouts and Terminal Positions
- 6 Safety Tips When Handling Car Batteries
- 7 Jump-Starting: Connecting Cables the Right Way
- 8 Signs of a Failing Battery and When to Replace
- 9 Conclusion
- 10 Frequently Asked Questions
Knowing which side of the car battery is positive is crucial for safe maintenance, jump-starting, and avoiding electrical damage. This guide explains how to identify the positive terminal, why polarity matters, and best practices for working with your car’s battery.
Have you ever popped the hood of your car, stared at the battery, and thought, “Wait—which side is positive?” You’re not alone. Even seasoned drivers can get confused when faced with a dirty, corroded, or oddly configured battery. But getting this right isn’t just about convenience—it’s about safety, preventing costly damage, and keeping your vehicle running smoothly.
Car batteries are the heart of your vehicle’s electrical system. They power everything from the ignition to the infotainment system, and they need to be handled with care. One wrong connection—like attaching the jumper cables backward—can fry your car’s computer, blow fuses, or even cause the battery to explode. That’s why understanding which side of the car battery is positive is so important. It’s a small detail with big consequences.
In this guide, we’ll walk you through everything you need to know: how to identify the positive terminal, why polarity matters, common battery layouts, and step-by-step safety tips. Whether you’re jump-starting a dead battery, replacing cables, or just doing routine maintenance, this knowledge will keep you confident and safe under the hood.
Key Takeaways
- Positive terminal identification: The positive side of a car battery is usually marked with a “+” symbol, red color, and may have a red cover or larger cable.
- Standard placement varies: While many vehicles place the positive terminal on the right (when facing the battery), it’s not universal—always verify before connecting.
- Color coding matters: Red typically indicates positive, while black or bare metal indicates negative—stick to this standard for safety.
- Correct polarity prevents damage: Reversing connections can fry electronics, blow fuses, or even cause battery explosions.
- Use caution during jump-starts: Always connect positive to positive first, then negative to a grounded metal surface—not the battery’s negative post.
- Check your owner’s manual: Manufacturer specifications provide the most reliable info on battery layout and terminal orientation.
- Wear protective gear: Safety glasses and gloves reduce risk when handling batteries due to acid and electrical hazards.
📑 Table of Contents
Understanding Car Battery Basics
Before diving into which side is positive, let’s cover some fundamentals. A typical car battery is a 12-volt lead-acid battery made up of six cells, each producing about 2.1 volts. These cells are connected in series to deliver the total voltage needed to start your engine and run electrical components.
Each battery has two terminals: positive (+) and negative (−). The positive terminal is where electrical current flows out of the battery, while the negative terminal is the return path to complete the circuit. Think of it like water flowing through a pipe—the positive side is the outlet, and the negative is the drain.
Most modern car batteries are sealed and maintenance-free, but older models may require periodic checks for water levels and corrosion. Regardless of type, all batteries follow the same basic electrical principles. The key is knowing how to identify each terminal correctly.
How Car Batteries Work
When you turn the key or press the start button, the battery sends a surge of electricity to the starter motor. This creates the spark needed to ignite the fuel-air mixture in the engine. Once the engine is running, the alternator takes over, recharging the battery and powering the vehicle’s systems.
The battery stores energy chemically and releases it as direct current (DC). This DC power flows from the positive terminal, through the car’s wiring, and back to the negative terminal. If the connections are reversed, the current flows backward—potentially damaging sensitive electronics like the ECU (Engine Control Unit), sensors, or even the alternator.
Why Polarity Matters
Polarity isn’t just a technical detail—it’s a safety and functionality issue. Modern vehicles rely on complex electronic systems that are designed to operate with correct polarity. Reversing the battery connections can cause:
– Blown fuses
– Damaged wiring
– Malfunctioning dashboard lights
– Failed sensors
– Permanent damage to the ECU
In extreme cases, reverse polarity can cause the battery to overheat, leak acid, or even explode. That’s why it’s essential to double-check terminal identification before making any connections.
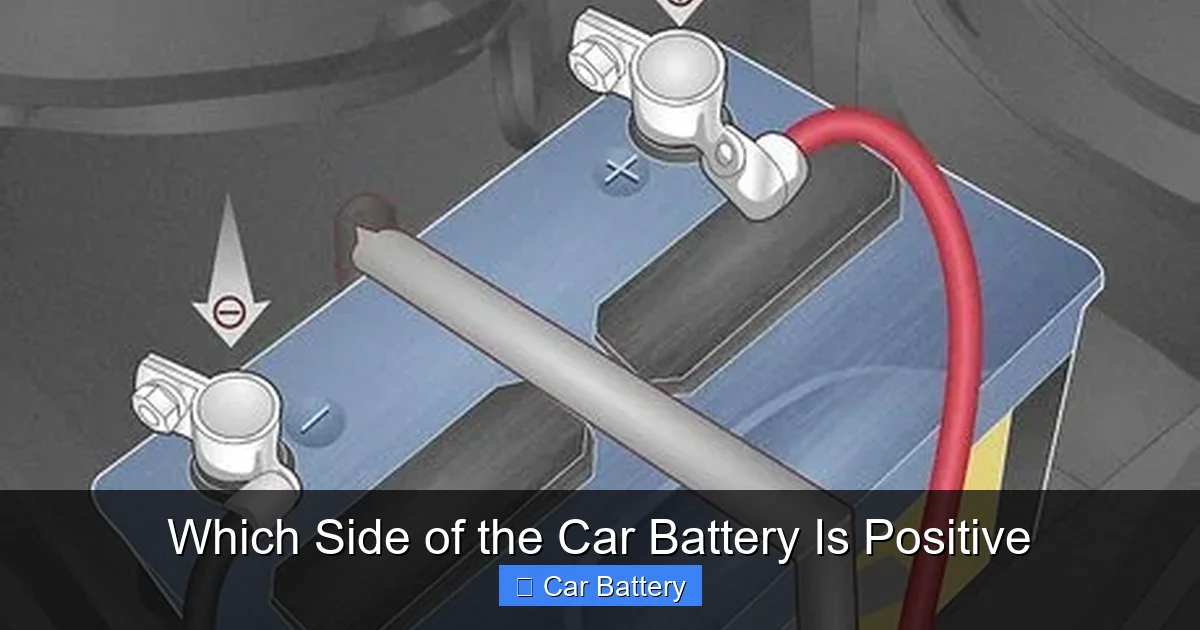
How to Identify the Positive Terminal
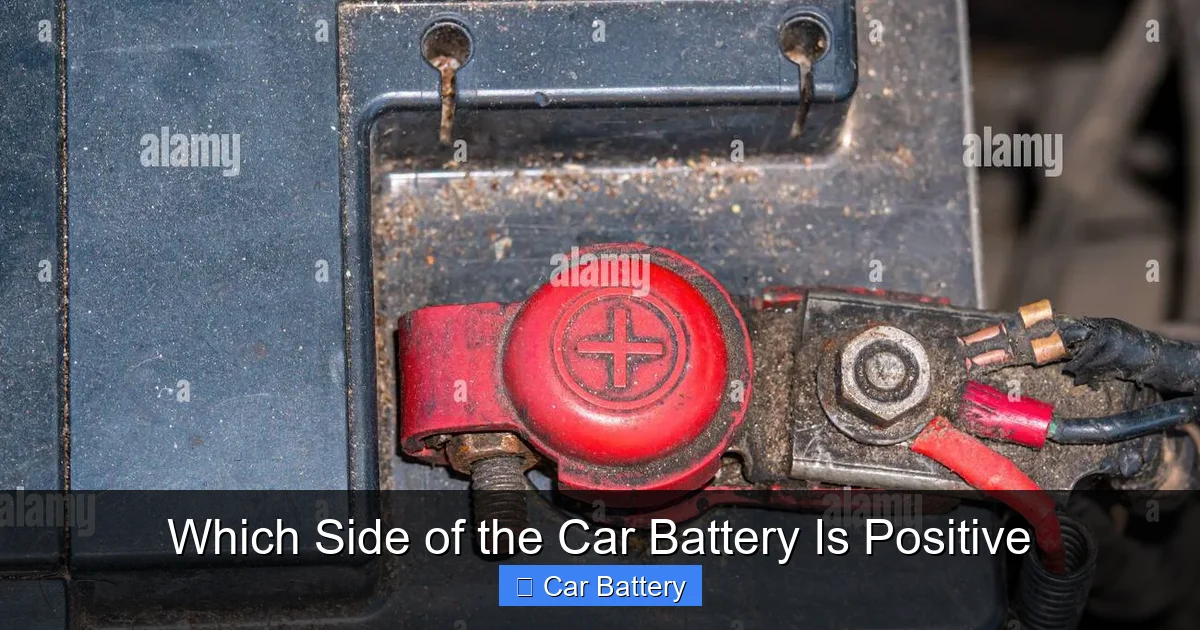
Visual guide about Which Side of the Car Battery Is Positive
Image source: c8.alamy.com
Now for the main question: which side of the car battery is positive? The answer isn’t always the same—it depends on the vehicle make, model, and battery orientation. However, there are several reliable ways to identify the positive terminal.
Look for the “+” Symbol
The most obvious clue is the “+” symbol stamped directly onto the battery casing near one of the terminals. This marking is usually clear and easy to spot, even on older or dirty batteries. If you see a “+” sign, that’s your positive terminal.
Some batteries also include a “−” symbol for the negative terminal, but the positive is almost always labeled. If only one symbol is present, it’s almost certainly the positive side.
Check the Color Coding
Color is another strong indicator. The positive terminal is almost always connected to a red cable or covered with a red plastic cap. The negative terminal is typically black or connected to a black cable.
This color standard is used across nearly all vehicle manufacturers. Even if the battery is dirty or the cables are faded, the red color on the positive side is a reliable guide. If you’re unsure, look for the red cable—it leads directly to the positive terminal.
Examine the Cable Size
In some cases, the positive cable is slightly thicker than the negative one. This isn’t always true, but it can be a helpful clue, especially on older vehicles. The positive side carries the main current load during engine start, so it often uses a heavier-gauge wire.
Look for a Red Cover or Cap
Many batteries come with a red plastic cover over the positive terminal. This is a safety feature designed to prevent accidental short circuits. If you see a red cap, it’s a clear sign that the terminal underneath is positive.
Some aftermarket batteries or replacement models may not include this cover, but original equipment manufacturer (OEM) batteries often do. If your battery has a red cap, leave it on when the car is running—it protects against metal tools or jewelry causing a spark.
Use a Multimeter (For Absolute Certainty)
If you’re still unsure, a multimeter is the most accurate way to confirm polarity. Set the multimeter to DC voltage (20V range), then touch the red probe to one terminal and the black probe to the other.
If the reading shows a positive voltage (e.g., +12.6V), the red probe is on the positive terminal. If the reading is negative (e.g., −12.6V), you’ve got it backward—the red probe is on the negative side.
This method is especially useful when working with unfamiliar vehicles, aftermarket batteries, or in low-light conditions.
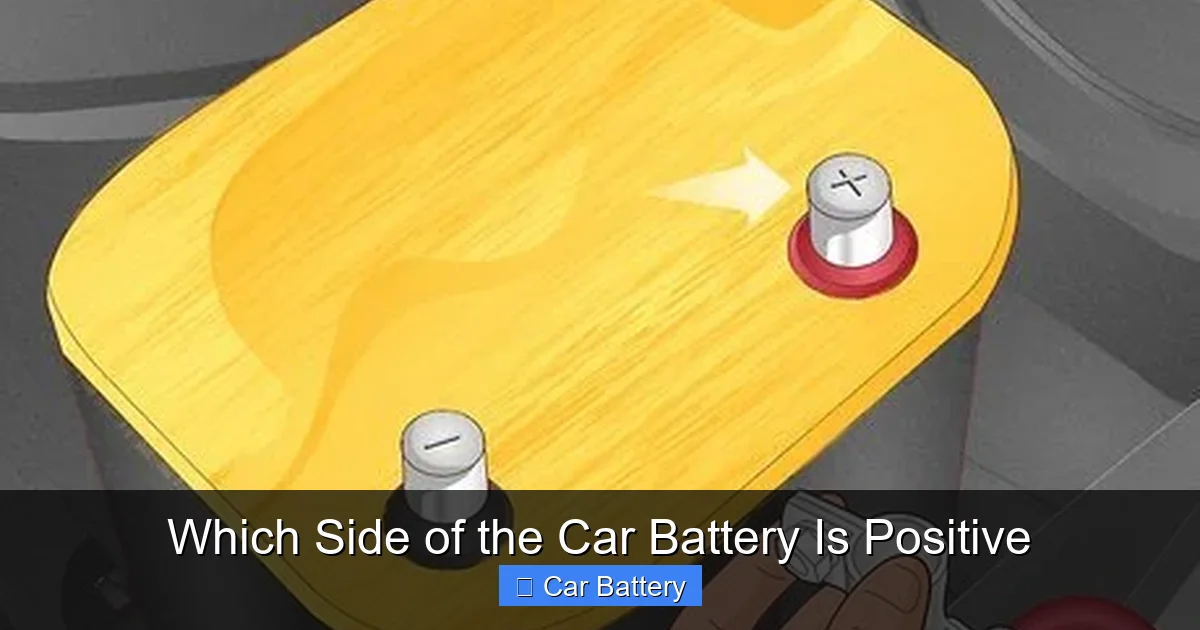
Common Battery Layouts and Terminal Positions
Visual guide about Which Side of the Car Battery Is Positive
Image source: wikihow.com
While there’s no universal rule for which side the positive terminal is on, certain patterns are common across vehicle types. Understanding these can help you make an educated guess—but always verify before connecting anything.
Passenger Cars and Sedans
In most front-wheel-drive sedans and compact cars, the battery is located in the engine bay, often toward the front or side. When facing the battery (standing in front of the car), the positive terminal is frequently on the right side.
For example, in Honda, Toyota, and Ford models, the positive terminal is typically on the right. However, this isn’t guaranteed—always check the markings.
Trucks and SUVs
Larger vehicles like trucks and SUVs often have the battery placed in different locations—sometimes under the hood, sometimes in the fender well, or even under the passenger seat. When under the hood, the positive terminal is commonly on the left side in many GM and Ford trucks.
For instance, in a Ford F-150, the positive terminal is usually on the left when facing the battery. In a Chevrolet Silverado, it’s often on the right. This variation highlights why you can’t rely solely on vehicle type—always inspect the battery itself.
European and Luxury Vehicles
European cars like BMW, Mercedes-Benz, and Audi often have batteries in the trunk or under the rear seat to improve weight distribution. When accessed, the positive terminal is usually marked clearly, but orientation can vary.
In some BMW models, the positive terminal is on the left; in others, it’s on the right. Always refer to the battery label or owner’s manual for confirmation.
Motorcycles and Small Engines
Motorcycle batteries are much smaller and often have side terminals or top posts. The positive terminal is still marked with a “+” and usually has a red cable. Due to space constraints, polarity is critical—reversing connections can damage the bike’s electrical system instantly.
Safety Tips When Handling Car Batteries
Visual guide about Which Side of the Car Battery Is Positive
Image source: wikihow.com
Working with car batteries involves risks: electrical shock, acid burns, and fire hazards. Following safety guidelines isn’t optional—it’s essential.
Wear Protective Gear
Always wear safety glasses and gloves when handling a battery. Battery acid can cause severe burns, and sparks can ignite hydrogen gas emitted during charging. Gloves also protect your skin from corrosion and dirt.
Work in a Well-Ventilated Area
Batteries release hydrogen gas, which is flammable. Avoid working in enclosed spaces or near open flames, sparks, or cigarettes. If you’re jump-starting, do it outdoors or in a garage with the door open.
Remove Metal Jewelry
Rings, watches, and bracelets can conduct electricity and cause short circuits if they touch both terminals at once. Remove all metal accessories before working on the battery.
Disconnect the Negative Terminal First
When removing a battery, always disconnect the negative (black) cable first, then the positive (red). This reduces the risk of sparking near the battery.
When reinstalling, connect the positive cable first, then the negative. This sequence minimizes the chance of accidental shorts.
Never Let Tools Touch Both Terminals
A wrench or screwdriver that bridges the positive and negative terminals can cause a massive spark, melt metal, or even explode the battery. Keep tools insulated and away from both posts.
Dispose of Old Batteries Properly
Car batteries contain lead and sulfuric acid, which are hazardous. Never throw them in the trash. Take them to an auto parts store, recycling center, or battery retailer—most will accept old batteries for free.
Jump-Starting: Connecting Cables the Right Way
One of the most common reasons people need to identify the positive terminal is jump-starting a dead battery. Doing this incorrectly can damage both vehicles or cause injury.
Step-by-Step Jump-Start Procedure
1. Park the working vehicle close to the dead one, but don’t let them touch.
2. Turn off both engines and remove keys.
3. Open both hoods and locate the batteries.
4. Identify the positive (+) and negative (−) terminals on both batteries.
5. Connect the red (positive) jumper cable to the positive terminal of the dead battery.
6. Connect the other red clamp to the positive terminal of the good battery.
7. Connect the black (negative) clamp to the negative terminal of the good battery.
8. Attach the final black clamp to an unpainted metal surface on the dead car’s engine block—not the negative terminal. This grounds the circuit and reduces sparking risk.
9. Start the working car and let it run for a few minutes.
10. Try starting the dead car. If it starts, leave it running.
11. Disconnect cables in reverse order: black from ground, black from good battery, red from good battery, red from dead battery.
Why Not Connect to the Dead Battery’s Negative Terminal?
Connecting the final negative clamp to the dead battery’s negative post can cause sparks near the battery. Since batteries emit hydrogen gas, this spark could ignite an explosion. Grounding to the engine block is much safer.
Signs of a Failing Battery and When to Replace
Even with proper handling, car batteries don’t last forever. Most last 3–5 years, depending on climate, driving habits, and maintenance.
Common Symptoms of Battery Failure
– Slow engine crank (engine turns over slowly)
– Dim headlights or interior lights
– Clicking sound when turning the key
– Check engine or battery warning light on dashboard
– Swollen or bulging battery case (sign of overheating)
If you notice any of these signs, test the battery with a voltmeter or have it checked at an auto shop. A healthy battery should read around 12.6 volts when the car is off and 13.7–14.7 volts when running.
When to Replace Your Battery
Replace your battery if:
– It’s more than 4 years old
– It fails a load test
– It won’t hold a charge
– You’ve had multiple jump-starts in a short period
Don’t wait for a complete failure—especially in winter, when cold weather reduces battery efficiency.
Conclusion
Knowing which side of the car battery is positive might seem like a small detail, but it’s one of the most important skills for any car owner. Whether you’re jump-starting, replacing cables, or performing maintenance, correct terminal identification prevents damage, saves money, and keeps you safe.
Remember: look for the “+” symbol, red color, and red cable. Use a multimeter if you’re unsure. Always follow safety procedures—wear gloves, disconnect the negative first, and avoid sparks near the battery.
While many vehicles place the positive terminal on the right, this isn’t universal. Always verify based on markings, not assumptions. And when in doubt, consult your owner’s manual or a professional.
With this knowledge, you’ll never have to guess again. Stay safe, stay informed, and keep your car running smoothly.
Frequently Asked Questions
Is the positive terminal always on the right side of the battery?
No, the positive terminal is not always on the right. While many vehicles place it on the right when facing the battery, others—especially trucks and European cars—may have it on the left. Always check the “+” marking or red cable to be sure.
Can I tell the positive terminal by the cable color alone?
Yes, in most cases. The positive terminal is connected to a red cable, while the negative uses black. This color standard is widely followed, but if cables are faded or replaced, confirm with the “+” symbol or a multimeter.
What happens if I connect the battery backward?
Reversing the battery connections can cause serious damage, including blown fuses, fried electronics, and even battery explosion. Always double-check polarity before connecting cables.
How can I test if my battery is still good?
Use a multimeter to check voltage. A healthy battery reads about 12.6 volts when off and 13.7–14.7 volts when the engine is running. If it’s below 12.4 volts, it may need charging or replacement.
Should I disconnect the battery when working on my car?
Yes, especially when performing electrical work. Disconnect the negative terminal first to prevent short circuits. This protects both you and your vehicle’s electronics.
Can I jump-start a car in the rain?
Yes, but take extra precautions. Water increases conductivity, so avoid touching metal parts. Ensure cables are dry and connections are secure. If lightning is present, wait for safer conditions.