
Graco Tranzitions 3 in 1 Harness Booster Car Seat Install Guide

Quick Answer
To install the Graco Tranzitions 3-in-1 Harness Booster in 5-point harness mode, secure it with either the lower anchors or the vehicle seat belt, then attach and tighten the top tether. Never use the lower anchors and vehicle seat belt together in harness mode. Follow the official Graco Tranzitions instruction manual for your exact setup.
Fast Installation Checklist
- Choose one method: Use either lower anchors or the vehicle seat belt in 5-point harness mode.
- Use the tether: Connect the top tether to the vehicle’s approved tether anchor and remove the slack.
- Check the belt path: Route the lower-anchor strap or seat belt through the orange-marked forward-facing belt path.
- Test tightness: The seat should move less than 1 inch side-to-side or front-to-back at the belt path.
- Check harness fit: Straps belong at or just above the shoulders, with the chest clip at armpit level.
- Know the LATCH limit: Do not use the lower-anchor installation for a child weighing more than 45 pounds.
The Graco Tranzitions 3-in-1 Harness Booster can look simple until you’re standing in the back seat trying to decide which strap goes where. The biggest installation mistakes usually involve the belt path, top tether, or using two installation methods at once.
This guide focuses on the current Tranzitions instructions as of 2026. I’ll walk through both approved harness-mode installation methods, the final fit check, and what changes when you convert the seat to booster mode.
In This Guide
- What Should You Check Before Installing the Graco Tranzitions?
- How Do You Install the Graco Tranzitions With LATCH?
- How Do You Install It With the Vehicle Seat Belt?
- LATCH vs Seat Belt: Which Installation Method Should You Use?
- How Should the 5-Point Harness Fit Your Child?
- How Do You Set Up the Graco Tranzitions in Booster Mode?
- Frequently Asked Questions
What Should You Check Before Installing the Graco Tranzitions?
The Graco Tranzitions is a forward-facing harness booster, not a rear-facing car seat. It changes from a 5-point harness seat into a highback booster and then a backless booster.
Graco’s current Tranzitions product information lists the forward-facing harness range as 26.5 to 65 pounds and up to 49 inches.
Before using it, make sure your child is ready for a forward-facing seat. NHTSA recommends keeping children rear-facing until they reach the rear-facing height or weight limit of their current seat.
- Harness mode: 26.5-65 lb and 49 inches or less.
- Highback booster: 40-100 lb, 43-57 inches, and at least 4 years old.
- Backless booster: 40-100 lb, 43-57 inches, and at least 4 years old.
- Rear-facing: Not supported by the Tranzitions.
Next, open your vehicle owner’s manual. Find the approved child-restraint seating positions, lower anchors, top tether anchors, and seat-belt locking instructions.
I like to identify the tether anchor before tightening anything else. It prevents the common problem of getting the seat tight and then discovering the tether was routed incorrectly.
A top tether is the strap coming from the upper rear of a forward-facing car seat. It connects to a dedicated vehicle anchor and helps limit forward movement during a crash.
NHTSA’s car-seat parts guidance recommends using the tether with a forward-facing seat when the car-seat and vehicle manufacturers permit it.
How Do You Install the Graco Tranzitions With LATCH?

For a child within the allowed lower-anchor weight range, the Tranzitions can be installed using its lower-anchor connectors plus the top tether. Graco says not to use this installation method once the child weighs more than 45 pounds.
LATCH means Lower Anchors and Tethers for Children. The lower connectors secure the bottom of the seat, while the tether secures the upper portion.
- Remove the lower-anchor connectors and tether from storage. Make sure each strap is free and untwisted.
- Place the Tranzitions forward-facing in the back seat. The bottom should sit as flat as possible against the vehicle seat.
- Extend the lower-anchor strap. Giving yourself extra strap length makes the connectors easier to attach.
- Connect both lower-anchor connectors. Attach each connector to an approved vehicle lower-anchor bar.
- Check the strap for twists. The lower-anchor webbing should lie flat.
- Press down and tighten. Push firmly into the center of the car seat while pulling the adjustment strap tight.
- Attach the top tether. Connect it only to the tether anchor identified in your vehicle manual.
- Remove tether slack. Tighten until the tether is firm.
- Test the installation. Grip the seat at the forward-facing belt path and move it side-to-side and front-to-back.
The shell should move less than 1 inch at the belt path. Don’t test tightness by grabbing the headrest or top of the seat because movement there can be normal.
The NHTSA forward-facing installation guide uses the same basic tightness test and emphasizes connecting the tether after tightening the lower anchors.
One mistake matters here: don’t add the vehicle seat belt because you think two systems will make the seat safer. Graco specifically says not to use the seat belt and lower anchors together in 5-point harness mode.
How Do You Install It With the Vehicle Seat Belt?
The seat-belt method is another approved way to install the Tranzitions in harness mode. It also becomes especially important once your child exceeds the seat’s 45-pound lower-anchor installation limit.
You still use the top tether. The vehicle seat belt replaces the lower-anchor strap as the method securing the car seat to the vehicle.
- Store the lower-anchor connectors. Attach them to their designated storage locations so they aren’t loose behind the seat.
- Release the tether from storage. Leave it accessible for attachment after tightening the seat belt.
- Position the seat forward-facing. Put it in an approved rear seating position with the bottom sitting flat.
- Find the orange-marked belt path. Route the vehicle belt through this forward-facing path and out the other side.
- Buckle the vehicle belt. Check that the belt lies flat and has no twists.
- Lock the seat belt. Follow the exact locking procedure in your vehicle owner’s manual.
- Press into the car seat and tighten. Feed loose belt webbing back toward the retractor while holding firm pressure on the seat.
- Connect the top tether. Hook it to the correct tether anchor.
- Tighten the tether. Remove the remaining slack.
- Perform the 1-inch test. Check movement only where the vehicle belt passes through the car-seat shell.
Many modern vehicles let you lock the shoulder belt by slowly pulling it fully out and allowing it to retract. Your vehicle may work differently, so its owner’s manual decides the correct procedure.
Don’t route the belt around the front of the seat or through a booster belt guide. In harness mode, it must pass through the forward-facing installation belt path.
LATCH vs Seat Belt: Which Installation Method Should You Use?
Neither approved method is automatically safer when both are installed correctly. The better method is the one permitted by both manuals that gives you a secure installation in your vehicle.
| Setup | Child Range / Limit | Top Tether | Important Rule |
|---|---|---|---|
| Lower anchors in harness mode | Do not use above 45 lb child weight | Use it | Do not combine with vehicle belt |
| Vehicle belt in harness mode | Within the seat’s 26.5-65 lb harness range | Use it | Lock the vehicle belt correctly |
| Highback booster | 40-100 lb, 43-57 in., age 4+ | Harness tether no longer restrains child | Child must use vehicle lap/shoulder belt |
| Backless booster | 40-100 lb, 43-57 in., age 4+ | Not used as harness tether | Never use a lap-only belt for the child |
If the lower-anchor installation feels awkward but the locked seat belt gives you less than 1 inch of movement, use the seat belt. Correct installation matters more than choosing LATCH simply because the vehicle has lower anchors.
For children over 45 pounds who still fit the 5-point harness, the choice gets easier. Switch to the vehicle seat-belt installation and continue using the top tether.
How Should the 5-Point Harness Fit Your Child?
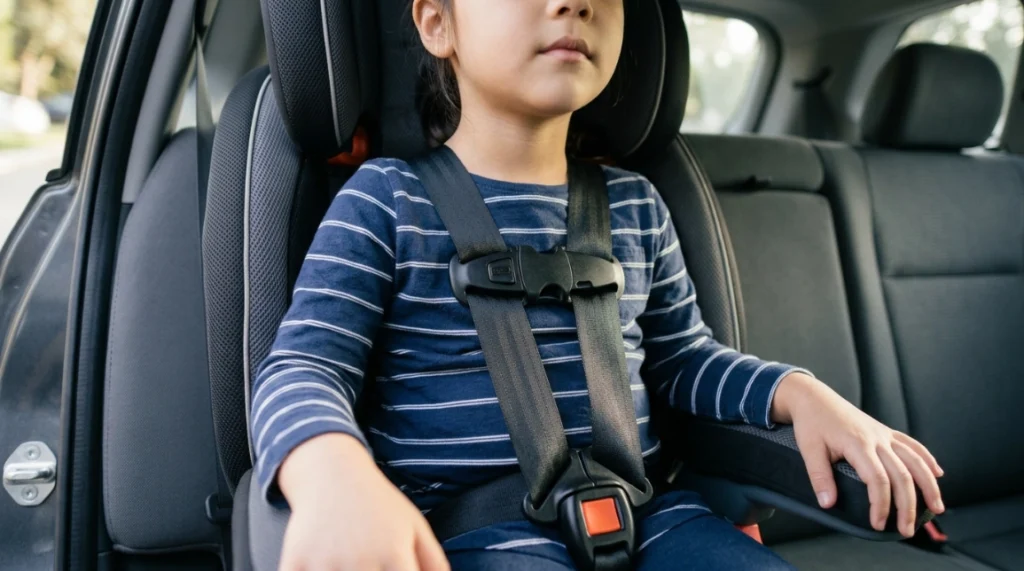
A tight car-seat installation is only half the job. Your child also needs the harness positioned and tightened correctly every time they ride.
- Shoulder straps: Position them even with or just above the child’s shoulders while forward-facing.
- Chest clip: Place it level with the child’s armpits.
- Harness tension: Tighten until you cannot pinch extra harness webbing at the shoulder.
- Buckle position: Use the approved slot closest to the child without placing the buckle underneath them.
- Head position: Make sure the child’s ears remain below the top of the headrest within the seat’s fit rules.
The Tranzitions uses Graco’s no-rethread adjustment system, so the headrest and harness height move together. That makes it easier to correct shoulder height as your child grows.
A bulky winter coat can make a harness look tight while leaving hidden slack underneath. NHTSA advises securing the child in the harness first and putting blankets or outer layers over the harness when needed.
My final check is simple: shoulder height, chest clip, pinch test, then belt-path movement. That catches most obvious fit and installation problems before the vehicle moves.
How Do You Set Up the Graco Tranzitions in Booster Mode?
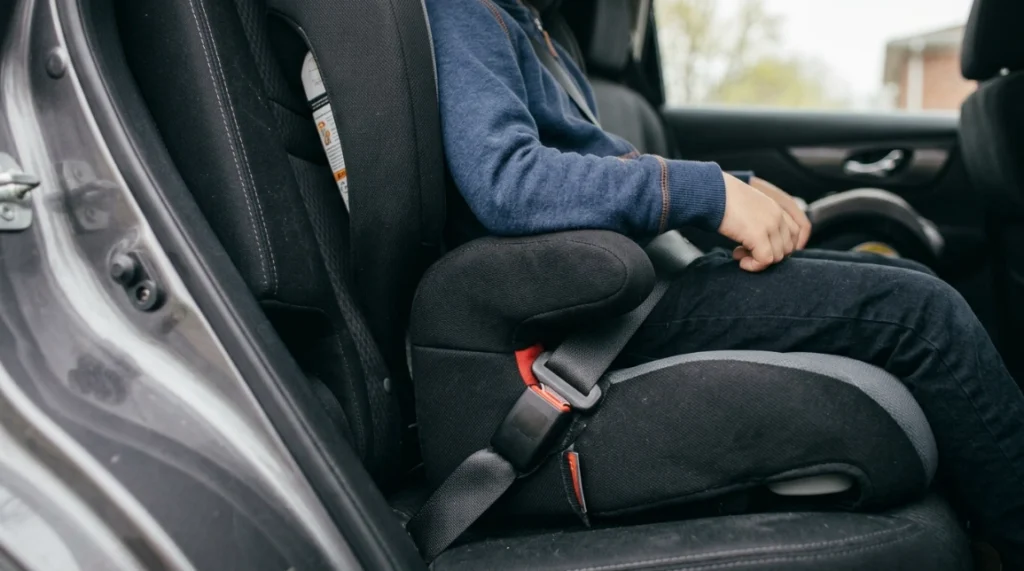
Booster mode works differently because the vehicle’s lap-and-shoulder belt restrains your child. The built-in 5-point harness must be removed according to Graco’s conversion instructions.
Don’t move to booster mode just because your child reaches 40 pounds. Graco and NHTSA recommend keeping a child in a forward-facing harness as long as they remain within the harness limits.
When your child meets the booster requirements and can sit properly throughout the ride, check these points:
- Use a lap-and-shoulder belt: A lap-only belt is not acceptable for booster use.
- Keep the lap belt low: It should lie across the hips and upper thighs, not the abdomen.
- Center the shoulder belt: It should cross between the neck and outer edge of the shoulder.
- Never route it under the arm: The shoulder belt should not go behind the child’s back either.
- Prevent slouching: The child must stay upright and maintain correct belt placement during the trip.
Graco permits the seat to be secured with the LATCH system in booster mode when the vehicle manufacturer allows it. Check both manuals before doing this.
NHTSA’s broader car-seat and booster guidance also recommends staying with each restraint stage until the child reaches the applicable height or weight limit.
Frequently Asked Questions
Can I use LATCH and the seat belt together on the Graco Tranzitions?
No. Graco says not to use the vehicle seat belt and lower-anchor attachment at the same time when the Tranzitions is installed forward-facing in 5-point harness mode. Choose one installation method, then use the top tether as instructed.
When should I stop using LATCH on the Graco Tranzitions?
Graco’s manual says not to install the Tranzitions with its lower anchors when the child weighs more than 45 pounds. If the child still fits the 5-point harness, reinstall the seat with the vehicle seat belt and continue using the tether.
Does the Graco Tranzitions need the top tether?
Yes, use the top tether for forward-facing harness installation as directed by Graco. Attach it to the vehicle’s designated tether anchor and tighten it after securing the seat with either the lower anchors or the vehicle seat belt.
How tight should the Graco Tranzitions installation be?
Grip the seat at the forward-facing belt path and push it side-to-side and front-to-back. Graco says the seat should move less than 1 inch, or 2.5 centimeters, at that location once properly installed.
Can the Graco Tranzitions be installed rear-facing?
No. The Graco Tranzitions is not a rear-facing car seat. It is designed for forward-facing 5-point harness use followed by highback and backless booster modes as your child meets the applicable size and maturity requirements.
Where should I install the Graco Tranzitions in my vehicle?
Use a rear seating position approved by your vehicle manufacturer that allows a secure installation. Check your vehicle owner’s manual for lower-anchor locations, tether anchors, seat-belt rules, and any restrictions that apply to the center or outboard seating positions.
Final takeaway: Install the Graco Tranzitions with either lower anchors or the vehicle seat belt in harness mode, never both. Use the top tether, keep movement under 1 inch at the belt path, and verify your child’s harness fit before every ride.
If anything in your vehicle setup conflicts with these general steps, stop and follow your exact Graco manual and vehicle owner’s manual. A certified Child Passenger Safety Technician can also check the seat, vehicle, and child together when you’re unsure
