
21 Gear Cycle With Disc Brake: Your Guide
Contents
- 1 Key Takeaways
- 2 Understanding the 21-Gear Setup
- 3 The Advantage of Disc Brakes
- 4 Gear Shifting: Mastering Your 21 Gears
- 5 Basic Maintenance for Your 21-Gear Disc Brake Cycle
- 6 Choosing the Right Gear: A Practical Approach
- 7 Pros and Cons of a 21-Gear Cycle with Disc Brakes
- 8 External Resources for Further Learning
- 9 Frequently Asked Questions (FAQs)
- 10 Conclusion


Your guide to understanding and maximizing a 21-gear cycle with disc brakes. This setup offers versatile performance for various terrains, making it an excellent choice for cyclists seeking control and efficiency. Learn about its components, benefits, and basic maintenance.
Key Takeaways
- Master shifting across 21 gears for optimal cycling.
- Understand disc brake advantages for reliable stopping power.
- Discover how to perform basic maintenance for longevity.
- Learn to select the right gear for different riding conditions.
- Appreciate the efficiency and control offered by this bike type.
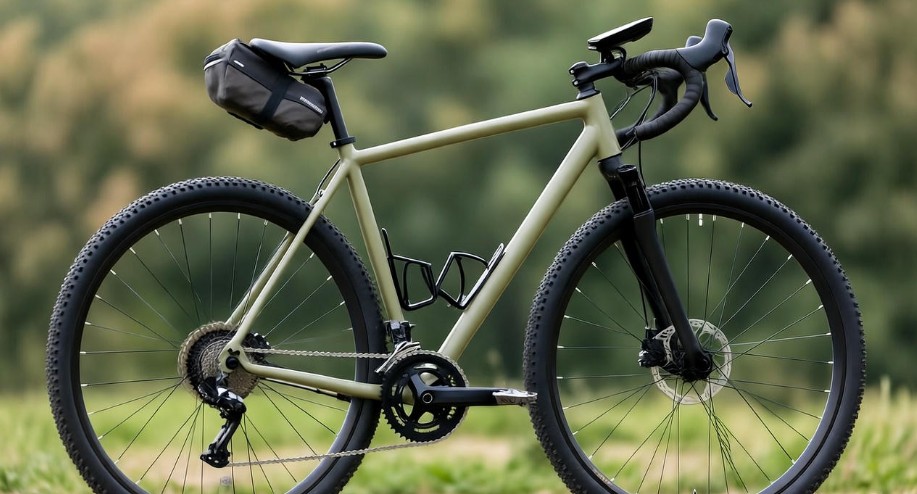
Navigating the world of bicycles can sometimes feel like deciphering a secret code. You might be looking at a bike and see features like “21 gears” and “disc brakes” and wonder what exactly that means for your ride. If you’re a beginner cyclist, an expat new to American cycling paths, or just someone looking to upgrade, understanding these specifications is key. A 21-gear cycle with disc brakes is a popular choice for good reason. It offers a wide range of capabilities, allowing you to tackle hills with ease and descend with confidence. This guide is here to demystify this common bicycle setup, breaking down its components, benefits, and how to get the most out of it. Let’s start by exploring what makes this combination so effective for everyday riders.
Understanding the 21-Gear Setup
The “21 gears” on a bicycle refer to the number of different ratios available between the pedals and the rear wheel. More gears mean you have a broader spectrum of resistance to choose from, making it easier to pedal efficiently whether you’re climbing a steep hill, cruising on a flat road, or zipping down a slight incline. This versatility is achieved through a system of gears and derailleurs. At its core, it’s about finding that sweet spot where your pedaling feels comfortable and effective for the terrain you’re traversing. For anyone getting into cycling, especially in diverse American landscapes, this range is a significant advantage.
The Role of the Drivetrain: Gears and Derailleurs
The drivetrain is the heart of your bike’s gear system. It’s comprised of several key components working in harmony. The front gears, often called chainrings, and the rear gears, known as the cassette or freewheel, are connected by a chain. When you shift gears, you’re actually moving the chain to different-sized sprockets on either the front or rear set. This changes the mechanical advantage, making it easier or harder to turn the pedals.
A 21-gear system typically involves:
- Three Chainrings (Front): These are usually labeled as small, medium, and large. The smallest chainring provides the easiest pedaling, ideal for steep climbs. The largest chainring offers the most resistance, best for high speeds on flat or downhill sections.
- Seven Cogs (Rear Cassette): The rear cassette has multiple sprockets of varying sizes. Smaller cogs on the rear make it harder to pedal but allow for speed, while larger cogs make pedaling easier, perfect for ascending.
The number of gears is calculated by multiplying the number of front chainrings by the number of rear cogs. In this case, 3 (front) x 7 (rear) = 21 gears. It’s important to note that some gear combinations may overlap or be inefficient, so not all 21 are truly unique or recommended for use. However, this system provides a wide and useful range of options for most riding scenarios.
Front and Rear Derailleurs: The Gear Changers
The derailleurs are the mechanisms that physically move the chain from one sprocket to another. You’ll typically have a front derailleur that shifts the chain between the front chainrings and a rear derailleur that moves the chain across the rear cassette. These are controlled by shifters mounted on your handlebars.
- Front Derailleur: Usually controlled by a lever or twist shifter. It guides the chain onto the different front chainrings.
- Rear Derailleur: Also controlled by a handlebar shifter. It is a more complex mechanism that precisely moves the chain across the rear cogs.
Learning to use these shifters smoothly is key to benefiting from all 21 gears. It allows you to adapt to changing inclines and speeds without breaking your momentum or straining your legs.
The Advantage of Disc Brakes
Disc brakes represent a significant advancement in bicycle braking technology, offering superior performance, especially in wet or muddy conditions, compared to traditional rim brakes. For riders in the USA, where weather can be unpredictable, or for those who enjoy off-road trails, disc brakes are a valuable feature. They provide more consistent and powerful stopping, enhancing safety and control.
How Disc Brakes Work
Instead of pressing brake pads against the wheel rim, disc brakes use a rotor (a metal disc) attached to the wheel hub and a caliper mounted on the frame. When you squeeze the brake lever, the caliper actuates brake pads that clamp down on the rotor. This friction slows the rotation of the rotor, and thus the wheel, bringing your bike to a halt.
There are two main types of disc brakes:
- Mechanical Disc Brakes: These are actuated by a standard brake cable. They are generally less powerful and require more lever force than hydraulic disc brakes but are simpler to maintain and less expensive.
- Hydraulic Disc Brakes: These use brake fluid to transmit force from the lever to the caliper. They offer much greater stopping power, better modulation (finer control over braking force), and require less effort at the lever, making them the preferred choice for many cyclists.
Why Choose Disc Brakes?
The benefits of disc brakes are substantial for riders of all levels:
- Superior Stopping Power: Disc brakes provide significantly more braking force than rim brakes, allowing you to stop more quickly and effectively.
- Consistent Performance in All Weather: Unlike rim brakes, which can be compromised by water, mud, or dirt on the rim, disc brakes are much less affected by external conditions. This means reliable braking in rain, snow, or on dusty trails.
- Better Modulation: You have finer control over how much braking force you apply, which can be crucial for precise maneuvering and avoiding skids.
- Less Wheel Damage: Rim brakes can wear down your wheel rims over time. Disc brakes do not contact the rim, preserving its integrity.
- No Rim Brake Rub: With rim brakes, wheel true-ness can cause brake rub. Disc brakes are less prone to this issue.
For anyone regularly riding in varied conditions or tackling descents, the enhanced safety and control offered by disc brakes on a 21-gear cycle are invaluable.
Gear Shifting: Mastering Your 21 Gears
The real magic of a 21-gear bicycle lies in its ability to adapt to your riding. However, to truly benefit from this system, you need to master the art of shifting. It’s not just about pressing a button; it’s about understanding when and how to change gears to maintain efficiency and comfort.
When to Shift Gears
The general rule of thumb is to shift gears before you need them. This means shifting to an easier gear as you approach a hill and to a harder gear as you start to descend or speed up on a flat. Trying to shift while under heavy load (like struggling up a steep hill) can strain your drivetrain and potentially cause the chain to skip or break.
Consider these scenarios:
- Climbing: As the road starts to go uphill, shift to larger rear cogs (easier pedaling) and potentially smaller front chainrings.
- Descending: As you start going downhill, shift to smaller rear cogs (harder pedaling) and larger front chainrings to maintain pedaling cadence and gain speed.
- Flat Terrain: On flats, you’ll likely use a combination of medium front chainrings and various rear cogs to find a comfortable pedaling speed.
- Starting and Accelerating: Begin in an easier gear (larger rear cog) and shift to harder gears as you gain speed.
- Slowing Down: Shift to easier gears as you slow down to make it easier to pedal when you start moving again.
Proper Shifting Technique
The key to smooth shifting is to pedal lightly while you change gears. Think of it as “easing off” the pressure for a moment as the derailleurs do their work.
Here’s a step-by-step approach:
- Anticipate the Terrain: Look ahead and predict changes in the road.
- Ease Pedaling Pressure: Just before or as you shift, slightly reduce the force you apply to the pedals.
- Use Your Shifters:
- Right Shifter (Rear Derailleur):
- Pushing the lever forward or twisting towards “lower numbers” moves the chain to smaller, harder cogs (faster, more effort).
- Pushing the lever backward or twisting towards “higher numbers” moves the chain to larger, easier cogs (slower, less effort).
- Left Shifter (Front Derailleur):
- Pushing the lever forward or twisting often moves the chain to a larger front chainring (harder to pedal, higher speed potential).
- Pushing the lever backward or twisting often moves the chain to a smaller front chainring (easier to pedal, for climbing).
- Right Shifter (Rear Derailleur):
- Continue Pedaling: Once the chain has moved to the new gear, resume normal pedaling pressure.
Avoid cross-chaining, which is using the largest chainring in the front with the largest cog in the rear, or the smallest chainring in the front with the smallest cog in the rear. This puts the chain at an extreme angle, causing excessive wear and inefficient power transfer. It can also increase the risk of the chain coming off.
Basic Maintenance for Your 21-Gear Disc Brake Cycle
To ensure your 21-gear cycle with disc brakes performs reliably and lasts for years, a little regular maintenance goes a long way. Many of these tasks are simple and can be done at home, saving you time and money. For more complex issues, consulting a professional bicycle mechanic is always recommended.
Keeping Your Drivetrain Clean and Lubricated
A clean drivetrain runs smoother and lasts longer. After riding in wet or dirty conditions, it’s a good idea to wipe down your chain, chainrings, and cassette. Periodically, give your drivetrain a more thorough cleaning with a degreaser and a brush, then rinse and dry thoroughly. Once dry, apply a suitable bicycle chain lubricant. Most lubricants come with instructions on how much to apply – usually, a drop on each roller of the chain is sufficient. Wipe off any excess lube.
A maintenance schedule can look like this:
| Frequency | Task | Notes |
|---|---|---|
| After Every Ride (if dirty/wet) | Wipe down chain and drivetrain | Remove surface dirt and grime. |
| Every 2-3 Rides (or weekly) | Lubricate chain | Apply appropriate bicycle chain lube. |
| Monthly (or every 100-200 miles) | Clean drivetrain with degreaser | Thoroughly remove old lube, dirt, and grime. |
| Annually (or if shifting issues arise) | Inspect for wear and tear | Check chain, cassette, and chainrings for worn teeth. |
Caring for Your Disc Brakes
Disc brakes are generally low-maintenance but require specific care:
- Keep Rotors Clean: Avoid touching the rotor surface with your fingers, as oils can contaminate it and reduce braking performance. If contamination occurs, clean the rotor gently with isopropyl alcohol.
- Check Pad Wear: Brake pads wear down over time. Inspect them regularly. If they appear thin or worn down to the metal backing, they need to be replaced.
- Listen for Noises: Squealing or grinding noises can indicate worn pads or contamination.
- Avoid Contamination: Never spray degreasers or lubricants near the rotors or calipers, as this can transfer to the pads and rotors, severely impacting braking.
- Hydraulic Fluid: Hydraulic systems may need occasional bleeding (replacing the brake fluid) to maintain optimal performance. This is a more advanced task best left to a bike shop if you’re unsure.
For more detailed information on bicycle maintenance, resources like the Sheldon Brown website, a highly respected technical resource, offer in-depth guides.
Tire Pressure and General Inspection
Ensuring your tires are properly inflated is crucial for a comfortable ride, efficient pedaling, and preventing flats. Check your tire sidewall for the recommended pressure range (usually in PSI or Bar). Also, periodically inspect your tires for wear, cuts, or embedded objects. A quick check of bolts, cables, and general frame integrity can prevent many roadside mishaps.
Choosing the Right Gear: A Practical Approach
The 21 gears on your bike are there to be used! Don’t be intimidated; think of them as tools to make your cycling experience more enjoyable and less taxing. The goal is to keep your pedaling cadence (the speed at which you turn the pedals) relatively consistent, typically between 70-90 RPM, regardless of the terrain.
Understanding Gear Ratios
A gear ratio tells you how many times the rear wheel turns for each complete revolution of the pedals. A higher ratio (e.g., 48-tooth chainring / 11-tooth cog) means the wheel turns many times for one pedal stroke – good for speed on flats or downhills. A lower ratio (e.g., 22-tooth chainring / 32-tooth cog) means the wheel turns fewer times for one pedal stroke – good for climbing steep hills with less effort.
Here’s a simplified comparison of gear functions:
| Gear Combination (Front-Rear) | Riding Condition | Effort Level | Speed Potential |
|---|---|---|---|
| Smallest Chainring / Largest Cog(s) | Steep Uphill Climbs | Lowest | Lowest |
| Smallest Chainring / Medium Cogs | Moderate Uphill or Headwind | Low to Medium | Low |
| Medium Chainring(s) / Medium Cogs | Flat Terrain, Moderate Pace | Medium | Medium |
| Largest Chainring(s) / Smaller Cogs | Fast Riding on Flats, Slight Downhill | High | High |
| Largest Chainring / Smallest Cog | Steep Downhill (for speed) | Very High (can feel difficult to pedal) | Highest |
Finding Your Cadence
Experiment with different gear combinations to find what feels comfortable. If you find yourself pushing hard on the pedals and your legs feel like they’re burning, you’re likely in too hard a gear. Shift to an easier gear. If you’re spinning your legs very fast but not gaining much speed, you’re in too easy a gear, and you should shift to a harder one.
Pro Tip: When learning to shift, practice on a flat, open area. Make small adjustments one gear at a time, focusing on how the pedaling effort changes.
Pros and Cons of a 21-Gear Cycle with Disc Brakes
Like any piece of equipment, this bike configuration has its advantages and disadvantages. Understanding these can help you decide if it’s the right choice for your cycling needs.
Advantages
- Versatility: The 21 gears provide a wide range for tackling various terrains, from gentle paths to challenging inclines.
- Superior Braking: Disc brakes offer excellent stopping power and reliability in all weather conditions.
- Beginner Friendly: The broad gear range makes it easier for new cyclists to find comfortable pedaling speeds.
- Control: Disc brakes improve rider confidence and control, especially during descents or emergency stops.
- Durability: While requiring maintenance, the components are generally robust for everyday use.
Disadvantages
- Complexity: More gears mean more components, which can be slightly more intimidating for absolute beginners to understand and maintain.
- Weight: Disc brake systems can be slightly heavier than their rim brake counterparts.
- Maintenance Nuances: While basic maintenance is straightforward, specific disc brake care (like bleeding hydraulic lines) might require professional help.
- Cost: Bikes with disc brakes, especially hydraulic ones, tend to be more expensive than those with rim brakes.
External Resources for Further Learning
To deepen your understanding of cycling mechanics and maintenance, consider these authoritative sources:
- The National Highway Traffic Safety Administration (NHTSA) offers valuable information on bicycle safety and laws, relevant for cyclists in the USA.
- Many reputable cycling publications and websites, like Bicycling Magazine, provide comprehensive guides and tutorials on bike maintenance and repair.
- Local bike shops are invaluable resources for advice, repairs, and community knowledge.
Frequently Asked Questions (FAQs)
Q1: How do I know if my disc brake pads need replacing?
You can usually see the pad material through the caliper. If the pad material is worn down to less than 1-2 millimeters, or if you hear a metallic scraping sound when braking, it’s time for replacement.
Q2: Can I mix and match chainrings and cogs from different brands?
While some mixing is possible, it’s generally best to stick with components from the same manufacturer or series (e.g., Shimano, SRAM) for optimal compatibility and shifting performance. Consult a bike mechanic if you’re unsure.
Q3: How often should I get my bike serviced by a professional?
For most casual riders, an annual professional tune-up is sufficient. If you ride frequently, in harsh conditions, or participate in competitive events, you might consider servicing every 6 months.
Q4: What’s the difference between a 21-speed and a 24-speed bike?
A 21-speed bike typically has 3 front chainrings and 7 rear cogs (3×7). A 24-speed bike usually has 3 front chainrings and 8 rear cogs (3×8), offering slightly more gear options.
Q5: Do disc brakes add a lot of weight to a bicycle?
Disc brakes add some weight compared to rim brakes, but the advancements in materials have minimized this difference for many bikes. The performance benefits often outweigh the slight weight penalty for most riders.
Q6: What is “gear indexing” on my bike?
Gear indexing refers to how precisely your shifters and derailleurs move the chain to the correct gear. When your gears are “indexed” properly, shifting is smooth and accurate, with the chain landing exactly on the chosen cog.
Conclusion
A 21-gear cycle equipped with disc brakes offers a fantastic combination of versatility and control, making it an excellent choice for cyclists in the USA looking for a reliable companion for various adventures. By understanding how the gears work, mastering proper shifting techniques, and performing basic maintenance, you can ensure your bike performs at its best for years to come. The added confidence and safety provided by disc brakes further enhance the riding experience, allowing you to focus on enjoying the journey. Whether you’re commuting, exploring trails, or enjoying a leisurely ride, this setup empowers you to ride smarter, safer, and with greater enjoyment.


